2mm Holywell Town.

adrian

Flying Squad
Slowly ticking along - I've been tidying up the woodwork and building the name board/pelmet which is also curved so a bit more gluing and clamping. Still working out a suitable arrangement for attaching it, hopefully photo's soon.

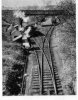
In the meantime one little successful experiment. Forming bendy-ply, at the righthand end of the layout the curve in the back scene is a fairly sharp 4" radius as I wanted to leave that end open as possible, see the earlier photo's. Bendy-ply is great but it is very springy and getting it down to a 4" radius needed quite a bit of effort to get it to shape. I couldn't see how I could clamp it in place whilst I glued it all together. So wondering if there was some way to form it and a quick search suggested a couple of methods so a little experiment was in order.

So an offcut was soaked for 10 minutes in hot water then wrapped around a 2litre pop bottle and clamped in the workmate for the afternoon. After tea I removed it and it worked!
models - 2 (3).jpg

It fits remarkably well so now I just need to find a suitable tube long enough to have a go on the actual back scene section.
 
Last edited:

adrian

Flying Squad
Adrian, how about some guttering downpipe as a former?
Good idea - unfortunately our downpipes are square section! I was hoping to find something suitable in the various sheds but nothing suitable so it probably is a trip to the builders merchants and see if they have any suitable offcuts. Never see any fly tipping when you need it!
 

adrian

Flying Squad
A rather belated post to show that things are progressing slowly. My 2mm workbench postings have been related to Holywell Town so I haven't completely neglected it. Anyway the Christmas break has allowed a few steps forward.

The first has been to sort out the workroom - moving shelves and cabinets so that the layout can be moved from the shed to the workroom.
So this is where it now lives - easy access so a daily reminder to keep working on it. It just squeezes in - something I could never have done in 7mm.
Holywell_Jan_16 - 4.jpg

I still haven't sorted out the back scene - still waiting for a dry day so I can work outside for a bit! The lighting pelmet is in the shed having had the first coat of paint applied and I'm waiting for some LED lighting strips to fit before fitting it back on the layout.

I also spent a few days over Christmas battling with Templot to get the final track plan sorted, I'm still struggling with it but I got there eventually. I've sorted out the track templates although I've not bothered with shuffling timbers for the interlacing etc. it's near enough for what I want. Also sketched out sizes for the centre piece i.e. the bridge. Still needs a little tweaking but it's getting there.
Holywell_Jan_16 - 11.jpg

Holywell_Jan_16 - 10.jpg

Holywell_Jan_16 - 5.jpg

So Christmas saw the start of building the track. I decided to build in a few panels. The plain interconnecting track is going to be Easitrack but main approach track on the curve has a check rails all the way along which can't be done easily with EasiTrack so this was built with copper clad PCB sleepers. I then used the etched slide chairs from the 2mmFS Association to provide a wide base to solder both the running rail and the check rail to. The first effort was scrapped ironically for not using enough solder!! The slide chairs have a slot etched into them for some reason, I had soldered them to the PCB with as little solder as possible and then cleaned then up for soldering on the running rail. Unfortunately all the debris from cleaning the etched plates got in the slots and this made soldering the rail on a real pain in the ass, I just couldn't get the solder to flow between the rail and the chair plate properly. Rather than persevere I scrapped it and started again. Second attempt I soldered them on with enough to fill the slot with solder and I didn't clean them either so the solder was clean. The rail soldered on quite easily this time.

Holywell_Jan_16 - 1.jpg

and all soldered up with the check rail - first panel complete!!

Holywell_Jan_16 - 9.jpg

I then moved onto the next panel - the point and catch point on the approach. This is just setting up the sleepers before fitting the chairplates.
Holywell_Jan_16 - 2.jpg

Whilst setting out the sleepers I noticed that one of the PCB sleepers had not had the central slot cut fully so I thought it prudent to check the electrical insulation for each sleeper prior to soldering any rail on.

Holywell_Jan_16 - 3.jpg

Hopefully this weekend I will get the chairplates soldered on.

In the meantime various people have been uploading stuff on to shapeways for the 2mm modellers. Over Christmas they had a free postage offer so I ordered some LNWR D1/D2 wagons.

Holywell_Jan_16 - 6.jpg

I also ordered a set of three 4 plank designs D4/D53/D63 - however this is what they supplied.:eek:

Holywell_Jan_16 - 7.jpg

So I will be contacting shapeways for the other 4 plank wagons, for whatever reason they seemed to have supplied a couple of D2's by mistake.

Also earlier last year I ordered these as well from Shapeways. Two LNWR D6 wagons, on the right, and three Midland wagons on the left.

Holywell_Jan_16 - 8.jpg

Anyway with these and the etched kits announced in the latest 2mmFS newsletter means that I have enough wagon kits to keep me busy for a while.

However before I get stuck into these I want to progress the track work.
 
Last edited:

queensquare

Western Thunderer
Great progress Adrian, it looks like it will be fun to operate.

I too took advantage of the free shipping and bought some of the LNWR wagon prints, along with some LYR ones. I built about twenty wagons over Christmas for another project and felt quite pleased I had at least made a dent in my wagon gloat box - only to then fill it up with some more! Oh well.......

Jerry
 

adrian

Flying Squad
Great progress Adrian, it looks like it will be fun to operate.
Thanks for that and I hope so! One of the aerial photos shows a couple of dozen wagons in the yard and the restrictions on the line meant that goods trains had to be topped and tailed with a brake van and no more than half a dozen wagons. The headhunt is only long enough for a loco and two maybe three wagons at a push so I suspect it will be a bit of a shunting puzzle when operating.
 

Ian Smith

Western Thunderer
Great progress Adrian. Looking forward to seeing more. I really must try to get a bit more done to Modbury, as since "finishing" the signal box I haven't done anything. Although I have started to refresh my HTML coding and made a start on a few webpages dedicated to my Modbury project (I'm not completely happy with my RMweb blog or my "Modbury threads" both there and here, as everything just seems to get lost.

Ian
 

unklian

Western Thunderer
By sheer coincidence I was enjoying this thread before looking through some very old RM,s. Where I found this, don't know if you have seen it before or the pictures. It was the first time I noticed the two catch points interlaced with the entry point to the yard. The interlacing of the point timbering shows a bit better. Don't think I can increase the quality of the scans, that is the print quality of the mag I am afraid !
 

Attachments

  • Holywell Town RM52001.jpg
    Holywell Town RM52001.jpg
    191.4 KB · Views: 72
  • Holywell Town RM52002.jpg
    Holywell Town RM52002.jpg
    287.2 KB · Views: 68
Last edited:

adrian

Flying Squad
I'm not completely happy with my RMweb blog or my "Modbury threads" both there and here, as everything just seems to get lost.
I know what you mean - I've tried various options as well, none working out very well. I started messing about with the HTML and stuff but then decided I was spending too much time on the coding and not enough on the content. So last year I decided to give Wordpress a go. So current method is post build threads on here and get the feedback. Once complete cut and paste my posts into wordpress. I've got the first post for Holywell town in draft at the moment so hopefully get a few more 2mm articles published.
Cherryclan - A potpourri of articles from a sporadic modeller.

The interlacing of the point timbering shows a bit better.
Thanks for that - perfect timing. I'm just building up the first point at the moment, the approach one as it's the simple one. I had put in a few interlaced timbers in but these photos show it interlaced almost up to the crossing so it wasn't too difficult at this stage to take out a few point timbers and replace with a few more interlaced timbers. It does look better now so many thanks, I'll keep an eye out for a copy of the magazine.
 

Ian Smith

Western Thunderer
I know what you mean - I've tried various options as well, none working out very well. I started messing about with the HTML and stuff but then decided I was spending too much time on the coding and not enough on the content. So last year I decided to give Wordpress a go. So current method is post build threads on here and get the feedback. Once complete cut and paste my posts into wordpress. I've got the first post for Holywell town in draft at the moment so hopefully get a few more 2mm articles published.
Cherryclan - A potpourri of articles from a sporadic modeller.

Adrian,
Just had a look at your web pages. It looks very good. I must admit that I do like the idea of continuing to post on both RMweb and here for the feedback - it's often very informative and useful. So I will probably adopt your idea and put stuff on my own website once an item is complete.

For myself I just felt that it will be better to have everything about an item in one place - for instance the RMweb blog entries on my signal box were over some 5 or 6 instalments, so too dispersed for my liking. Also because I'm a bit of a modelling butterfly sometimes, doing things in a thread means that potentially to get to a completed article you'd have to trawl through loads of non related stuff in between.

My web design is very old hat (and is meant to be really), I don't want anything too difficult to maintain or add to. I am using simple HTML (with a bit of CSS). It may not be pretty but I think it will serve its purpose - it is after all a by product of my modelling activities and I don't want to spend hours and hours building it up.

Ian
 

adrian

Flying Squad
Track work is ticking along slowly - there's only so many chairplates I can solder on to the PCBs in one go before I need a break.
Holywell_Jan_25 - 1.jpg

Once that was done it was a case of making up the various components. Joggles in the running rail etc. the 2mm Association book on track work provides all the required details of required jigs and filing methods.

The crossing V was silver soldered so that when soldering it to the chainplates it wouldn't fall apart.

Holywell_Jan_25 - 2.jpg

Finally complete after a good clean.

Holywell_Jan_25 - 3.jpg

and in situ (temporarily!)

Holywell_Jan_25 - 4.jpg

So next main panel will the remaining three turnouts which I'll probably do as one panel, the lengths of rail I have are just long enough to cover all three but I'm going to have a short break on other items before I can go back to soldering on 100's of chairplates.
 

adrian

Flying Squad
In-between soldering on chairplates I made a start on painting the facia so that I could fit some lighting. This was prompted by a blogpost by Anthony Yates who included a few details about his setup. He also included a link to the LED strip he used.

So a quick shop I bought a couple of metres of self adhesive LED strip and a transformer.
Holywell - 1.jpg

So the vertical uprights I decided on a matt black finish to minimise reflections so a small sample tin from the local diy store provided a graphite black. The top facia will have the name across the front so I decided on a gloss black finish on the outside, hopefully suitable for some LNWR embellishments, and a gloss white finish on the inside to reflect the LED lightning.

All fitted gives me this.
Holywell - 2.jpg

I really must get that back scene fitted to hide the holes in the wall, although I did manage to drill a few holes in the corner plate to feed the wires up. So this should hide the wiring once fitted.
Holywell - 3.jpg

So a couple of shots to see how it looks.
Holywell - 4.jpg

Holywell - 5.jpg

That's all up to date so it'll be a couple of weeks before I have any more updates to show.
 

Yorkshire Dave

Western Thunderer
Looking at your design I assume you'll be operating the layout from the front?

It is also a good candidate for DCC wireless operation while standing in crowd at exhibitions.

Have you used a bright white LED strip?
 

Mike Sheardown

Western Thunderer
That looks really great Adrian - and some pretty impressively fast progress too !! I particularly like the stone effect as the track levels split - very realistic !!

Cheers

Mike
 

adrian

Flying Squad
Yes it is intended to be operated from the front - and I am looking at DCC control of some form or another, probably some MERG/JMRI/Raspberry Pi/Wireless hybrid eventually but I've not worked out any details yet - so stage one is probably going to be straight DC with single engine in steam to get things running.

From the link supplied above I went for the pure white LEDS ~5000Kelvin.
 

adrian

Flying Squad
That looks really great Adrian - and some pretty impressively fast progress too !! I particularly like the stone effect as the track levels split - very realistic !!
Thanks for the feedback. It doesn't feel particularly quick with the trackwork - it's just I was running the two jobs in parallel.

The stone effect was just an experiment on on painting the stone effects on a bit of plasticard and has just been slotted into place to judge it's effect. It really should be closer to the lower track as the ground needs to fall away a bit from the goods yard down to the stone wall. The critical item is going to be getting the bridge looking right and then I can add the walls properly.
 
Top