The Penguins 7mm thread.

mike knowles

Active Member
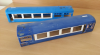
Thanks for the many compliments Sean. Had I realised the amount of work which would be involved I might have not been so keen to volunteer! However the finished article does offer some degree of satisfaction.
For reference the bogies were the original style being a mix of etched brass and nickel silver with various white metal and brass castings. Current models use resin bogies as per the other kits in the JLTRT range.
As received they were coated in a thick layer of black treacle (paint?). A soak in paint stripper removed most of it, revealing the following;


RSCN3079.JPG RSCN3080.JPG RSCN3081.JPG RSCN3083.JPG RSCN3085.JPG RSCN3093.JPG RSCN3095.JPG RSCN3098.JPG

Whilst some parts of the bogies had been soldered (with large globs of solder) most of the assembly had been done with glue which was in a thick layer over everything. So with a lot of persuasion the bogies were stripped right back to the component parts, thoroughly de-glued and de-soldered and assembly started again. In so doing the correct frame spacers were used, as originally a mix of O Gauge and S7 spacers had been used and the carrier for the front pony wheels inserted the right round.

RSCN3074.JPG RSCN3075.JPG DSCN5140.JPG RSCN5141.JPG

As Sean has mentioned some of the castings had to be replaced as they were too clogged up with solder/glue/paint to recover. The (poor) photos below shows one of the spring/axlebox assemblies and given all due respect to Sean's table top resin casting method I have to say the results were superb, showing up the efforts of many others who expect us to pay money for their poor efforts.

RSCN5124.JPG RSCN5126.JPG

Finally I'd like to thank Laurie at JLTRT for providing replacements for some parts which were beyond repair e.g.the steps and Northampton Model Supplies for providing a replacement buffer housing after one of them came into contact with my soldering iron!
 

The Penguin Of Doom

Western Thunderer
Hi all.

I've managed to resize a few pictures of my 26s and 27 (well, Chubhill has), and so here are some from our work in progress, "Invermire" which we displayed at the Hull MRS show yesterday. It was a thoroughly enjoyable day and, despite the layout being "under test", it ran extremely well with only a few little niggles to sort out.

20160604_102859.jpg

20160604_102912.jpg

20160604_141329[1].jpg

20160604_141353.jpg

20160604_152131.jpg

Cheers.

Sean.
 

The Penguin Of Doom

Western Thunderer
Sean,

Those are seriously nice looking locos!!

How did you do the headlamps in the class 26?

Cheers
Lee

Hi Lee.

Thanks for the compliments. The 2 x 26s used lamps sourced from some 7mm scale mini cars (4 in total), sourced from ebay. I forget the make now but may be able to find out as I think I still have some packaging somewhere.

The real lamps were (I believe), a standard part and fitted to many BMC cars in the 70s, certainly my Mk1 Escort had them and I believe they were used on Morris Minors amongst other things.

Speaking of My Mk1 Escort, a 7mm version will be appearing on the layout in due course alongside other members previous vehicles. I've even had some correct number plates made up for it - HCE 259N..... Happy days! ☺
 

The Penguin Of Doom

Western Thunderer
Hi all.

Spurred on by my recent escapades in 7mm, I decided to make a start on my Westdale Mk1 Sleeping Car. We decided that Invermire would have a token sleeper service and since we can only fit 3 coaches in the run round loop, this service will be joined to other portions elsewhere before making the long journey South.

Anywho, that's enough of the back story, the model itself was started by fixing the ends to the bodysides. I then found that (in my opinion), the roof overhang was a little too much and so I have since filed the overhang down a little to match it with my existing Mk1s. I also intend to bulk up the trunking on the end as it appears to be a bit on the thin side. I have sanded the filler down now and blended the ends in so next, it will be onto the roof details before adding the bodyside furniture.

20160608_200111.jpg

20160608_215302.jpg

20160608_215323.jpg

Cheers.

Sean.
 

The Penguin Of Doom

Western Thunderer
Hi all.

Work has been progressing on the SLC and I have now just about completed the roof details.

Firstly, the rather fiddly items which I will refer to as "exhaust silencers" since I'm not sure what they are as well as their rather fiddly wiring runs. The photo's are self explanatory.....

20160619_124440.jpg

20160619_135039.jpg

20160619_135100.jpg

I then moved onto the roof ribs. I know this is an eternal argument but I feel that a completely flush Mk1 roof does not look right so I use Slaters 0020 thou plastic rod and apply using PlasticWeld after a thick coat of primer. This way the rod sort of melts into the paintwork and once a final few top coats are applied, they look quite convincing (to me.....) In the pictures below, the final effect can be seen on the TSO in the background.....

20160622_215245.jpg

20160622_215259.jpg

Finally, once the roof detail was complete, I moved onto the trunking on the coach end. I had already reprofiled the roof ends and on what pictures I have been able to source, the trunking appears to protrude beyond the end of the roof so I have bulked this out using 4.8mm Evergreen strip. The trunking has now been trimmed to size and filled and I will post pictures of this next time.

20160628_220452.jpg

Next jobs are to finish the end details (plated steps, handrails, filler pipes etc), before moving onto the sides.

Cheers.

Sean.
 

The Penguin Of Doom

Western Thunderer
Hi all.

A little more progress on the Mk1 SLC and some rather frustrating steps backwards.....!

Firstly, I completed the end details and hopefully the photographs below should show what I've done. The end step blanking plates are made from sticky labels and hopefully, when painted, should look the part. The etched steps are from the Easybuild fret and make up rather nicely.

I continued onto the bodyside, commencing with the door hinges (Easybuild), before adding the weather protection strips. All was going well until I compared this coach with one of my earlier efforts and of course, when looking from above, the roof details are most obvious. Sadly, I couldn't get away from the fact that the SLC roof welds/ribs differed in size from the earlier builds. A quick google search revealed that Slaters do smaller sizes than 20thou and so, having stripped all the roof ribs off, they were replaced with 10thou. The work is done now and pending new paint on the roof, so I will post again once this task is complete.

That leaves me with a coach body that is just about ready for paint. I do not have any suitable paint at home at the moment and for builds like this, I prefer to do a job lot if possible so this means that work bench space will be turned over (finally), to another couple of Mk2 coaches. Some of you will have seen my first attempt over on the dark side whilst my contributions were still welcome. Reluctant to allow that forum to benefit from my projects any more means one forums loss is anothers gain in this instance and so whilst the last two pictures are of a stack of Tri - ang Big Big Mk2s, I intend to start a seperate thread dealing with this project and their conversion into something more accurate. Many people in both the real world and internet land have shown much interest in this conversion so I thought it would be rude not to document it again.

Cheers.

Sean.

20160713_204345-1.jpg 20160713_204421-1.jpg 20160713_215523.jpg 20160713_215613-1.jpg 20160720_213845.jpg 20160720_214153.jpg 20160720_214207.jpg
 

The Penguin Of Doom

Western Thunderer
Hi Sean,

Some really nice detail work there. It looks like you have your work cut out with all those to do.

Cheers
Lee

Thanks Lee.

There certainly is plenty of work to do but I guess that I'm fortunate in that I have already tested my idea out so as long as I can keep my mind on the job at hand, they should all come together nicely, hopefully......

Cheers.

Sean.
 

The Penguin Of Doom

Western Thunderer
You could gladly have them Phil but unfortunately, I only just have enough to get me by.

50% of the donors came without bogies sadly. If all goes to plan I may have one left which you can gladly have.

Sean.
 

The Penguin Of Doom

Western Thunderer
It was on my consideration list but I was happy with the Tri - ang ones once the detail was filed out a bit on my original one. I just have to remember that they should be fitted with 3' 1" wheels.....!
 

Yorkshire Dave

Western Thunderer
Hi Sean

I've only just caught up with your excellent work on the classes 26 and 27 :thumbs:.

To my eyes the BRCW classes 26, 27, 33/0 and 33/1 were the most elegant of the BR go-anywhere do-anything Bo-Bo locomotives with their understated styling. It was a shame that the 33/2 effectively bankrupted BRCW.

My only photograph of a 27 is 27 203 taken at Crew open day in 1981. If it's of any use - no need to worry about numbers being straight!
27 203 Crewe open day 1981.jpg
 

The Penguin Of Doom

Western Thunderer
Hi Sean

I've only just caught up with your excellent work on the classes 26 and 27 :thumbs:.

To my eyes the BRCW classes 26, 27, 33/0 and 33/1 were the most elegant of the BR go-anywhere do-anything Bo-Bo locomotives with their understated styling. It was a shame that the 33/2 effectively bankrupted BRCW.

My only photograph of a 27 is 27 203 taken at Crew open day in 1981. If it's of any use - no need to worry about numbers being straight!
View attachment 57360

Hi Dave.

Glad you like my work. I was fortunate to see a few more of the BRC&W locos during the 80s mainly the 33s on the Southern but to be honest, I never really had much affection for them. I always had a soft spot for the 26s and 27s, possibly because I never managed to get haulage from them, they always seemed elusive to this fellow Yorkshire lad.....

As for the wonky numbering, I've no intention of replicating it but I bet one day I will.....;)

Cheers.

Sean.
 

The Penguin Of Doom

Western Thunderer
Do you effectively do a 'cut and shut' job on these to achieve the desired vehicle?

Hi again Dave.

In effect, I use 2 x scale length halfs grafted together to make one scale length one. It's a bit hard to put into words and I deleted all my pictures from "the other place" but I will be posting plenty here as work progresses.

Here's a taster of some of the TSO I did.....

2013-05-22 20.56.48.png 2013-05-21 13.38.01.png 2013-05-22 20.56.48.png

Cheers.

Sean.
 

Attachments

  • 2013-05-16 17.35.20.png
    2013-05-16 17.35.20.png
    293 KB · Views: 1
Top