7mm 7mm Mick's Workbench - LNER A2/3 60514 Chamossaire

28ten

Guv'nor
Ressaldar said:
Hi Mick,

all looking good, nice idea to build the whole train at the same time.

regards

Mike
There is a lot to be said for the approach, at least you end up with some stock to go behind the locos  :))
 

lnerjp

Western Thunderer
have the slater's sprung w-irons on the bench to convert to S7 and finally finish them off but i'm not sure of the best way to get the old plastic ones off

Any help appreciated...............
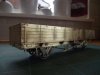
How did you fix them on in the first place? If you used ordinary Liquid Polly, just get a sharpe scapel blade behind them and gently prise them off, you should be able to get away with being quite brutal.

J.P.
 

micknich2003

Western Thunderer
When Mick was using my workshop to turn the "Dummy Axles", I suggested he make four. Oneday an "austerity" or 8F may appear. Mick Nicholson.
 

7mmMick

Western Thunderer
Dog Star said:
What am I missing here - three wheelsets and four dummy axles?

regards, Graham

Hi Graham,

Thanks Mick, you took the words right out of my mouth :thumbs: Also I think I just got carried away on Mick's laith, I was enjoying it  :))

lnerjp said:
How did you fix them on in the first place? If you used ordinary Liquid Polly, just get a sharpe scapel blade behind them and gently prise them off, you should be able to get away with being quite brutal.

J.P.

JP,

I think I will have used mek pak but I hope I didn't soak them in it or brutallity may be called for  :headbang:
Ressaldar said:
Hi Mick,

all looking good, nice idea to build the whole train at the same time.

regards

Mike

Mike,

My logic is that if I post a few things at once at least i'll be able to have more regular updats and not one every six months  :)),

Best reagrds to all, Mick
 

Dog Star

Western Thunderer
7mmMick said:
I think I will have used mek pak but I hope I didn't soak them in it or brutallity may be called for  :headbang:
Best reagrds to all, Mick

Easy - using a razor saw, cut between the bottom of the solebar and the spring hanger seats - go through the axleguard.  Repeat until bored.  Remove wheels. :thumbs:

Using razor saw, cut between rear face of solebar and remains of axleguard.  You may not be able to make a full depth cut so break the axleguard away and then resort to paring the remainder with a scalpel.

If the wagons have been built to FS standards then you may well have to move the brake blocks and brake block hangers.

regards, Graham
 

Scale7JB

Western Thunderer
micknich2003 said:
When Mick was using my workshop to turn the "Dummy Axles", I suggested he make four. Oneday an "austerity" or 8F may appear. Mick Nicholson.

No chance of a 9f in Scale7 then? Haha..

JB.
 

7mmMick

Western Thunderer
Thanks Graham, i'll give it a go and post how I get on. And as for a 9F........ Not many made it into the area I want to model but I'm sure at some point in the distant future I may  :)) :)),

Best regards Mick
 

Steph Dale

Western Thunderer
Mick,

I'm looking forward to seeing more on your J73 build (I caught up with it for the first time today)  I recognise the small blue packets; I'm at the same stage with a LSWR G6 0-6-0t (FS rather than S7 though).  It appears you'll be going for functional valvegear in your loco too... ;-)

Steph
 

Eastsidepilot

Western Thunderer
Mick,
Nice job on the tube wagon Mate, and looking forward to seeing the J73 come to life. Were the buffers I directed you to the right pattern ?

"Oi" JB if you don't 'urry up with the L1 ( want to see that running ) Mick will 'ave built a 9F before your finished Ha, Ha.

Col.
 

7mmMick

Western Thunderer
Steph Dale said:
Mick,


I'm looking forward to seeing more on your J73 build (I caught up with it for the first time today)  I recognise the small blue packets; I'm at the same stage with a LSWR G6 0-6-0t (FS rather than S7 though).  It appears you'll be going for functional valvegear in your loco too... ;-)

Steph

Hi Steph,

Well spotted, the pile of bits to the right is a set of Laurie Griffin inside joy valve gear and i'll be using your thread as a guide as i've never fitted inside valve gear before. I'm also going to pinch your loctite idea if thats ok?? I had some experience with loctite when I served in the army. I used all sorts of different grades and I think the strongest was 630. I used to stick flash elimiators on the end of rifle barrels and they never ever came off !!

Hi Colin,

Thanks for your comments, still getting my eye in with this microflame thingy. I keep burning hairs off my hands and various other thing around the bench and as such I've now set up an exclusion zone around the work area !! The buffers are about the closest I've seen so far, although I may have to turn the collar off prior to fitting, thanks for the link you sent. All being well I should have more to post soon,

Best regards Mick 
 

Rob Pulham

Western Thunderer
micknich2003 said:
When Mick was using my workshop to turn the "Dummy Axles", I suggested he make four. Oneday an "austerity" or 8F may appear. Mick Nicholson.
Hi Mick and welcome to the forum. It's nice to see you on here. :wave: :wave: :thumbs:
 

Rob Pulham

Western Thunderer
Mick, the tube wagon looks great - I have one in the pile and I may try the exactoscale W irons on it too.
The J73 is looking good, have you rolled the boiler or used a piece of tube whatever  you have done it looks quite substantial. :thumbs: :thumbs:
 

7mmMick

Western Thunderer
Hi Rob,

Thanks for your comments, the tube wagon is just as good a kit as the other connoisseur wagons i've built and hopefully i'll do it justice  :)) The boiler for the J73 is brass tube. The other Mick on the thread, Mick Nich, sourced it from a model engineering website. The boiler diameter plus cladding was calculated and I think off the top of my head was 31.5mm and the tube supplied is 32mm so i'm hoping it will be ok. Saves having to roll one up in any case and there's no need to flare it to form a firebox as it won't be seen  ;D,

Best regards Mick
 

7mmMick

Western Thunderer
A quick update on the Tube wagon and some help please  :scratch: So far most of the etched brass work is done and the Exactoscale W-irons are fitted and working well. I also took JP's advice and fitted some MMP builder's plates and load clips which really look the part :D Because of the sprung units I'm unable to use the axle boxes and springs provided so does any one know of a suitable replacement?? Here's the ones I need - http://newimages.fotopic.net/?iid=ydi8k ... uality=100. Also some small chain for the body locking pins please ??

The work so far, just the castings to fit,
 

Attachments

  • 2011_0130westernthunder20006.JPG
    2011_0130westernthunder20006.JPG
    130.5 KB · Views: 38

Steph Dale

Western Thunderer
Mick,

That's a very tidy looking build.  Just a quick note on your axleguards: I assume that they're one-piece whitemetal jobbies?  If theyr'e the correct style, why not cut out the springs and axlebox from the W-iron?  Rubbing them down on coarse (150 grit) wet and dry, used wet, would soon get you what you want.

In terms of the chain, I can thoroughly recommend the stuff that's produced by A-line.  I've previously bought it from Model Junction, or through Walthers.  It's listed at the bottom of this webpage: http://www.modeljunction.info/estore/index.php?manufacturers_id=23&osCsid=00adso8n74735ctgtkdhh399b4.  If necessary, it's also available in horrid untreated brass finish too...

Steph
 

lnerjp

Western Thunderer
Hi Mick

I have one of these in a unfinished state (a common theme on here, perhaps this forum should be re-named "the never finish anything group"). For the small chain I got some very fine stranded wire pulled out two strands and twisted them together, if you use fine enough wire you cannot tell the differance between that and very small chain. I got some sprung buffers from Invertrain. I managed to cut off and reuse the kit axle boxes and springs, but it was a great deal of work. I would look at ABS wrightlines for the Axle boxes and exactoscale now do a ABS plastic sprue with springs, axleboxes and brake blocks. Not sure if the springs are correct though you will have to check.

J.P.
 

Rob Pulham

Western Thunderer
7mmMick said:
fitted some MMP builder's plates and load clips which really look the part :D
Mick are the MMP wagon plates LNER or just generic plates? (I ask as I have some spares with the glass wagon that is languishing part complete on the bench but they are LMS/BR in origin). I wasn't aware that David did any LNER based wagons?
 

Dog Star

Western Thunderer
Rob Pulham said:
I ask as I have some spares with the glass wagon that is languishing part complete on the bench...
So if Jonpaul is the founding member of the "never finish anything" section of this forum  ;D, then preusmably you are the seconder...  ;D ;D

I wish to apply for an honorary (?) position in this select body, although I did finish something, sometime, somewhere...  :) (that is not a reference to lunch, just the GUV-nor does not like references to other places where WTs might otherwise be found).
 

Rob Pulham

Western Thunderer
Absolutally,  although I did make an effort to finishing some of the 4mm stuff last week by getting a Slaters Midland fruit van ready for varnishing/transfers/ebay.
but perhaps a list may help
7mm - A3, MMP Glass Wagon, JLRT D114 Gresley (although I am not sure if I have really started this) Parkside LNER Cattle wagon (this is WIP up at the cottage and will be finished to painting stage on my next visit in a couple of weeks). Scratch built tank awaiting Eileens order.
Severn, Midland fruit van, tank wagon, machinery wagon all need painting (waiting for better weather he kids himself).

4mm Comet Gresley Restaurant triplet set (needs interiors, glazing, roofs attaching and transfers) MJT D114 Gresley coach, LMS period III BG (just needs the body painting and glazing), [s:1p43hhen]2 Chivers LMS Tube wagons[/s:1p43hhen] (just sold on RMWeb). Parkside LNER grain wagon. Chivers BY 120 :eek: :eek: :eek: :eek: :eek:

All the 4mm stuff will be sold off as I complete it.
 
Top