7mm A little detailing of RTR locos and wagons

bernd lachmund

Active Member
Hi,

though I don`t really know if it`s good enough showing, having seen all the good model engineering in all the other threads and not alone being new here, but also German, (so please in advance excuse my perhaps faulty English), I `ll try it .
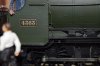
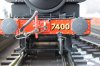
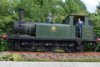
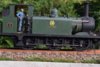
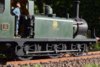
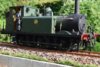
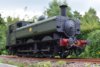
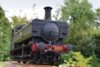
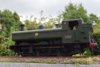
Having done German railway modelling in O gauge for several years, I got to British railway modelling last year by a friend and by purchasing a Lionheart 7400 and , the fascinating 43xx Mogul. Besides the very well detailed look of the models I appreciate the very good running performance.
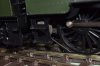
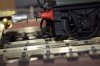
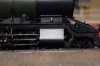
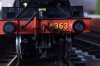
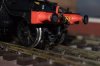
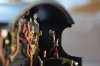
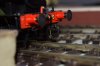
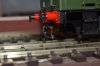
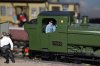
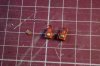
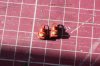
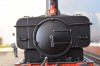
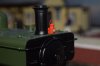
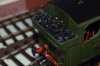
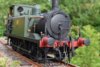
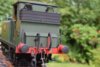
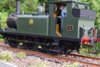
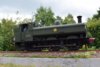
As with all German RTR locos, I think there are possibilities of improving detailing with British RTR locomotives ,too. So I added the missing sandboxes (brasss cast by Warren Shepherd) at the back of the Mogul and fitted the pipes (0,5mm brass wire). Then I fixed a small chain to hold the heating pipe at the tender backside. I exchanged the mounted tall vacuum pipe at the front buffer beam against a low one (Laurie Griffin) and lenghtened it with a 1,5mm brass rod, because the loco`s appearance should be as if between 1932- 1939. That`s why I fitted it with an ATC pick up shoe (Hobbyhorse and self built 0,3mm brass holder) and "electrical" wire (0,4mm brass) from the cab to the front apparatus. The clamps holding the wire to the footplate are self made from 0,1mm wide brass. Finally I fixed the missing ATC bell at the right inner cabside.
Regards
Bernd
 

Attachments

  • DSC_0260_01.JPG
    DSC_0260_01.JPG
    133.6 KB · Views: 331
  • DSC_0261_01.JPG
    DSC_0261_01.JPG
    125.7 KB · Views: 329
  • DSC_0347_01.JPG
    DSC_0347_01.JPG
    162.9 KB · Views: 319
  • DSC_0348_01.JPG
    DSC_0348_01.JPG
    150 KB · Views: 323
  • DSC_0200_01.JPG
    DSC_0200_01.JPG
    126.9 KB · Views: 324
  • DSC_0177_01.JPG
    DSC_0177_01.JPG
    123 KB · Views: 327
  • DSC_0180_01.JPG
    DSC_0180_01.JPG
    106.5 KB · Views: 324

Locomodels

Western Thunderer
Hello Bernd,

Welcome to Western Thunder. Nicely done with your detailing. You understand that we all like pictures as well.
I don't think that you have anything to worry about, your work looks good to me.

Paul.
 

Ressaldar

Western Thunderer
welcome to WT Bernd, you have passed the first requirement- lots of photos with our posts - I look forward to more of your postings.

regards

Mike
 

bernd lachmund

Active Member
Many thanks for welcoming me so friendly and your kind words to all of you!!! I`ve thought over posting my topic several times before I then did it.
Now I do feel a bit relieved thanks to your gentle comments!!!
Up to now I have only been reading a lot of threads on "Western Thunder" and because of the fantastic quality of model engineering here, it was quite a difficult decision for me to post.
Best
Bernd
 

allegheny1600

Western Thunderer
Hallo Bernd und wilkommen.
Ich spreche ein bisschen Deutsch! Ich werde im nächsten Monat mehr üben, wenn ich dein schönes Land besuche.
Tschüss!
John.
 
Pannier 7400

bernd lachmund

Active Member
Hello,

thanks to welcome me Pete. And John and Jordan in German ! John, have a hopefully good time in Germany next month!!


And many thanks for the "likes"!

As with all my GWR locos the Pannier 7400 has got the fascinating prototypical brake use by pressing the function key with the brake sound. It`s because all of them are fitted with Zimo decoders. I`ve got some German Lenz locos and there the locos get only slower by reducing speed through the controller.
The Lionheart Pannier has got very good running qualities especially at low speed!!
What I didn`t like so much was the look of the cacuum pipes and so they were exchanged against Laurie Griffin ones. Then the hooks for the couplings at rest were made from 0,3mm brass wire. Further on I connected the loose ends of the pipe below the front buffer beam( sorry, but don`tknow what it is for) by using 2 small parts of wire insulation and 5mm brass wire. Again I fitted small parts of chain to the heating pipes. (By the way the figures in the cab are from "Detailed miniatures" and I think they have got fantastic looking O gauge figures.) A bit difficult was the reducing of the rather broad rim of the bunker by filing it a bit sloping and though it still looks ( in contrast e.g. to brass locos) too broad I simply didn`t risk to go further. I filled the bunker with real O gauge coal. The head lamp is from Laurie Griffin with some changes. I used 0,3mm brass wire to replace the handle( two parts) and filed the left side flat. On this side I fixed a small part of a brass L profile to make it fit to the lamp irons.

Regards
Bernd
Bernd
 

Attachments

  • DSC_0216_01.JPG
    DSC_0216_01.JPG
    185.6 KB · Views: 247
  • DSC_0211_01.JPG
    DSC_0211_01.JPG
    108.4 KB · Views: 243
  • DSC_0214_01.JPG
    DSC_0214_01.JPG
    115.7 KB · Views: 243
  • DSC_0209_01.JPG
    DSC_0209_01.JPG
    157.2 KB · Views: 248
  • DSC_0208_01.JPG
    DSC_0208_01.JPG
    195 KB · Views: 243
  • DSC_0215_01.JPG
    DSC_0215_01.JPG
    190.3 KB · Views: 244
  • DSC_0217_01.JPG
    DSC_0217_01.JPG
    134.9 KB · Views: 245
  • DSC_0218_01.JPG
    DSC_0218_01.JPG
    82.9 KB · Views: 245
  • DSC_0219_01.JPG
    DSC_0219_01.JPG
    125.8 KB · Views: 245
Last edited:
Terrier A1X Portishead, shortly after being purchased by GWR

bernd lachmund

Active Member
Hello again,

comparing my Dapol Terrier with prototype photos I was a bit disappointed as the vents on the tanks were missing on the model, though the Terrier had them until being condemned. Another important detail were the condensing pipes that were still there on a prototype photo from 1948. So I decided to model these details and others to show the Terrier as if it was purchased from Weston , Clevedon, Portishead Railway by GWR only shortly before. As DCC supplies didn`t have any spares I needed any more, I searched for substitution and found the vents and Westinghouse pump with Roxey mouldings , the different Vacuum , heating , airpipes with Laurie Griffin and Warren Shepherd. Condensing pipes are 1,5mm copper wire , their fittings on tanks and front boiler are wheels from a sack barrow kit. The pipe from cab to left front boiler , parallel to handhold is 1mm brass wire. As the fittings of the vents was modelled on the tanks, I had to cut off the bases of the Roxey vents and then to lengthen them with plasticcard. Hope I didn`t forget anything! And in advance , sorry for any wrong English words /expressions!

Regards
Bernd
 

Attachments

  • DSC_0199_01.JPG
    DSC_0199_01.JPG
    250.2 KB · Views: 217
  • DSC_0205_01.JPG
    DSC_0205_01.JPG
    253.5 KB · Views: 217
  • DSC_0210_01.JPG
    DSC_0210_01.JPG
    252.8 KB · Views: 217
  • DSC_0212_01.JPG
    DSC_0212_01.JPG
    270.4 KB · Views: 213
  • DSC_0213_01.JPG
    DSC_0213_01.JPG
    202.7 KB · Views: 216
  • DSC_0214_01.JPG
    DSC_0214_01.JPG
    172 KB · Views: 211
  • DSC_0215_01.JPG
    DSC_0215_01.JPG
    245.7 KB · Views: 211
Pannier 7400 changed to 6430

bernd lachmund

Active Member
Hello again,

I bought the Lionheart 7400 Pannier as one of the last of the Lionheart range to get.( detailing above in the thread) It was my first British loco and I must confess it was really a very convincing purchase , especially compared to the running qualities of my German Lenz locos. As I had bought a DCC model I looked for a sound decoder and got the Zimo MX645R and fitted an SC68 stay alive capacitor as well. "Keith the Soundguy" helped me with the right soundfile and to use "Real Drive" with my Pannier, what is really an impressing function as it makes prototypical driving much more realistic! Later I found out the differences between 64xx and 74xx Panniers and was fascinatined at once with the autotrain function of the 64xxs. So at last I decided to transform my 7400 to a 64xx , keeping in mind the main difference between the 64xx and the 74xx , the curved join between bunker and cab of the earlier 64xx in contrast to the sraight one of the 74xx. So I chose 6430 ( a heritage loco at the same time) and with HMRS transfers, PeterRoles`autogear castings, Severnmillsnameplates I tried the change.
(Only slightly weathered as in 1937 quite new condition)

Bests
Bernd
 

Attachments

  • DSC_0289_01.JPG
    DSC_0289_01.JPG
    229 KB · Views: 142
  • DSC_0291_01.JPG
    DSC_0291_01.JPG
    195.1 KB · Views: 143
  • DSC_0292_01.JPG
    DSC_0292_01.JPG
    161.8 KB · Views: 139
  • DSC_0293_01.JPG
    DSC_0293_01.JPG
    182.7 KB · Views: 138
  • DSC_0295_01.JPG
    DSC_0295_01.JPG
    212.1 KB · Views: 138
  • DSC_0296_01.JPG
    DSC_0296_01.JPG
    210.3 KB · Views: 137

bernd lachmund

Active Member
Thank you and the others, too!

I think next will be the Ixion Fowler !

Meanwhile , though it doesn`t quite fit to the topic of the thread, I´d like to show a brake van I built from a Peco kit. I added the sandpipes ( brass wire) and scratch built brake triangles (hope it`s the correct expression), vacuum pipe below and again slightly tried to weather it. I know it`s nothing really worth being displayed ( certainly often shown and better built:)), but perhaps someone may like it.

Bernd
 

Attachments

  • DSC_0280_01.JPG
    DSC_0280_01.JPG
    184.3 KB · Views: 132
  • DSC_0281_01.JPG
    DSC_0281_01.JPG
    250.3 KB · Views: 122
  • DSC_0283_01.JPG
    DSC_0283_01.JPG
    252 KB · Views: 122
  • DSC_0286_01.JPG
    DSC_0286_01.JPG
    189.4 KB · Views: 128
Top