A Venture into the Garden

JimG

Western Thunderer
I've almost got it finished. :)

garden-X125.jpg
All the sleepering was completed under and around the crossing.

The next things to deal with was the switch.

garden-X126.jpg
The first two sleepers to the left of the points are the normal sleepers as supplied by Cliff Barker. I like to provide long timbers at the tierod area - easier to do when building the turnout and they can be cut off later if not required. I also have an idea to house a waterproof microswitch on these timbers to switch crossing polarity. The Caledonian had a habit of boxing over turnout and signal operating equipment so I'm looking at hiding the microswitch under such a covering. This message on the Caledonian Association forum gives some idea of what they did.

The timbers were made up by using two sleepers with the chairs milled off, overlapping them with chair areas opposite each other and cutting through both with a razor saw. A thick styrene strip was glued in the channel on their undersides to make the join.

The other two sleepers to the right were standards sleepers with the chairs milled off. Slide chairs will be added to these four rightmost sleepers.

garden-X127.jpg
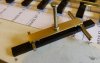
...and a quick shot of most of the turnout with all the interlaced sleepering in place and just the gap in the sleepering at the switch heel to deal with.

garden-X128.jpg
On the prototype, nine foot sleepers were used with the special chairs for the divetring road being placed closer to the sleeper ends. I wanted to use the external chair detail which meant cutting the sleepers as above.

garden-X129.jpg

I used 2mm styrene strip again join the pieces of the sleepers but I changed the glue I used since I had to have a fair bit of wriggle room to get the rail in to line thins up and place the sleeper ends. The No Nonsense superglue was a bit to fast to allow this so I used the Gorilla glue which takes about two hours to set partially hard (24 hours for full setting).

garden-X130.jpg

The three sleeper ends in place and waiting for the Gorilla glue to set hard. I'm intending to fill the gaps with short sections of sleeper glued in although the gaps would be hidden by chairs. You can also cit the Cliff barker sleepers to 8' 6" scale length by clipping a scale three inches off the ends. So I cut this end off to get close to representing the nine foot sleeper length.

garden-X131.jpg
The next job was to fit one of the check rails. Here's the rail fitted with the milled halves of the Cliff barker check rails...

garden-X132.jpg
...and the stock rail with its milled chairs...

garden-X133.jpg
...and the rail in place located by two check gauges., with the chairs glued with MEK.

garden-X134.jpg
The work so far with closure rails fitted and the other check rail lying close to its position waiting on chairs - I've run out of the check rail chairs and need to get some more.

garden-X135.jpg
...and a shot of the switch with one of the milled point blades in position. I've just got the slide chairs to fit and, of course, the other blade. :)

Things I found out today - the gauge in the sleepers is close to 44.60mm, not 45mm. Technically, G1 has always been 1.75" (44.45mm) or 45mm, so the sleepers are pretty close to the average between both gauges. But ScaleOne32 is based on a gauge of 45mm, so my gauges don't fit and I could run into problems. I actually found out because I was checking the clearance clearance at the heel of the switch blades. It was while I was checking this that I found that my gauges didn't fit. It could be that if the chairs had the correct inclination then the gauge would be closer to 45mm. However, Cliff Barker does a gauge widened sleeper of 45.5mm gauge so I might get some of them and see what these pan out to in actual fact. It never crossed my mind to check the gauge. :) In fact I wasn't going to make any gauges except check gauges since the sleepers would be maintaining gauge. :)

The other thing I found out was that Cliff Barker's 45mm gauge sleepers are polypropylene - not ABS. I had probably mis-read his website information. That certainly explains the difficulty in gluing - polypropylene is way up there with the most difficult materials to join anything to. :) But his gauge widened sleepers are ABS so if I go for these sleepers, my gluing problems might disappear as well. :)

And now a bit of a gap in tracklaying until I get more supplies from Cliff Barker. :)

Jim.
 

unklian

Western Thunderer
Interesting stuff Jim, I suspect I might have similar issues to deal with when I tackle some Gauge 3 finescale ( whisper it Spur II ) points. Although I am glad they wont be interlaced .
 

Steve Cook

Flying Squad
Fantastic looking turnout Jim, really impressed with the way you have gone about it :)

My old line was built with the gauge widened sleeper units - I'll go out into the garage tomorrow and measure up the old track and post the results. I hope its 45.5mm - all the stuff for the new line has already been bought.

Cliff also does long sleepers for turnout construction, perhaps it may be worth tacking a few onto your next order to save you gluing them together.

Keep it up and sorry to hear about the carpet :)
Steve
 

JimG

Western Thunderer
Interesting stuff Jim, I suspect I might have similar issues to deal with when I tackle some Gauge 3 finescale ( whisper it Spur II ) points. Although I am glad they wont be interlaced .

Certainly a standard form of turnout will be easier - making interlaced turnouts with Cliff Barker's sleeper units becomes a peculiar form of jigsaw puzzle. :)

Jim.
 

JimG

Western Thunderer
My old line was built with the gauge widened sleeper units - I'll go out into the garage tomorrow and measure up the old track and post the results. I hope its 45.5mm - all the stuff for the new line has already been bought.

I would be interested to see what the gauge is. If it is 45.5mm then I might go for them in any case, preferring to be 0.5mm over gauge than 0.4mm under gauge. It would also mean ABS sleepers avoiding the gluing problems. I can see that Cliff's standard sleepers being a bit tight on gauge would not normally be a problem since the G1 standard has a lot of play built into it.

Cliff also does long sleepers for turnout construction, perhaps it may be worth tacking a few onto your next order to save you gluing them together.

The only problem is that the turnout timbering is a scale 12" wide and interlaced pointwork - certainly in Scotland - only use the standard 10" wide timbers

Keep it up and sorry to hear about the carpet :)

It's rather a disreputable carpet in my workshop which I should have changed some time ago but it means moving my desk and workbench so there is a natural disinclination. The burn mark adds to the weathered look. :)

Jim.
 

Simon

Flying Squad
No wonder you couldn't glue the sleepers!

You have done incredibly well to get this far with those ghastly "floppy plastic" things!

The Gauge widened ones are much nicer to work with. Timbering-wise, the Peco ones are possibly a bit narrower then Cliff's and there is enough "meat" in the sides that you could mill them down, I've a packet that you'd be most welcome to have if you want to try them out, e-mail me your address and I'll stick them in the post. They are glueable hard plastic, colour and thickness compatible with Cliff's stuff.

Simon
 

JimG

Western Thunderer
The Gauge widened ones are much nicer to work with. Timbering-wise, the Peco ones are possibly a bit narrower then Cliff's and there is enough "meat" in the sides that you could mill them down, I've a packet that you'd be most welcome to have if you want to try them out, e-mail me your address and I'll stick them in the post. They are glueable hard plastic, colour and thickness compatible with Cliff's stuff.

Simon,

I must drive over and look at da shop - I've never visited it - so I'll try and do that in the coming week and save you postage. :)

Jim.
 

Steve Cook

Flying Squad
I would be interested to see what the gauge is. If it is 45.5mm then I might go for them in any case, preferring to be 0.5mm over gauge than 0.4mm under gauge. It would also mean ABS sleepers avoiding the gluing problems. I can see that Cliff's standard sleepers being a bit tight on gauge would not normally be a problem since the G1 standard has a lot of play built into it.

Just measured up some of the old track Jim

GRC61 Track Gauge.jpg

That bit of track was from the 9' radius curve although the straight sections of track registered the same. I think Simon use the gauge widened stuff everywhere on his line, I did on the old one and will do for the current one.
Steve
 

JimG

Western Thunderer
That bit of track was from the 9' radius curve although the straight sections of track registered the same. I think Simon use the gauge widened stuff everywhere on his line, I did on the old one and will do for the current one.

Steve,

Thanks very much. I'll go for the gauge widened sleepers. I'm wondering what to do at crossing noses in my interlaced pointwork. I could lay them as gauge widened with a 2mm check rail gap, or I could tighten the gauge to 45mm since I'm chopping off a chair on each sleeper at the crossing to go under the nose assembly. Otherwise, with my Templot drawings, I'll probably centre the sleepers on the track centres and check the rails off the drawing with my small square and a wee bit of 10 thou metal clipped over the rail. I only have one piece of fairly complex pointwork - the tandem release turnout at the platform end, and I think I can wangle the gauge variation through that. Thank goodness I don't have any diamonds or slips. :)

Jim.
 

JimG

Western Thunderer
I'm back on to tracklaying again after a few weeks getting new supplies of Cliff Barker's gauge widened sleepers and a pile of nickel silver rail. I had decided on the nickel silver rail to make life a bit easier when machining it for the crossings and the point blades. I found the stainless steel rail quite hard going on the milling machine. Cliff Barker says that his stainless steel rail is annealed to make it easier to work and I suspect it might be work hardening under the milling cutters.

I decided that the first turnout will be written off to experience and most of it salvaged to make some plain track in sidings. So it was back to square one again on the milling machine.

garden-X136.jpg

A 300mm x 150mm sheet of CZ120 2mm clock brass was got from Ian Cobb to use for all the crossing nose bases and the two bases for the crossover at the station entrance were cut out. I had decided to build the crossover as one unit since I could foresee problems with the interlaced sleepers if the two turnouts were built individually.

Also to note is the rough edge on the slots which is usually a sign of the cutter gettng a bit blunt. Normally I get a way with a bit of this if the finish is not critical and I kept plugging on in this case till the job was finished. However, when I came to solder the rails to the crossing noses, I found that the slots were undersize which I can only put down to possible deflection of the blunt cutter since I can't find any other reason for it. So a fair bit of time was spent last weekend correcting the problem with the slots.

garden-X137.jpg
I machined up the rails for the crossing nose splice joint and started assembling them during the week. I machined up one more tool to help and it is shown on the right here - a gauge for the wing rail gap machined out of aluminium alloy.

garden-X138.jpg

...and here it is in use, clamping the wing rail in the correct position while soldering. The tool of choice for soldering is a small gas blowlamp using the solder paste I mentioned earlier on in the thread.

However, building the two crossing noses did not go well and there was a fair bit of cursing and swearing during the week until I got the two in a reasonable state. The main problem was that I had introduced a twist into the rails to match the inclination of the rails in the chairs on the sleepers and that made lining up the running edges of the rails quite difficult. So after getting the two crossings complete, I set about and built a clamping system for the others which would be built, hopefully, a lot easier. :)

garden-X139.jpg
The stock rails and the two crossing noses of the crossover were laid out on the Templot printouts. This was really done to let me get my brain round the fiddling about I was going to have to do. The sleeper units are the gauge widened variety with a gauge of around 45.5mm and the Templot drawings are dead scale to 45mm. So I've decided to lay the sleepers on the centre lines at the switches with 0.25mm widening on each side, then bias the rails to make the stock rails on the main road 0.5mm wide of gauge with the crossings noses dead on the drawing. On the diverging routes, the stock rails will also be biased by 0.5mm at the crossing noses then will be biased back to exact 45mm gauge at the join between the turnouts. Well that's the theory. :)

garden-X140.jpg

The first crossing was laid to the varying gauges noted above but a slight alteration was made to make the widest 0.5mm gauge widening at the start of the crossing nose base rather than the crossing nose itself, then reducing the gauge widening to exact gauge at the end of the diverging road. You can see the 45mm gauge on the end of the diverging road.

garden-X141.jpg garden-X142.jpg garden-X144.jpg
The next job was to make an exact 45mm gauge sleeper necessary at the join between the turnouts and that was made from a 45.5mm gauge sleeper which was cut into two, then the cut ends filed until the gauge would be 45mm. Then a piece of the cut off sleeper spacing plastic was used to make a joint between the pieces and a 45mm gauge placed on rail bits in the chairs to ensure the correct gauge.

garden-X145.jpg
The the sleeper was put in place at the joint then the second crossing was started,

garden-X146.jpg
The diverging route sleepers were placed first and the diverging stock rail pushed through, and through the sleeper at the joint to meet the other crossing.

garden-X147.jpg
...then the other sleepers were placed on the main route and the main stock rail inserted.

garden-X148.jpg

I should now be saying that the last sleepers were now placed on the exit of the main road but I found that that wasn't possible and I had to fiddle the crossing nose assembly out of its situation to place these sleepers, then get it back in position again. It wasn't too easy but I'll know the order to do it next time round. :)

garden-X149.jpg

Then the remainder of the sleepers were laid down to the stock rail joins and it doesn't look too bad with all the fiddling about with the gauge widening. It could be a bit obvious at the crossing nose with the check rail gap being wider than 1.5mm, so the next job will be to fit the check rails and see how they look.

So far, the stock rails and the crossing noses have taken up about five yards of rail and I'll probably need at least another two yards for the closure rails and the switch blades. In fact it will probably be a bit more since the Caledonian used continuous check rails between crossings on a crossover. :)

Jim.
 

Attachments

  • garden-X143.jpg
    garden-X143.jpg
    78.5 KB · Views: 4

JimG

Western Thunderer
With the weather improving the garden calls again. :) The crossover shown in the previous message has been finished except for the point blades since I'm working on designing stretcher bars for them. The main task outstanding is to clear the last bit of the jungle at the back of the garden. My original intention was to finish tracklaying on the station boards before venturing onto the lawn to build the oval. But a chat with Richard (Dikitriki) at the Bristol O Gauge show this year convinced me to get the work on the oval finished sooner to get a continuous run.

garden-X150.jpg
This was the situation yesterday morning. The track will run just about where the bird table and bath stand and I'm intending to put an access path on the outside of the track as well. I also want to get at least one other trig point on the back wall to help laying out the track at this point.

garden-X151.jpg
...and a few hours later, there's a wall in there somewhere. :) The ivy was bad enough but the worst offender was a rambling rose which was trained round the metal frame on the right and it had run riot over the past six years. Some of its tendrils were about twenty feet long.

garden-X152.jpg
A shot from the other angle showing the buttress behind the tree on to which I will put a trig point. This had been completely hidden by ivy. I'm not sure about clearing all the ivy out of the tree branches and will probably leave it for a few months to die off before doing that. About half the pile of rubbish, mainly the rambling rose cuttings, was chopped up and packed into my green wheelie bin which will go off today. The rest is mostly ivy and I might try and burn that over the next week or so. It was a change from spiking track. :)

Jim.
 

JimG

Western Thunderer
The weather improved a bit and I got a bit more done over the weekend - all preparation work and no baseboard work. :)

garden-X153.jpg
A trig point was fitted on the central buttress on the wall - the short wooden stub with a screw on the top, centre left on the picture. When I measured up to this trig point from other established trig points I found that the wall was about 400mm nearer to the house than I had shown on my original survey. So I have re-drawn the garden details to reflect this and I have redrawn the layout in Templot to match. I want a clear metre of space between the baseboards and the wall to allow for an access path to the area between the layout and the wall.

I also had a look at the jungle of shrubbery around the silver birch trees to the right of the picture. I was intending just pruning the shrubbery back but on close inspection there was such a mass of twisted branches and dead wood that I opted to clear it all to stumps on the ground to re-grow in a controlled manner.

garden-X154.jpg
...and the situation afterwards with a clear site round the birches and another large pile of cuttings to get rid off again. :) This job would have been quite difficult if the baseboards had been in place.

garden-X155.jpg

The aforementioned access path has to pass between the wall and the layout at the west side of the garden and right in the way is the very large stump of a buddleia which was cut down last year. From previous experience of treating a eucalyptus stump with stump killer a few years ago, it took a year or two for it to rot down enough to clear it out. I didn't want this holdup so I've opted to attempt to dig around the stump and cut through the roots to get it out.

garden-X156.jpg

...and here was the state of play before rain stopped matters, with two large roots exposed so far. I think this might be a long job. :):):):):)

Jim.
 

JimG

Western Thunderer
time to get the mini-digger in I think Jim:eek::cool:

I regularly drive past a hire shop on the main road through the town which hires out small digging machines and I am often tempted. :) But my garden is completely surrounded by the brick wall featured in the pictures and the gates are under three foot wide, so I don't think I can get one thin enough to get through. I'll maybe pop along with a tape measure. :)

Jim.
 

JimG

Western Thunderer
Well, I didn't need a digger... :)

garden-X157.jpg

..with a bit of help from a length of 4 x 2 as a crowbar. :):) Luckily the roots were mainly radial so I was able to clear them round the stump and cut them with the saw. The rip saw against the wall was the best for the job and there's a section of one of the roots at the bottom of the picture. I was able to get at the last root under the stump by tipping the stump over to get the saw in.

I've now got to wait for a westerly wind before getting a fire going (got to keep on friendly terms with the neighbours :) ) to burn all the prunings of the last week or so to clear the place before starting to mark out the track positions.

Jim.
 
Last edited:

JimG

Western Thunderer
Well things are still progressing with the weather being quite kind down Bristol way. Moving on from the stump, the next action was to do something about the corner of the garden just beyond where the stump was.

garden-X158.jpg
The forsythia in the corner was cut right back and I'll probably cut it back further to get more growth lower down. The bits have been piled up around the plum tree awaiting burning. The bush against the wall nearer to camera was also trimmed right back to give enough clearance for a path and the track baseboard bewteen the wall and the plum tree.

I then had a good day yesterday with a westerly wind to burn off most of the cuttings I had made over the past month or so which meant that I could start preparing the ground for planning and setting up the baseboards through this part pof the garden.

garden-X159.jpg
The weather today was supposed to be poor in the afternoon, so a start was made on clearing out the undergrowth in the area. In the background you can see the clearance round the forsythia and in the left middle distance, a rowan tree that I haven't surveyed as yet. I think the planned track route will miss it but I'll double check with a survey over the weekend. :) In the centre foreground is a bush stump which is just about where a baseboard support is supposed to go, so out it has to come.

On the left of the picture is a bit of decking which was used as a base for the bird table. When I turned it over I found this...

garden-X160.jpg
...and if I magnify the centre you get this...

garden-X161.jpg
...Frog 1 at lower left, frog 2 at upper, centre left and frog 3 at upper right. I thinks that's all there were. :) I've had to go carefully when clearing the undergrowth. I found a toad when working around the forsythia and managed to persuade it under the bush next to the forsythia and out of harm's way. The frogs and toads are all but invisible in undergrowth and it's only movement which gives them away. I'm going to move the decking base to another position and re-create the frogs' hideaway and I've also created another hideaway under the forsythia using some flat stones.

garden-X162.jpg
Back to the stump - it was just a matter of digging around the stump with spade and trowel, exposing the roots and cutting them with the saw...

garden-X163.jpg
...and it was out at last. Then the rain came. :)

I've got some more bushes to take up to clear the way for the baseboards but they are around where the frogs' retreat is at present so re-siting that has to be the next job.

Jim.
 
Top