Another David Andrews Stanier 2-6-4T

Hello. In the summer of last year I placed an ad in the Guild 'wants' section for a Stanier or Fowler 2-6-4 tank from the David Andrews stable in the high hope that there was someone out there who had bagged one or the other back in 2016, when they were probably all snaffled within weeks of appearing on the market and had either got the wind up about building it or was having a clear out. As I half expected there was no response:(.
In desparation I rang David Andrews with the question "have you by any chance got a 2-6-4 tank lurking in the back of a cupboard anywhere", and the reply came back " yes, as it happens I've got a Stanier and your lucky, I was going to put on the list tonight" "I'LL HAVE IT", was my reply and it was on my bench the next day. How lucky was that:thumbs:

I started it in October and I now have a rolling chassis which has gone together very nicely and I have to say, with huge thanks to the hugely helpful threads by PAD and Roger Scanlon.

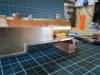
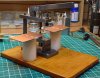
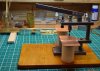
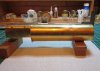
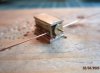
I have now put the chassis aside for a while and started on the body which is also going together very well, (DA does indeed produce very nice kits). The footplate is complete and looming in sight is the daunting task of punching out the hundreds of close rivets on the tank and bunker sides. I have a GW model rivet press and am using it without the micrometer slides. I have had a play with the 'practice' rivets and intend to use
the 2mm scale anvil provided for the close spaced rivets and this seems to be ok. It goes without saying, you only have one go at each rivet and any cock-ups will stick out like a carbuncle on a babys nose. So the question is,
does anyone have any hints, tips etc., on how to attack this job, if so I will be eternally greatful. I have noted that one of the aforementioned Western Thunderers hinted at a darkened room following rivetting sessions and I have a supply of Paracetamol to hand.

Wish me luck!

John Johnson
 

michael080

Western Thunderer
Morning John,

welcome at WT, the nicest forum in the world.

It's nice to see that I am not the only person that likes the David Andrews kits, I am currently building a S&DJR 7F from his stable and -- as you write-- it is going together very well.

The GW rivet press is a wonderful tool, I don't use the slides either, I think it is useful for the scratchbuilders, but not so much for the kitbuilders with pre-etched rivets.

My method for rivetting is "inverse". I don't put the part on the anvil and try to hit it with the tip. I actually hold the part and move it so that the half-etched rivet hole is caught by the tip and then actuate the lever, so that the tip with the part moves towards the anvil. Works nicely and so far I had no need for a Parcetamol or a dark room. :cool:

Forgot to say, WT wants pictures....

Cheers,
Michael
 

P A D

Western Thunderer
Hi John,
Welcome to the house of fun!

As to the use of the rivet press, I use the same technique as Michael. Bring the rivet to the punch the lower the lever. There's no need for the slider scale for half etch rivets so I also have left it off. I would have thought the 2mm set up would be too small and if I recall correctly, I used the 4mm one throughout. Perhaps Dikitriki could comment as he is also building the Stanier 4P.

Dibateg has highlighted one or two additional areas to watch out for so I suggest you work through his build write up. There has been a lot of correspondence regarding various details and Dave Holt has made some very useful comment. Watch out for the overhang at the front buffer beam which is too much. I missed that and although my model is not painted yet, correcting that will be a pig of a job. Get as much detail as you can on the various plates while in the flat, oil pots on tank front, and the stuff on the tank tops and bunker rear, plus the additional details on the inside of the rear cab bulkhead, if you are going to add them. Good luck with the build and as Michael said, WT is a picture book, so if you don't feel like writing much, just choose up to 15 images and hit the full image tab.

Michael, you are well down the queue of people who like David Andrew's kits. :p
Anyway, where's the pictures of the 7F, or have I missed it?

Cheers,
Peter
 
Last edited:

dibateg

Western Thunderer
Hello John -
you can follow my build on the Derby Line thread and try and avoid some of the mistakes I've made. PADs thread is well worth a read all the way through... I have done it multiple times...
I use GW rivet tool too, you don't need the sliders unless you are doing something from scratch - I just get a good play on Radio 4 going and work my way through the rivets. Its quite therapeutic...

Best Regards
Tony
 
Another David Andrews Stanier 2-6-4T
Hello again.
Being new to WT I'm not sure if I am hitting the correct buttons so I hope all who replied get this message.

Michael. Thanks for the tip. I tried it today with the test rivets. Works a treat! For anyone considering buying a GW press, its well worth the investment.

Peter. Thanks also for your advice on the press. I have pressed out a line of close spaced test rivets using this method and they look good but I will do some with the 4mm anvil and see how they go, they were a pigs ear when I tried them the 'old' way. I spotted the front overhang and began to doubt that I had the valances wrong but all was well. It must be about a scale 3 inches so I should be able to correct it before the whole thing becomes a big lump. I must have read all of your 4P thread half a dozen times and have taken on board adding details with parts in the flat. I have built a few locos over the years and have often invented new swear words fitting detail onto a mainly complete loco. I will read up on Dikitriki's thread and also Dibateg before I get to deep into the superstructure. I'm not very computer savvy unfortunately but I will post some pics when I have worked out how to do it!

Tony. Thanks, I'll visit your thread too. The more the merrier I think. Radio 4 sounds like a good idea!!

Cheers,

John J
 

adrian

Flying Squad
Being new to WT I'm not sure if I am hitting the correct buttons so I hope all who replied get this message.
We like to keep things simple here so you can't really go wrong. The message got through okay but if you have any queries then let me know and we'll do our best to help. I like to think we're fairly easy going so just go with the flow and don't worry about getting it wrong - we've all been there at some point so we will help where possible.
 

P A D

Western Thunderer
Hello again.
Being new to WT I'm not sure if I am hitting the correct buttons so I hope all who replied get this message.

Michael. Thanks for the tip. I tried it today with the test rivets. Works a treat! For anyone considering buying a GW press, its well worth the investment.

Peter. Thanks also for your advice on the press. I have pressed out a line of close spaced test rivets using this method and they look good but I will do some with the 4mm anvil and see how they go, they were a pigs ear when I tried them the 'old' way. I spotted the front overhang and began to doubt that I had the valances wrong but all was well. It must be about a scale 3 inches so I should be able to correct it before the whole thing becomes a big lump. I must have read all of your 4P thread half a dozen times and have taken on board adding details with parts in the flat. I have built a few locos over the years and have often invented new swear words fitting detail onto a mainly complete loco. I will read up on Dikitriki's thread and also Dibateg before I get to deep into the superstructure. I'm not very computer savvy unfortunately but I will post some pics when I have worked out how to do it!

Tony. Thanks, I'll visit your thread too. The more the merrier I think. Radio 4 sounds like a good idea!!

Cheers,

John J

John,
Sorry, I meant Dibateg (Tony) not Dikitriki. I don't think Dikitriki has done the 4P and in any case, he can't build for toffee! :)):)):))
Cheers,
Peter
 
Good morning all.
I must apologise for starting this thread way back in January when life was generally normal, and then going AWOL. In that post I was showing sme concern about punching out the rivets on the 2-6-4T tank sides etc and received some excellent tips on the use of the GW rivet press which I have followed and 'bobs your uncle ' the jobs done. The main reason for the time lapse is that I am rubbish with tech, although I can manage my electric toothbrush, and its taken a while to work out how to adjust the image size on the camera. If it works by steam, thats more my line.

I have had a GW rivet press for some time and have it set up in the usual way on a piece of wood but with the addition of a rest on either side on which to hold the work and give the wrist a little support. This has probably been thought of but just in case, here's some pictures, (I HOPE).

I think it's worked so here goes.......................
 

Attachments

  • DSC00235 (2).JPG
    DSC00235 (2).JPG
    220.4 KB · Views: 73
  • DSC00236 (2).JPG
    DSC00236 (2).JPG
    238.2 KB · Views: 70
Good Morning.
At long last here are some pictures. I don't intend to write detailed explanations as I have been following the excellent treads by PAD and Roger Scanlon very closely except if I do anything differently or have another problem to overcome. Whether the final product will be any near as good as the aforesaid, we'll have t see.

Here's the rolling chassis in basic form. I blackened the wheels on a spare axle hand turning in the lathe with neat Birchwood Casey. This has kept the fluid off the tyre treads. The bogie and pony are just placed for the pictures. The whitemetal front valve covers were oval so I've turned brass ones.

DSC00229 (2).JPG DSC00230 (2).JPG DSC00231 (2).JPG
 

adrian

Flying Squad
Thanks for the photos - it looks to be progressing nicely and that is one incredibly well organised workbench.

With respect to the technology - it's no problem and we're here to help. For the photos please feel free to insert them as "full image" - it makes it easier when people are viewing them to scan through them.
Screenshot 2020-04-18 at 09.45.51.png
 

P A D

Western Thunderer
Hi John,
It looks very excellent so far. Lovely clean work. I see you have added the correct springs and hangers to the pony truck, which make a big difference to the front end appearance. Keep the pictures coming, the more the merrier.
Cheers,
Peter
 
Good morning.

Adrian, Thanks for the tips on tech, I'll give it a go with the following and thanks also for your compliments regarding my workbench. It' not always like that I have to admit. I must have given it a tidy in case The Queen dropped by!

Peter, Thanks for your very kind remarks. Warren Shepherds springs are much better but I did'nt shorten the push rods as you did. I did'nt fancy drilling relocating holes in the spring and the bottom section. I've got spares so I may revisit the pony truck later to add the extra detail and deal with it then.

I have been visiting you superb build at every stage and following your advice. I am now working backwards from the cab to the bunker and all is fitting nicely so I'm hoping I don't have to split and file the front bunker bulkhead. In case I do, what is a scrawper? Can you buy one or is it a home made invention? The riveting turned out reasonably well with the GW so here's some pictures.

Cheers,

John J.IMG_2057 (2).JPG IMG_2056.JPG IMG_2058 (2).JPG IMG_2058 (2).JPG IMG_2059.JPG
 
Here's some more photos and an appeal for help.

As can be seen I have not used the lost wax buffers from the kit as they were not so good and with two of them, when the buffer heads were inserted in the stocks the oval head was almost 45 degrees. A square peg in the wrong hole eh. The ones I have fitted are very nice from Markits but the drawback is the absence of the step plates. I would be very grateful if anyone can recommend a suitable material to make them from bearing in mind that the base will have to be curved to fit. The spring access plate is probably quite easy.

Once the boiler was made up the mudhole door covers were fitted and they looked a bit lumpy so I started to file them down until I noticed the PAD had fitted some nice copper ones from Malcolm Mitchell. So off the lumpy ones came and here's the result.IMG_2061.JPG IMG_2061.JPG IMG_2065 (2).JPG
I also used the Laurie Griffin lamp irons which I think are much stronger. This is a superb kit to build but there are one or two casting that I am not too keen onbut more of that later.

Cheers, John J.
 

Attachments

  • IMG_2063 (2).JPG
    IMG_2063 (2).JPG
    150.7 KB · Views: 21

P A D

Western Thunderer
Thanks Dave,
Saved me a job.

John,
Neither Dibateg or Scanlon needed to cut the bulkhead, so I suspect it was something I miss aligned earlier that caused the problem. At the time I couldn't find a reason for the problem and in the end (wrongly) attributed it to the bulhead being too wide. Hopefully you won't need to do it.

As to the buffers, the cast ones took a fair bit of fettling to get them to work and be parallel. In the end I had to hold the "square" shank with a pair of pliers and carefully twist the heads with another pair. To add the footsteps you could try making them from plasticard and fixing them with epoxy. When the epoxy has cured, clean up the oozed resin to be flush with the edges of the plastic card.

Getting back to the scrawker, even if you don't need to cut the bulkhead, I would suggest it is a must have tool. Sooner or later you'll need to cut brass sheet and it's the best tool for the job. Mickoo did did an excellent write up on using one as highlighted by Biggles, sorry Daifly. :D

Excellent build , keep it coming.
Cheers,
Peter
 

adrian

Flying Squad
I would be very grateful if anyone can recommend a suitable material to make them from bearing in mind that the base will have to be curved to fit. The spring access plate is probably quite easy.

Do you mean like this? This was for my Ivatt 2. The step plate was made by cutting a thin strip of chequer plate and silver soldering it to a strip of nickel-silver (28thou?) to make it thicker. Then with a round file I filed the curve in the back to fit the buffer, You could tell when you got through to the chequer plate as you could see the line of solder as you filed through. I then soldered the plate to a plain brass bar so that I could file and shape the top. Once finished remove and solder to the buffer housing - hence why it's a lot easier if you can silver solder the 2 plates together in the first place and it won't fall to bits when doing the fettling.
buffer - 1.jpeg
 
Good Morning.

Dave, Thanks for enlightening me as to what a skrewker is. I bought one of these years ago but I can't find its so I have one on the way from OLFA.
Also for the link to Mickoo's post.

Adrian, Thanks for your method of manufacturing the step plates. I have all the kit for silver soldering but it looks like quite a bit of work. I may try the other suggested method from PAD. If not, it's out with the Easyflo and blow torch.

Peter, :( This is mystery as my Part No. 23B does'nt fit either. I also have retraced my footsteps and everything fits perfectly and square. I have tried pushing the bottom section of 23B into place from inside the bunker whilst it is still in the flat and it will go in but its a tight fit. I may try a thin shaving off both sides, a couple of thou or so and I think this may provide and interference fit but I'm not going to rush into it until the scrawker arrives. As a precaution I am going to mark out this part onto a piece of suitable brass!

Anyway, here's some more pics.

I obtained an 8 way Silvertown lubricator from LG and tried it for size. The base was beefed up to form something like a plinth and the pipework
fitted. The drawback was running the front 8 'pipes' between the smokebox saddle and the lubricator. Its a tight squeeze.IMG_2083 (2).JPG IMG_2086 (2).JPG IMG_2086 (2).JPG IMG_2091.JPGIMG_2093 (2).JPG IMG_2094.JPG
 

Attachments

  • IMG_2081 (2).JPG
    IMG_2081 (2).JPG
    82 KB · Views: 20
  • IMG_2083 (2).JPG
    IMG_2083 (2).JPG
    80.6 KB · Views: 19
  • IMG_2081 (2).JPG
    IMG_2081 (2).JPG
    82 KB · Views: 19
  • IMG_2092.JPG
    IMG_2092.JPG
    88.8 KB · Views: 20
GOOD morning all.

No matter how who's or how good a loco kit is, over the years I have found that some whitemetal fittings are the downfall and end up in the bin and my DA 2-6-4T also has a few wonky bits. Most notably is the chimney which is not round and in my humble opinion is about 1mm to short. Way back in my distant youth, we Merseyside, (sorry, South Lancashire spotters) called these engines Jubilee tanks, only because of the shape of the chimney. Laurie Griffin markets 3 lost wax cast chimneys for the Jubilee and I sent for one. The casting is superb and fits the 4P smokebox perfectly. The other non-round castings are the water scoop domes, which I will have to turn from brass bar.

Here's some pictures of the brass chimney placed on with the dome and clack covers. See what you think?IMG_2079.JPG IMG_2071.JPG IMG_2071.JPG IMG_2071.JPG IMG_2066 (2).JPG IMG_2066 (2).JPG IMG_2066 (2).JPG IMG_2066 (3).JPG
 

Attachments

  • IMG_2077.JPG
    IMG_2077.JPG
    119.2 KB · Views: 11

P A D

Western Thunderer
Hi John,
Interesting point about the chimney. I'll have to check mine when I can get back to my work bench after the lock down is over. The 4P is still not painted so removing and replacing the chimney will be easy to do. Can you tell me the LG product code for the chimney you bought please.

Many thanks,
Peter
 
Top