Dan's Workbench - D1031 Western Rifleman

Dan Randall

Western Thunderer
Some of you may be pleased to know there was further progress on ?Rifleman? today.

I have a list of almost 30 outstanding jobs and decided to tackle the fans today.
I?d cleaned up the castings some time ago, but hadn?t noticed this at the time?.
 

Attachments

  • SNV33153.JPG
    SNV33153.JPG
    166.6 KB · Views: 76
  • SNV33154.JPG
    SNV33154.JPG
    202.7 KB · Views: 77
  • SNV33155.JPG
    SNV33155.JPG
    195.4 KB · Views: 77
  • SNV33156.JPG
    SNV33156.JPG
    172 KB · Views: 81
  • SNV33157.JPG
    SNV33157.JPG
    168 KB · Views: 80
  • SNV33158.JPG
    SNV33158.JPG
    175.6 KB · Views: 79
  • SNV33159.JPG
    SNV33159.JPG
    173.5 KB · Views: 77
  • SNV33152.JPG
    SNV33152.JPG
    190.2 KB · Views: 79

Dan Randall

Western Thunderer
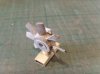
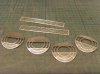
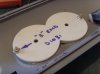
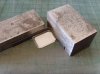
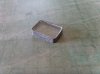
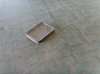
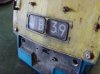
I?m not having rotating fans, but decided to make the resin fan bases removable, as I thought it might make painting a little easier, when the time comes.

There?s a tiny bit of slop when the bases are fitted to the apertures in the roof, so I positioned them as centrally as possible, then drilled a hole at each end, through the bases and into the roof?.
[attachment=7:1f6mypnt]SNV33162.JPG[/attachment:1f6mypnt]


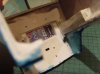
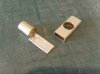
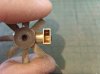
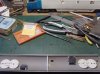
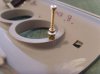
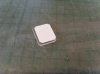
All holes in the bases and roof were enlarged, then bolts (with 2 spacer nuts, a washer and top nut), were screwed into the holes in the roof, until they bottomed out.  The bolts seemed to cut their own threads quite nicely, but I had visions of them stripping threads if they were screwed in and out too often, so it was on with the plan.  The nuts were all wound down the threads, until they too, could go no further and at this point, the top nuts were soldered to the washers beneath them?.
[attachment=6:1f6mypnt]SNV33163.JPG[/attachment:1f6mypnt]


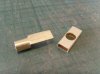
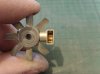
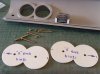
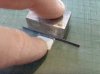
The excess bolts were snipped off and cleaned up with files and abrasive paper?.
[attachment=5:1f6mypnt]SNV33164.JPG[/attachment:1f6mypnt]


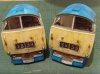
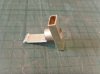
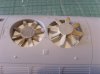
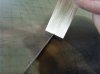
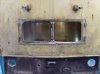
The cut down bolts were removed from the holes to allow a tiny drop of superglue to be placed in each hole, and then they were screwed back in.  All nuts were then removed, the fan bases were slid over the protruding bolts and secured with the top nuts/washers.
[attachment=4:1f6mypnt]SNV33166.JPG[/attachment:1f6mypnt]


All done?.
[attachment=3:1f6mypnt]SNV33168.JPG[/attachment:1f6mypnt]


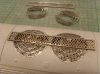
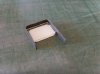
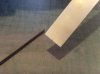
The next job was the etched fan grills and walkways?.
[attachment=2:1f6mypnt]SNV33169.JPG[/attachment:1f6mypnt]


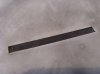
The walkways are made from two etches, whilst the fan grills are single etches?.
[attachment=1:1f6mypnt]SNV33171.JPG[/attachment:1f6mypnt]
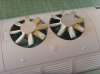
The fan grills were quite difficult to curve to the roof profile, but I got there in the end.  After chemically blackening (which wasn?t a major success), here?s what they look like?.
[attachment=0:1f6mypnt]SNV33172.JPG[/attachment:1f6mypnt]


I?m pleased with today?s progress and managed to cross two things off the list.  :thumbs:

More updates, as and when.  :D


Regards

Dan
 

Attachments

  • SNV33168.JPG
    SNV33168.JPG
    191.1 KB · Views: 73
  • SNV33172.JPG
    SNV33172.JPG
    172.4 KB · Views: 75
  • SNV33171.JPG
    SNV33171.JPG
    199.6 KB · Views: 74
  • SNV33169.JPG
    SNV33169.JPG
    194.9 KB · Views: 76
  • SNV33166.JPG
    SNV33166.JPG
    173.6 KB · Views: 74
  • SNV33164.JPG
    SNV33164.JPG
    175.8 KB · Views: 76
  • SNV33163.JPG
    SNV33163.JPG
    156.5 KB · Views: 74
  • SNV33162.JPG
    SNV33162.JPG
    199.8 KB · Views: 77

28ten

Guv'nor
Nice jig! I just used the calipers to mark 1mm of each blade and filed them :laugh: but then im a bodger at heart :laugh:
I have actually found the resin quite good for tapping, it seems to hold the threads pretty well, but im sure your method is better n the long run.
Its nice to see it with the grills in :thumbs: one of mine was bent in packing so I need to send it back. Im getting worried that you might finish it before mine :laugh:
 

Dan Randall

Western Thunderer
28ten said:
Nice jig! I just used the calipers to mark 1mm of each blade and filed them :laugh: but then im a bodger at heart :laugh:
I have actually found the resin quite good for tapping, it seems to hold the threads pretty well, but im sure your method is better n the long run.
Its nice to see it with the grills in :thumbs: one of mine was bent in packing so I need to send it back. Im getting worried that you might finish it before mine :laugh:

I don't think there's any chance of me finishing first, but as long as it's finished this year, I'll be happy. :thumbs:
The main thing that's holding me up is the crew figures. I was going to have a go at them today actually, but couldn't face it. Still, I'm happy with what I did achieve. :)

Regards

Dan
 

28ten

Guv'nor
Dan Randall said:
[quote=""28ten"":er93u4w4]Nice jig! I just used the calipers to mark 1mm of each blade and filed them :laugh: but then im a bodger at heart :laugh:
I have actually found the resin quite good for tapping, it seems to hold the threads pretty well, but im sure your method is better n the long run.
Its nice to see it with the grills in :thumbs: one of mine was bent in packing so I need to send it back. Im getting worried that you might finish it before mine :laugh:

I don't think there's any chance of me finishing first, but as long as it's finished this year, I'll be happy. :thumbs:
The main thing that's holding me up is the crew figures. I was going to have a go at them today actually, but couldn't face it. Still, I'm happy with what I did achieve. :)

Regards

Dan[/quote:er93u4w4]
Yes that is a problem isnt it. i drew a blank on the resin figures as the original sculptor has moved continent.
 

lancer1027

Western Thunderer
Exellent work Dan :thumbs: Nice to see some progress. I noticed from the roof section two black blocks at the exhaust ports, what are they ?
 

Phill Dyson

Western Thunderer
Jordan said:
[quote=""lancer1027"":1yt6nka6]Exellent work Dan :thumbs: Nice to see some progress. I noticed from the roof section two black blocks at the exhaust ports, what are they ?
I dunno exactly what they are, but my guess is we could be seeing some clag from this model...? :scratch: :drool: :bowdown:[/quote:1yt6nka6]
It's the sounds I'm waiting for :drool: :cool: :cool: :cool:
Phill :thumbs:
 

28ten

Guv'nor
Im fairly sure Dan has a smoke unit, but as Phill says it the sound I want to hear, as thats what will tip me towards DCC
 

Dikitriki

Flying Squad
28ten said:
Im fairly sure Dan has a smoke unit, but as Phill says it the sound I want to hear, as thats what will tip me towards DCC

Hi

Do you mean diesel sounds in general, or the Western in particular. If the latter, I can't help. If the former, we can rustle up sound-equipped 20, 24, 25, 37, 10001 and Hymek on Heyside, and you're welcome to pop up the road to play :)

I'm still not sold on steam sound yet, but diesel sound is great. We still have a lot of learning to do to refine the DCC functions, and we're still at the face-splitting grin stage :D

Richard
 

28ten

Guv'nor
Dikitriki said:
[quote=""28ten"":11vht6n7]Im fairly sure Dan has a smoke unit, but as Phill says it the sound I want to hear, as thats what will tip me towards DCC

Hi

Do you mean diesel sounds in general, or the Western in particular. If the latter, I can't help. If the former, we can rustle up sound-equipped 20, 24, 25, 37, 10001 and Hymek on Heyside, and you're welcome to pop up the road to play :)

I'm still not sold on steam sound yet, but diesel sound is great. We still have a lot of learning to do to refine the DCC functions, and we're still at the face-splitting grin stage :D

Richard[/quote:11vht6n7]
DCC has rather passed me by and its the sound that would swing it for me as I am never going to need a lot of the gizmos, so yes any sounds and seeing how it functions. I am sure that once I see the application I will be sold on it! Im guessing that you think it was worthwhile? :laugh:
 

Dan Randall

Western Thunderer
lancer1027 said:
Exellent work Dan :thumbs: Nice to see some progress. I noticed from the roof section two black blocks at the exhaust ports, what are they ?

Hi Rob - As Jordan has correctly deduced, The two black blocks are "smokeboxes" and will be fed via a manifold and two pieces of equal length tubing from a Peter Clark smoke unit.
It was documented on RMweb and Cynric has very kindly done something that enables us to view my previous postings:

http://www.westernthunder.co.uk/danthread/

You'll have to search for it, but the smoke unit part is about three quarters of the way down the page. :)

"Phill Dyson[color=#0000FF said:
It's the sounds I'm waiting for [/color]:drool: :cool: :cool: :cool:
Phill :thumbs:[/quote:kgn7hxo4]


[color=#0000FF:kgn7hxo4]Me too![/color] :thumbs:

Regards

Dan
 

Dan Randall

Western Thunderer
I managed a little more work on Rifleman today and concentrated my efforts on the headcode glazing and rubbers. I had some glazing material laser cut some time ago and planned to represent the rubbers by wrapping 15 thou black styrene around them. Having done one glazing unit, I tried it for size, but I couldn?t get it in because the styrene was too thick! I rummaged through my box of styrene, but could find no 10 thou. I thought this was a little odd, so I had a look in the Squires catalogue with a view to ordering some and discovered that 10 thou only seems to come in white!

Not wishing to get some more (smaller), laser cut glazing made, I devised a means of thinning down the 15 thou styrene. I simply cut a slot in a piece of 10 thou white, cut a piece of 15 thou to the size required for the rubber and dropped it in the slot?.
[attachment=7:gossd88b]SNV33186.JPG[/attachment:gossd88b]
After a few minutes rubbing it over with an abrasive stick, it was hopefully, pretty much the thickness I required.


For giving the front of the ?rubbers? a half-round profile, I drilled a 0.45mm hole in a piece of 12 thou fret waste, then removed metal until half the hole was left?.
[attachment=6:gossd88b]SNV33189.JPG[/attachment:gossd88b]
The half hole is then engaged on the edge of the strip and dragged along a few times to create the required profile?.
[attachment=5:gossd88b]SNV33190.JPG[/attachment:gossd88b]


To ensure that the rubbers are proud of the surface of the glazing, a 10 thou spacer is stuck on temporarily with canopy glue?.
[attachment=4:gossd88b]SNV33191.JPG[/attachment:gossd88b]


With the 10 thou spacer underneath, superglue is applied sparingly to one edge of the glazing and the rubber pressed hard against it?.
[attachment=3:gossd88b]SNV33192.JPG[/attachment:gossd88b]
The process is repeated for the remaining sides?.
[attachment=2:gossd88b]SNV33193.JPG[/attachment:gossd88b]
[attachment=1:gossd88b]SNV33194.JPG[/attachment:gossd88b]
[attachment=0:gossd88b]SNV33195.JPG[/attachment:gossd88b]
 

Attachments

  • SNV33192.JPG
    SNV33192.JPG
    185.4 KB · Views: 94
  • SNV33195.JPG
    SNV33195.JPG
    188.3 KB · Views: 94
  • SNV33194.JPG
    SNV33194.JPG
    189.3 KB · Views: 93
  • SNV33193.JPG
    SNV33193.JPG
    171.9 KB · Views: 94
  • SNV33191.JPG
    SNV33191.JPG
    193.6 KB · Views: 94
  • SNV33190.JPG
    SNV33190.JPG
    185.2 KB · Views: 96
  • SNV33189.JPG
    SNV33189.JPG
    168.2 KB · Views: 96
  • SNV33186.JPG
    SNV33186.JPG
    157.3 KB · Views: 97
  • SNV33194.JPG
    SNV33194.JPG
    189.3 KB · Views: 97
  • SNV33193.JPG
    SNV33193.JPG
    171.9 KB · Views: 96
  • SNV33192.JPG
    SNV33192.JPG
    185.4 KB · Views: 96
  • SNV33191.JPG
    SNV33191.JPG
    193.6 KB · Views: 96
  • SNV33190.JPG
    SNV33190.JPG
    185.2 KB · Views: 96
  • SNV33189.JPG
    SNV33189.JPG
    168.2 KB · Views: 96
  • SNV33186.JPG
    SNV33186.JPG
    157.3 KB · Views: 96
  • SNV33195.JPG
    SNV33195.JPG
    188.3 KB · Views: 97

Dan Randall

Western Thunderer
Excess material is removed from the back by placing a 15 thou spacer under the glazing, then rotating the back on some abrasive paper until it bottoms out on the spacer?.
[attachment=6:uog4s76k]SNV33196.JPG[/attachment:uog4s76k]
After cleaning-up, this is how it looks?.
[attachment=5:uog4s76k]SNV33197.JPG[/attachment:uog4s76k]


Installed in the headcode aperture?.
[attachment=4:uog4s76k]SNV33198.JPG[/attachment:uog4s76k]
[attachment=3:uog4s76k]SNV33199.JPG[/attachment:uog4s76k]


Both sides done and the headcode blinds temporarily installed?.
[attachment=2:uog4s76k]SNV33200.JPG[/attachment:uog4s76k]
[attachment=1:uog4s76k]SNV33201.JPG[/attachment:uog4s76k]
[attachment=0:uog4s76k]SNV33202.JPG[/attachment:uog4s76k]


The job took a whole lot longer than expected, but I?m pleased with the results. I?ll have to do the other cab another time, as I have a 03:14 start in the morning, so it?s bedtime soon!


Regards

Dan
 

Attachments

  • SNV33197.JPG
    SNV33197.JPG
    187.5 KB · Views: 92
  • SNV33202.JPG
    SNV33202.JPG
    216.6 KB · Views: 93
  • SNV33201.JPG
    SNV33201.JPG
    189.6 KB · Views: 92
  • SNV33200.JPG
    SNV33200.JPG
    169.8 KB · Views: 93
  • SNV33199.JPG
    SNV33199.JPG
    189.7 KB · Views: 91
  • SNV33198.JPG
    SNV33198.JPG
    197.2 KB · Views: 91
  • SNV33196.JPG
    SNV33196.JPG
    168.6 KB · Views: 93
  • SNV33201.JPG
    SNV33201.JPG
    189.6 KB · Views: 97
  • SNV33200.JPG
    SNV33200.JPG
    169.8 KB · Views: 97
  • SNV33199.JPG
    SNV33199.JPG
    189.7 KB · Views: 94
  • SNV33198.JPG
    SNV33198.JPG
    197.2 KB · Views: 94
  • SNV33197.JPG
    SNV33197.JPG
    187.5 KB · Views: 93
  • SNV33196.JPG
    SNV33196.JPG
    168.6 KB · Views: 93
  • SNV33202.JPG
    SNV33202.JPG
    216.6 KB · Views: 97

Dan Randall

Western Thunderer
Thanks chaps - shame I didn't notice the cat hairs on the headcode blinds before I took the pictures... :oops: Just as well they're not fitted for good just yet. :)

Cynric - I forgot to mention in the text, that even after thinning the black styrene to something approximating 10 thou, I still had to fiddle around a bit to get the glazing units/rubbers installed. This may have been due to a paint build up on the inside of the apertures, but a few gentle stokes with a file and an emery stick on the apertures and rubbers repectively, gave the snug fit I was after. :thumbs:


Regards

Dan
 

Dan Randall

Western Thunderer
Having been fired-up by my jaunt to the S7 bash at Wallingford yesterday, I managed a few hours on the Western in the evening. :)

All headcode glazing, rubbers and blinds are now fitted to both cabs, so that's three more things crossed off the list. :thumbs: Here are a few piccies....
[attachment=4:2aejkov6]SNV33225.JPG[/attachment:2aejkov6]
[attachment=3:2aejkov6]SNV33226.JPG[/attachment:2aejkov6]
[attachment=2:2aejkov6]SNV33227.JPG[/attachment:2aejkov6]
[attachment=1:2aejkov6]SNV33230.JPG[/attachment:2aejkov6]
[attachment=0:2aejkov6]SNV33231.JPG[/attachment:2aejkov6]

More progress reports, as and when. :)


Regards

Dan
 

Attachments

  • SNV33231.JPG
    SNV33231.JPG
    215.1 KB · Views: 100
  • SNV33230.JPG
    SNV33230.JPG
    200.6 KB · Views: 100
  • SNV33227.JPG
    SNV33227.JPG
    180.2 KB · Views: 101
  • SNV33226.JPG
    SNV33226.JPG
    191.2 KB · Views: 100
  • SNV33225.JPG
    SNV33225.JPG
    193.8 KB · Views: 101
  • SNV33231.JPG
    SNV33231.JPG
    215.1 KB · Views: 102
  • SNV33230.JPG
    SNV33230.JPG
    200.6 KB · Views: 102
  • SNV33227.JPG
    SNV33227.JPG
    180.2 KB · Views: 101
  • SNV33226.JPG
    SNV33226.JPG
    191.2 KB · Views: 102
  • SNV33225.JPG
    SNV33225.JPG
    193.8 KB · Views: 102

28ten

Guv'nor
That looks excellent :thumbs: I had been tinkering with the idea of hinge detail myself, I think I might just get away with making 3 indentations to represent the hinge bolts. looking at D1011 they are barely visible..... I do need to remove some of the scuff plates (or whatever they are) beneath the doors as several of them appear to have gone AWOL on pictures
 
Top