westernfan
Western Thunderer
loads more detail than my springside kettle 
 Mind you, coming back to it fresh i can see a few more little details that need adding around the bogies, and I noticed that one of the sandbox covers is missing on one end, which is something i need to follow up with other pictures.....
I prefer this kit to the Slaters, but I have ended using a lot of Slaters fittings as they are better quality. If i need half a dozen I would do my own etch as it would be more economical.Scale7JB said:I was very happy with how my Slaters version went together, but I want to have a go at the Connoisseur version, and also the NE brakevan without the Verandahs too... I like brakevans!
Mine will have working brakes on DCC when I get round to it...
JB.
Dan and I are both using TurboCad - much cheaper than AutoCad! I'm working on some tutorials, but at this rate we will need a Western Thunder computer day !Scale7JB said:If you did your own etch, I'm sure I and more than a few other people would have some off of you...
That reminds me, I need to work out how to use Autocad for producing etch artwork, for my quintart ( http://lower-edmonton.anidea.co.uk/imag ... i/p33t.jpg ) that I want to build...!! Would you would be willing to provide a very brief tutorial on here next time you draw something up ?
JB.
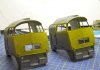
Its just the first coat of Railmatch acrylic yellow, but what a difference.I have been pleased with the acrylic paint it does cover quite well. The JLTRT kit does capture the cab really well, and the first bit of colour makes such a difference.Simon said:That looks to be a pretty good "intensity" for yellow, especially after just one coat.
Your picture is a very good advert for the kit you are building and shows just what a good clean design the Western was")
 . The acrylic does cover well. Are you giving it the heavy weathered look ?
28ten said:Medium weathering I think, most of the photos I have show fairly reasonable condition.and I don't have the skill for a heavy finish.
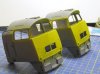
Looks very nice so far Guv, although the photo of the cab ends could be the 1970s back of Swindon works! :lol: 28ten said:Big moment today, I got some paint on the ends
I will give a second coat tomorrow evening, which hopefully will give the colour sufficient density. then I can paint the window surrounds and glaze the cab