7mm MOK BR Standard 4MT Tank

P A D

Western Thunderer
No problem Steph.
It was me that started the diversion. I'll post some pics of other sets in the gallery.

I paid 10 quid for the beam compass post free on eBay. The seller suggested it would be useful to cut up the alumium beams for modelling purposes! Philistine :mad:
Cheers,
Peter
 
Last edited:

P A D

Western Thunderer
So back to the build at last. I've added the support brackets either side of the balance pipe and all looks OK.

20180625_220645.jpg
20180625_220729.jpg
And the chequer plates to the footsteps at the cab and bunker.
20180626_200825.jpg
20180626_200856.jpg
The cast inspection plates under the tanks are also now in place.
20180626_201050.jpg
Here's a couple of views of the support brackets and balance pipes.
20180626_201627.jpg

And the other side.
20180626_201710.jpg
Some filling and smoothing needed in one or two areas but I'm getting there.

Here's a view of the left hand front after I fitted the overlay and footstep.20180627_113326.jpg

I have removed the strengthening piece from between the cab front and rear as it is no longer needed, and rolled the roof and fitted the ventilator covers.
20180627_115110.jpg
There are a number of parts still to be fitted from above, and then the roof can be soldered in place. The floor and back plate are fitted from below, which was the same with the DJB kit.

In this side view with the roof on, it's looking less like a Barry rust bucket.

20180627_113451.jpg
Cheers,
Peter
 

P A D

Western Thunderer
Tonight I made a start on adding the boiler detail. Here are the rear washout plugs after soldering in place. The plug casting have a flange at the end that needs to be filed flush. Before on the left and after filing on the right.
20180627_200137.jpg

The regulator castings have also been fitted as has the etched detail overlay.
20180627_200012.jpg

Here is the boiler with all six washout plugs added, plus the front and rear boiler bands. I also made a start on preparing the smoke box door casting.
20180627_200045.jpg

Here is is just pushed into the smoke box. I will fit all the details in the flat before finally fixing it in place.
20180627_195855.jpg
There's some pitting on the ring at the top left that will need filling to make good.

I'll get the chimney and dome on next and then it will really start to look like a 4MT tank. As usual I have been flitting about to suit myself, but that is the way I like to do it.
20180627_195748.jpg

Cheers,
Peter
 

P A D

Western Thunderer
So as planned, I've got the chimney and dome on, along with the remaining boiler bands, clack valves and feed pipes. As with the Finney A3, the chimney and dome were a perfect fit on the smoke box and boiler, though the MOK ones have the edge, being brass.
20180628_215811.jpg

From looking at a photo of 80002 that I took at Oxenhope, the feed pipes drop vertically and then disappear under the boiler. No doubt they then run back towards the rear, but I just soldered them out of sight underneath.
20180628_215840.jpg

I have also scribed the cladding joint at the top of the boiler and added small brass rivets to represent the retaining screws. I've seen the overlap to the left and the right on two different preserved examples, so I chose to have it to the right.
20180628_215555.jpg

Here are the various sub section so far.
20180628_195004.jpg

And back together.
20180628_215733.jpg

Cheers,
Peter
 

P A D

Western Thunderer
Many thanks Peter.

Yes it really is a superb kit and an absolute joy to build. Normally kits like these and Finney would be outside my budget, but having savoured the delights of the Finney A3 picked up on eBay, I decided to sell some of my earlier models built from Acorn Kits, to finance a move "up market". I wish you luck and trust that one of these will cross your bench at some time.
Cheers,
Peter
 

P A D

Western Thunderer
Next the rear buffer beam and strengthening webs. These are made up from four separate etchings, that are slotted into the right angle between the frames and buffer beam. Here are the left hand parts slotted in place before soldering. The right hand parts are below.
20180629_200531.jpg

The brackets are soldered via the tabs and slots inside the frames and through the buffer beam. The internal tabs have been snipped off and will be ground back with a dental burr later. The ones through the beam are simply twisted off and filed flat. This is the right hand side.
20180629_200252.jpg

And the left.
20180629_200334.jpg

Here, the rear lamp irons and bunker retaing brackets have been added. I put the lamp irons on first and then discovered that the upwards face of the brackets would not fit between the running plate and and the lamp bracket base. The bunker brackets were filed to reduce their height, but I suppose, it could be done the other way around, fixing them first and filing the lamp bracket bases. I overlooked to fill the superfluous holes between the footsteps so will do that later. The buffer beam overlay, strengthening piece for the coupling hole and the rivet strip were added with the chassis screwed to the body to ensure a snug fit under the running plate. The buffer beam overlay went on first, was tacked then the body removed and soldered all round. The body was then replaced and the procedure repeated for the rivet strip under the running plate. The coupling hole overlay was lined up and held with a coffee stirrer and then soldered.
20180629_191507.jpg

And finally , the lamp bracket and hand rail were fixed to the smoke box door. The holes for each were drilled using the drill stand, to ensure they were vertical.
20180629_190702.jpg

Cheers,
Peter
 

P A D

Western Thunderer
Eh up Dave,
You don't hear the word "Riding" very much any more. I grew up in Bradford in the West Riding, but now it's West Yorkshire. Gone are the days!

I should have filled the SR lamp bracket holes in the flat, or at least before I cleaned up after adding the other details. I think I should be able to wedge a small square of shim brass behind the hole and quickly place a small blob of solder on the outside. Then more rubbing down and cleaning up which is a shame as it looks nice and bonny now .
Cheers ,
Peter
 

Rob Pulham

Western Thunderer
Eh up Dave,
You don't hear the word "Riding" very much any more. I grew up in Bradford in the West Riding, but now it's West Yorkshire.

Ayeup, Peter, which bit of Bradford? I too am a Bradford lad. I grew up in Allerton, moved to Bingley for a couple of years before returning to Thornton for quite some time and subsequently moving to Wakefield almost 19 years ago.
 

P A D

Western Thunderer
Hi Rob,
I lived in Little Horton, about 10 mins walk from Park Avenue football ground. Before my time the GN line from Exchange Station to Queensbury ran right past the stadium and there was a station (Horton Park). At Queensbury Station which was in a triangle, the line went to Halifax in one direction and Keighley in the other, passing through Thornton. As far as I know, the viaduct at Thornton is still there, along with one or two others along the route.

The goods depot at City road remained open long after Horton Park and the line to Queensbury closed and I remember steam locos hauling coal along the line. The line to City Road left the Queensbury line at Horton junction just before Horton Park. Happy days.

Queensbury would be a facinating subject for a model.

Cheers,
Peter
 

parky

Western Thunderer
Last time I went to Simmonites Land Rover the viaduct was there at Thornton

I seem to remember seeing an OO gauge layout of Queensbury at an exhibition. It covered quite an area being triangular as per the prototype
 

Rob Pulham

Western Thunderer
Hi Rob,
I lived in Little Horton, about 10 mins walk from Park Avenue football ground. Before my time the GN line from Exchange Station to Queensbury ran right past the stadium and there was a station (Horton Park). At Queensbury Station which was in a triangle, the line went to Halifax in one direction and Keighley in the other, passing through Thornton. As far as I know, the viaduct at Thornton is still there, along with one or two others along the route.

The goods depot at City road remained open long after Horton Park and the line to Queensbury closed and I remember steam locos hauling coal along the line. The line to City Road left the Queensbury line at Horton junction just before Horton Park. Happy days.

Queensbury would be a facinating subject for a model.

Cheers,
Peter

Hi Peter,

Yes the viaduct is still there and it has recently been opened as a walking/cycle route - my son's front room looks out on to it.

I had considered the Queensbury triangle as a possible layout a few years ago but never did anything with it. While I lived in Thornton I also roamed around a bit but there isn't much left to indicate that there was a railway at the Queensbury side of Thornton. One of the platforms for Thornton station was still in existence in the middle school grounds not far from the viaduct and I doubt that anything will have changed since.

My family were farmers in Thornton for many generations before my grandfather sold the farm not long after my dad had done his national service. Not far from the farm house was one of the tunnels leading to Denholme and my dad told me that the local used to use it as a shortcut home after a night out in Denholme - presumably there wasn't much night traffic...
 

Yorkshire Dave

Western Thunderer
Towards Keighley, Cullingworth Viaduct is still extant as is the old GN tunnel mouth before the line turns from Keighley to Cullingworth. The track bed here is the now Damems caravan park.

I've found winter is the best time to look for any remaining earthworks as there is no vegetation. My grandfather was a Bradford man and I'll trawl through the photos I've inherited to see what I can find.

Apologies for the diversion.
 

P A D

Western Thunderer
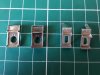
Moving back to the build, there is a rather nicely designed base for the smoke box number plate. Here are the two parts before soldering together.20180703_085106.jpg

And after soldering. The folding lugs on the base are shaped to take into account the curve of the door. Clever stuff.20180703_223832.jpg

And in place on the door.
20180703_223806.jpg

And back in the smoke box.
20180703_224041.jpg

Now back to the chassis starting with the brackets for the brake hangers. Here they are after fitting and after marking the position of the holes for mounting the sand boxes between the middle and rear wheels.
20180703_082946.jpg

Here are the hangers, yolks and plastic brake shoes during preparation. A length of rod is soldered into the hole in the hanger, then the halves of the shoes are mated over the rod and glue together with super glue. The excess rod is then snipped and dressed back.
20180703_152018.jpg

Ready for fitting.
20180703_153915.jpg

And after fitting to the hanger brackets. The sand box has also been fitted after drilling the holes marked out earlier.
20180704_135616.jpg

And after fitting the yolks and pull rods.
20180704_135749.jpg

A view from the side.
20180704_142641.jpg

Next the cab steps. Here's one after soldering, with the five parts for the other laid out.
20180706_191707.jpg

And the same for the rear steps.
20180706_191737.jpg

All four ready for fitting.
20180706_191629.jpg

The cab steps after fitting to the balance pipe casting. 20180706_191410.jpg

Cheers,
Peter
 

Attachments

  • 20180706_191629.jpg
    20180706_191629.jpg
    140.7 KB · Views: 5
Top