4mm Morfa - The race is run.

Scale7JB

Western Thunderer
Morfa - An Introduction.

Hi Neil..

Looking fantastic as ever... :thumbs:

Just one thing... had you thought about filling the 'boxes' with foam, or something similar to stop any echoing and resonance from the boxes while trains are running for a quieter more serene experience ? It is the Cambrian coast afterall.. :laugh:

JB.
 

28ten

Guv'nor
Morfa - An Introduction.

I like the first shot, the curve gives real depth of field :thumbs: which is an essential ingredient in getting the look and feel
 

Neil

Western Thunderer
Morfa - An Introduction.

alcors1 said:
.... I love those 24's, ..

You'll like this then, assuming you haven't stumbled across it already.

Scale7JB said:
.... had you thought about filling the 'boxes' with foam, or something similar to stop any echoing and resonance from the boxes while trains are running for a quieter more serene experience ?  ....

Now that's an interesting idea; I'd not noticed if the working part of Morfa was noisy or not so I fired my toys up earlier this afternoon to check. The 24's emit a low rumble that's not unpleasant, rolling stock also rumbles and clicks over the rail joints. Though there's none of the Sulzer splutter, the pitch is sort of ball park-ish, preferable I think to dead silence ,as real trains do roar and rumble. If I want the tranquil pauses between trains I can open the playroom windows, and get birdsong and a gentle noises of the river.

28ten said:
I like the first shot, the curve gives real depth of field  ....

Thank you, I'm rather taken with this short stretch of line, it's a pair of 3'6" radius reverse curves joined by about a foot of straight. It's the only fully visible reverse curve on the line (one other will be partially hidden by a copse and rock outcrop on the other side of the layout) but I do like the shape it gives to a train.
 

Neil

Western Thunderer
Morfa - An Introduction.

Well the red warning box at the top of the page tells me that this topic has not been posted in for at least 120 days, so it's high time I did.

As some may have guessed Steve (Cook) came for a couple days during the week. It's always fun to show others what I've done, but it's hugely motivating too. Shuttling trains up and down the track that is complete just makes me want to finish the circuit. I'll be spending more time with the plastic chairs and ply sleepers shortly. However there's an extra bit of woodwork to do; Steve realised that there was a pinched section of board just by the bridge between Morfa and the Barmouth approach. Twenty minutes of persuasion and a cup of tea later I was  firmly convinced that he was right so a scenic bump will be added to the outside of the curve. Here's a very roughly altered sketch showing how the addition should look.


Attachments

  • morfa board extension.bmp
    735.1 KB · Views: 141

Alan

Western Thunderer
Morfa - An Introduction.

After watching this elsewhere I'm pleased that it is progressing. Can't wait to see further progress.
 

Neil

Western Thunderer
Morfa - An Introduction.

Despite a snot factor of 9.5, my EM mojo has been running high since Cookies visit. A further half yard of track has been completed and later this afternoon I'll be braving the cold to assemble yet another 'fishbone' track panel ready to plonk down on the board.

Here's the current head of nickel,


Attachments

  • mail train.jpg
    349 KB · Views: 14
  • playroom temp.jpg
    188 KB · Views: 15
Last edited:

Geoff

Western Thunderer
Morfa - An Introduction.

Good to see things are moving along again Neil, I think we will have to send Cookie down more often.
I rather like the plan of the viaduct and sweeping curves which will look brilliant as one of your 24's leans into them.  Will the estuary be modelled at low tide with plenty of sand or should I say mud banks or are you taking the easy option ?

Cheers,
Geoff
 

Steve Cook

Flying Squad
Morfa - An Introduction.

Geoff said:
Good to see things are moving along again Neil, I think we will have to send Cookie down more often.
Thats Ok with me  :D

Good to see progress again Neil, must be getting close to Barmouth bridge / trestle now.... :thumbs:

Steve
 

iploffy

OC Blue Brigade
Morfa - An Introduction.

I am really impressed with the shot of the rear of the train I will  look forward to this being completed 24's and DMU's in a rural setting, Nice.
 

Simon

Flying Squad
Morfa - An Introduction.

I too can vouch for the motivating effects of a Cookie visitation 8)

That end of train shot is just great, I look forward to more Morfa!

Simon
 

Neil

Western Thunderer
Morfa - An Introduction.

Alan said:
After watching this elsewhere I'm pleased that it is progressing. Can't wait to see further progress.

I've just spent a happy half hour reading through the Morfa thread on the old version of RMweb. I'd almost forgotten how happy a process it was to share the small steps I made with the layout. I'll try and pick up the rythym again here.
 

Neil

Western Thunderer
Morfa - Back on track.

Looking back through the old RMweb thread has been most instructive, as I've learned that I started out with the notion of completing the track fairly quickly using pcb points and plain flexitrack. However part way through the design  ::) and build process I'd decided to up my game and try ply and plastic chairs. I've also learned that some of the techniques I now use have evolved a little from when I started. It might be useful to show how track is built and laid these days.

Because of the fragility of the track before it's fastened to the baseboard, I come as close as I'm going to get to the 'just in time' principle adopted by industry and commerce. Because I'm starting with a part built layout, i've picked up the process part way through the build and lay. By the end all should be clear even if it seems a bit disjointed at first.


Attachments

  • morfa track second rail.jpg
    595.6 KB · Views: 21
  • morfa track marking out template.jpg
    517.2 KB · Views: 10
  • morfa track timber jig.jpg
    748.7 KB · Views: 12
  • morfa track fettling rail.jpg
    morfa track fettling rail.jpg
    52.2 KB · Views: 37
  • morfa track threading chairs.jpg
    583 KB · Views: 9
  • morfa track positioning chairs.jpg
    morfa track positioning chairs.jpg
    39.6 KB · Views: 34
  • morfa track assembling half track.jpg
    559.9 KB · Views: 13
  • morfa track triming to length.jpg
    486 KB · Views: 68

Neil

Western Thunderer
Morfa - Back on track.

More from sausage fingers.

morfatrackflex.jpg


By now the fishbone half track is ready to come out of the jig. I've found that the only viable way of doing this is to flex it gently and let the half track find its own way out. You might notice that one of the sleepers has been left behind here, it's not too dificult to re fix any errant bits of wood, though great care has to be taken not to b@lls up what is a delicate assembly.

morfatrackfishplate.jpg


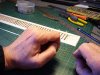
It's also time to prepare the fishplate. I now use the Peco Z gauge fishplates, which come with tags at either side. Like the N gauge plates they need crimping up to grip the rail properly, but being shorter they dont require trimming to length. I break off the tag at one side, bend one fishplate down at 90 degrees and squeeze with pliers. The tagging appears to protect against overtightening though I have a piece of rail filed to a sharp point I can jam down the fishplate to open things up if I've applied too much beef.

morfatrackpencilmark.jpg


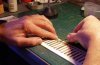
The fishplate is applied to the track built and stuck down. Usually all is well, but sometimes like this evening, I'm forced to deploy intemperate language. Ever so gently the half track is temporarily fitted in place and the position of the last sleeper marked on the trackbed. I note that when I first started laying half track I kept the sleeper spacing  using a thin line of masking tape. I don't do this now as proving one works carefully it is possible to manipulate the track without messing up the spacing.
 

Neil

Western Thunderer
Morfa - Back on track.

It's now the moment of high suspense where there's no go around procedure and one is fully committed.

morfatrackgluesquiggle.jpg


In the RMweb thread a couple of years ago, Simon (Dunks) asked if I could show how I stuck the track down. At the time I bottled as it all looked a bit too risky to manage a dificult technique and take snaps. Having a bit more track under my belt I thought I might manage.  I'm afraid some of the photos are technically pants, but there's not much time to faff about with lights. Here's how much glue gets applied ....

morfatrackgluebrushedou.jpg


.... and here's how it looks once brushed out. I try to get an even layer but am happy to get rid of the worst of the ridges.

morfatrackballasttamp.jpg


The half track is laid as quickly and carefully as I can before lots of ballast is tipped over and tamped.

morfatrackweighondown.jpg


I find that the PVA grips the sleepers rather well when pressure is applied, but offcuts of timber and weights make sure everything is held down and in place. The bulldog clip helps with alignment, stopping the threepenny bit effect.
 
S

Simon Dunkley

Guest
Morfa - Back on track.

Neil said:
In the RMweb thread a couple of years ago, Simon (Dunks) asked if I could show how I stuck the track down. At the time I bottled as it all looked a bit too risky to manage a dificult technique and take snaps. Having a bit more track under my belt I thought I might manage.  I'm afraid some of the photos are technically pants, but there's not much time to faff about with lights. Here's how much glue gets applied ....

morfatrackgluebrushedou.jpg


.... and here's how it looks once brushed out. I try to get an even layer but am happy to get rid of the worst of the ridges.
Aw, shucks, you remembered. (Don't spoil it by saying you noticed it when reviewing the old thread!)

Well, I now know where I went wrong when I tried this approach: too much glue. Acts more like a lubricant if you have too much...
 

Neil

Western Thunderer
Morfa - Back on track.

Simon Dunkley said:
Aw, shucks, you remembered. (Don't spoil it by saying you noticed it when reviewing the old thread!) ...

OK, I'll only half spoil it. I remembered the question, but not who asked it.
 

Neil

Western Thunderer
Morfa - Back on track.

Intrude away Jordan, I'm very partial to rumpled track.

The photos were taken using the camera's built in timer; line the shot up, press the button and strike the pose. I went a bit far with this photo ....

index.php


.... where I had to hold the lamp in my teeth. Not doing that again.
 
S

Simon Dunkley

Guest
Morfa - Back on track.

Neil said:
OK, I'll only half spoil it. I remembered the question, but not who asked it.
Pleased that you remembered at all.
 

Neil

Western Thunderer
Morfa - Back on track.

Just done some sums. To date I've made and laid seventeen half yards of track. Each half yard has 48 chairs on each side, that's 96 for both sides which multiplied by 17 gives a total number of chairs used as 1632 (not including points). Because of moulding failures and dexterity failures the grand total will be greater than this. Checking with the C&L website 500 chairs cost ?15.50 thats 3.1p per chair. So far I've used ?50.59 worth of chairs. There is some way still to go.

Good job I didnt do the sums before I started; I might have put myself off.
 
Top