PRMRP TEA 100 Ton Bogie Oil Tanker

richard carr

Western Thunderer
I purchased this TEA wagon at Kettering in March and thought it was time I built something in brass, something I haven't done for a while.

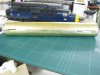
Here it is out of the box

IMG_0681.JPG

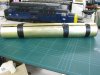
There is one main etched sheet from which Ihave removed one of the chassis ends and some very long etches that make up the brass channel for the chassis and the angle to support the tank.

IMG_0685.JPG

There is a bag of quite nice castings for the tank ens, the bogies and the brake equipment

IMG_0686.JPG

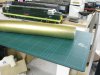
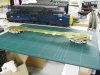
The tank comes as a pre rolled sheet of brass.

Now the interesting bit, there are extensive instructions, you can see them all here in the next photo.

IMG_0683.JPG

Thats it one page of instructions and on the previous page in very small print a note to tell you to cut the brass channel to a length of 397mm and the angle to 374mm. Not a lot tog go on.

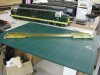
The first part to deal with is the chassis ends, here it is in the flat

IMG_0687.JPG

It took a good hour to work out how it folds up and thank goodness for Paul Bartletts wagon photos I would have struggled without them.

The first thing is to fold up the top deck above the buffer beam like so.

IMG_0688.JPG

The next part is to fold the buffer beam up and then back on itself into the half etched recesses in the beam itself.

IMG_0690.JPG

The buffer beam folder up

IMG_0692.JPG

Then back on itself you also need to fold the outer edges of the solebar out the way for now.

IMG_0693.JPG

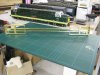
This is how it looks from above
 

richard carr

Western Thunderer
Thats the difficult bit to work out, the rest is relatively straight forward.

The tabs that you can see now fold up at 90 degrees, unfortunately the quality of the etchings on this piece are poor, a few half fold lines haven't appeared and a few of the centre tabs where there should be an etch all the way through are either half etched or not etched at all, it was necessary to get the piecing saw out to fix this.

So this is how the rest folds up.

IMG_0694.JPG

We also have the other parts for the solebar, these fold up as follows :-

IMG_0696.JPG

View attachment 20173

These sides are then solder on the sides of the chassis using the small square tabs to line them up to form the chassis units as below.

IMG_0698.JPG

You then need to fold up the long brass channel sections this is a little tricky as my longest folding device is too short to do it one go so I used my 8 inch hold and fold to graduallly fold it to channel. This then slides inside the the middle of the chassis units and can be soldered in place. BEFORE you do this though remember to solder in place a nut for the bogie screw, I used a 4BA nut as the hole is quite large.

Here's the main body of the chassis.

IMG_0704.JPG

IMG_0703.JPG


IMG_0705.JPG

I have also been working on the tank, but I'm not sure which is the best way to put this together at the moment.
 

tomstaf

Western Thunderer
Hi Richard,

I've never seen this kit built up so I'll watch with interest. You've done a good set of step-by-steps. I think this kit is an old RJH one - possibly one of DJP's originally? Will you be painting it in that nice BP green?

Cheers

Tom
 

richard carr

Western Thunderer
Tom

The etches say its a 1986 post war prototypes kit which I believe is our good friend DJP, the etches certainly has his mark on them they way fold and the way the half etch lines only just let you get a 90 degree fold.

Not sure about the green, I will have to see if I can find a picture of one from 1981, I only remember them in filthy black.

Richard
 

hrmspaul

Western Thunderer
Although I am not in the market, as you mention my photographs, it would be useful to know what this is a kit of. It would appear to be a Metro Cammell - as it doesn't have a continous solebar - Is it a class A or B for example? Do the instructions give a number range? I probably have posted the photos I have of them, but it is worth checking. I have largely given up posting tank wagons as there is so little interest in them.

You are correct about the livery, very boring in 1981, sometimes the original striped livery may remain but this was the period before the attractive late 80s liveries were introduced.

Paul Bartlett
 

Steph Dale

Western Thunderer
Richard,
Do you know which series or batch this kit represents? I'd be interested to know the leading dimensions to see what vehicles they are...
Anyway, I'm another who's watching with great interest as I can't recall seeing a build before.
Cheers,
Steph
 

djparkins

Western Thunderer
Tom

The etches say its a 1986 post war prototypes kit which I believe is our good friend DJP, the etches certainly has his mark on them they way fold and the way the half etch lines only just let you get a 90 degree fold.

Not sure about the green, I will have to see if I can find a picture of one from 1981, I only remember them in filthy black.

Richard

This kit is a Class A wagon photographed by me in detail in Preston Docks on 25th December 1984 [no one about!] - and was in light grey livery with red solebars each end. Operated by Total. That is all I recall from nearly 30 years ago. I passed the photos [black and white] & negs to RJH when I sold the range in 1988 - where they are now, well!

The kit was £25.50 when we released it in August 1986 & still holds up better that the others around as far as the etchings are concerned. Keep this in mind. The kit has NEVER been upgraded - only down-graded!

Do not expect the cast parts to fit, as by now these will be from 2 nd or 3rd generation sub-masters thanks to RJH. When I owned the kit the castings were done by ABS from the original masters which RJH 'lost' - still I got paid and there my concern endeth.

The fold lines are the same thickness as the brass which provides an automatic 'stop' at 90 degrees, as intended.

DJP
 

hrmspaul

Western Thunderer
Dear David and Richard

From the photographs and info from David it sounds like one of the BRT class A wagons. They were hired to quite a lot of different companies. There will have been design differences, but those which lack the through solebars in http://paulbartlett.zenfolio.com/brtbogietankhttp://paulbartlett.zenfolio.com/brtbogietank2 are all possibilities, depending on the details of fillers, ladders, walkways etc.

Total did order and own quite a lot of bogie wagons from 1979 onwards. Initially the French CFMF built ones - but they have an unusual tank support and later from Standard which have continous solebars. So not these http://paulbartlett.zenfolio.com/totalclassatea
 

Steph Dale

Western Thunderer
David, Paul,
Many thanks for that info. I can see I'll be getting a few of these for the Murco oil train to be hauled by (one of) my MMP Class 60(s).
Great stuff, it's for these sorts of reasons I'm on this forum.
I'll be watching the build with even more interest now...!
Steph
 

richard carr

Western Thunderer
I managed to do a bit more yesterday and some this morning.

These are the angled parts of the sole bar


IMG_0706.JPG

They solder onto the main channel the fit is ok but not perfect but nothing a bit of filler won't hide. I have forgotten to photograph this but will add it later.

Next we have the various brake fitting supports

IMG_0707.JPG

All fold up easy enough

IMG_0708.JPG


These are the brake casting and the oil outlet pipes. The air reservoir is a very odd oval shape, I can't believe it was really this shape so I have made a new one. The cast pipes also appear far too thick about a scale 3 inches.

IMG_0711.JPG

As I plan to build a number of these wagons I would like to get this cast, does anyone know someone who could do this for me in white metal.

Richard
 

djparkins

Western Thunderer
These are the brake casting and the oil outlet pipes. The air reservoir is a very odd oval shape, I can't believe it was really this shape so I have made a new one. The cast pipes also appear far too thick about a scale 3 inches.

View attachment 20250

As I plan to build a number of these wagons I would like to get this cast, does anyone know someone who could do this for me in white metal.

Richard

Richard,

See my posting above [don't know if you read it!] -

I saw these tanks being cast at RJH at around 3 times the correct clamp pressure - thats why they are oval. None of these castings resemble fully the original masters and from your photos exhibit signs of what I would call 'panic gating' with more & larger feeds & links being cut into the moulds to get items to cast - what you have will be from 2nd or third generation sub masters as I saidein my previous posting.

The air tanks were originally cast without any pipework and with shallow locations in each end.

I would not bother with castings but get Graham at GJH Plant to turn you some tanks in brass and add the pipwork from wire. He will do small quatities like 10 or 12 I believe. It will cost you less that having a mould made & they'll be perfect.

Regards,

DJP
 

richard carr

Western Thunderer
David

Thank you for the suggestion about GJH plant i will give him a call.

Paul thanks for the references to the tank wagon photos they have helped, you may have noticed that I even bought some !

Progress continues. The next major task is the tank. The first attempt went a bit wrong, the brass sheet that forms the tank is a bit over length but not by the same amount at each end. The first attempt ended up too tight in the middle so this time I cut off the offending extra bit and decided to use some annealed brass bits to hold it together. To help get it all in place I temporarily held it together with tape

These are the first attempts you can see the brass is too wide.

IMG_0700.JPG

I then started soldering it.

IMG_0702.JPG

Here's the second attempt

Just held together by tape
IMG_0713.JPG

IMG_0716.JPG

Now solder together. The join will be hidden between the solebars.

The next task is the bogies. Oh dear not a good start as the bogie cross beam is 44mm wide, thats about 6mm too wide so the first task is to cut 3mm off each end with a piercing saw. The bogies have 2 white metal side frames which are quite nice castings, you need to drill out the bearing holes 2.6mm for slaters bearings be careful yo could easily drill right through the casting, fortunately I managed to avoid that. The I just glued mine together with super glue tp get the followig.

IMG_0717.JPG

Its starting to look like a wagon. Ther are some brake castings to fit at each end of the bogie unfortunately these are about 2mm too short and don't fit scale 7 wheels, so there will be a bit of work to make these fit.
 

Attachments

  • IMG_0701.JPG
    IMG_0701.JPG
    969.2 KB · Views: 14
  • IMG_0703.JPG
    IMG_0703.JPG
    1 MB · Views: 15
  • IMG_0704.JPG
    IMG_0704.JPG
    1 MB · Views: 16
  • IMG_0714.JPG
    IMG_0714.JPG
    986.9 KB · Views: 16
  • IMG_0715.JPG
    IMG_0715.JPG
    950.4 KB · Views: 16
  • IMG_0718.JPG
    IMG_0718.JPG
    1,018.1 KB · Views: 18

tomstaf

Western Thunderer
Hi Richard,

This is looking like an relatively trouble free build apart form the tank section. What diameter is it?

Cheers

Tom
 

richard carr

Western Thunderer
Tom

It measures 59mm but I have no idea what the diameter should be.

The second attempt wasn't too bad as I was beginning to think of using 6mm tube


Richard
 

tomstaf

Western Thunderer
Richard,

Steph said exactly what I was thinking. Seeing as you said you're planning on doing a few the tube option may well be easier/quicker and rounder.

Cheers

Tom
 

richard carr

Western Thunderer
Tom/Steph

The plan is to build 10 of these provided they aren't too difficult, and to be honest they are not. I will probably etch a new part for the bogies to incorporate a rocking axle and some angle to fix the brakes. The ladders are a bit of work so I might see if Laurie will sell me 20 of his TTA ladders they look the same.

Richard
 
Top