Spitfire's G3 Workbench

Spitfire2865

Western Thunderer
Well busy day off.
A little work today on the tender fitting alignment pegs to the tank to locate into the frame and fitting the battery compartments to the floor.
But surprisingly I received two packages today.
First was the wheel castings.
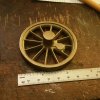
20180916_214746-1.jpg
I had 5 made up as each cost me $25.

But my other order which arrived was the lasercut wood! At a labour cost of $29, I cant complain.
And first thing I did was build the cab
20180916_214634-1.jpg
Still a bit of checking to do before I glue all the walls together. May just want to wait until I get further on the loco.

And I glued the wooden pilot together
20180916_214602-1.jpg
Will still require some carefully placed nails to make it completely solid.

Its been a productice weekend.
 

Spitfire2865

Western Thunderer
Well, been a little slow past couple days.
And slower still for the next week on account of being a few hundred miles away.
But tonight I did a bit of work on the wooden pilot.
20180919_211549-1.jpg
Staves nailed to the pilot beam. Technicaly should be lag screws, but I dont think Im finding any this small, so nails will do.
20180919_211500-1.jpg
And the brace underneath going from the tip of the pilot to the underside of the beam. Cut it a little too short and didnt want to cut another to length I added a small triangle of wood to the front to secure the end to. A couple holes and some .5mm wire stuck through and twisted together should do the trick. Once covered in paint it shouldnt be too noticable.

The pulling bar is a challenge though, as I want it functional but cant really check swing clearances without drivers in place, and I wont have drivers for probably some months now.

Oh well. If I get halted by the lacking wheels, Ill begin on another project, perhaps the boxcars as I should soon be getting some American G3 wheelsets! Apparently someone had a large number of them made a while back before the market moved to F scale. Certainly a LOT cheaper than getting Slaters axles and Walsall machined wheels.
 

Spitfire2865

Western Thunderer
Oh whoops.
I guess I forgot to post anything for a couple weeks.
Well progress has been slow.
Did a little cockpit scratchbuilding in 1/72nd, painted the tender tank a basecoat of black, smooth and filled the boiler prints and am planning to do final coats this weekend...
And a new project, a 1/24th scale tugboat as shared on the G3 forum.
So Ive traced some of the frame components into AutoCAD as I like to cheat and would like to have it all lasercut. I hate cutting sheets by hand.
tugboat 10,3,18.png

But I also did some real modelling. I made the rowboat from the same drawings.
20181003_190539.jpg


But Im still doing trains of course.
Sent off the metal drawings for quote for the boxcar. I also have the lasercut parts drawn up and ready to order as well as the 3D parts.
 

Spitfire2865

Western Thunderer
Well I have now spent a whole 35, American, freedom loving, non-gold backing, more a bother to carry than theyre worth, social worth defining, I paid 15 more for shipping to my house, Dollars on a load of balsa wood in the ever diminishing hopes of bashing it all together into the vague shape of an R/C tugboat.
.
.
.
.
.
.
.
.
.
.
.
.
More to follow!

(I hope you all can appreciate the humor. I think this will make an interesting diversion from the massive project that is the American locomotive.)
 

Spitfire2865

Western Thunderer
Well a rather relaxing weekend, but more importantly, a start on ANOTHER project, but this time a little smaller and more appropriate.
Earlier today I made a trip out to a fabric store to browse their selection of cotton fabrics because I want to finally make up a wagon tarpaulin or two.
So with 3 types of pure cotton fabric, Ive made a start of a prototype, sewn by hand.
20181007_194458-1.jpg
This one is a light, off-white.
In theory, I should be able to dye it and natural wear should weather it to a grey.
I also have some tiny brass grommets coming from ebay which Ill have to hammer into location.

Hopefully next one I can use a sewing machine if the old one still works and I can teach myself.

And to tie it all down Ive bought some miniature rope from SirenShipModelCompany.com
20181007_194836-1.jpg
Just then have to figure out how to make the ferrule on the ropes.
Anyone have a source on how long the ropes were?
 

Overseer

Western Thunderer
Bob Essery wrote a useful article titled 'Sheets, Ropes and Sacks' in Midland Record Number 3 (1995). I haven't found a reference to the length of the tie down cords but they look like they were usually 2' to 2'6" long. The cords were quite small diameter, probably 3/8" or less. There are details of the knots to be used for securing the coords, for rings it was a round turn with a looped half hitch so they could be undone easily. Ropes were another thing altogether, used for securing loads in open wagons, and were standardised at 2 1/2" diameter. The tarpaulins, called sheets by the railways, were treated with a mixture of boiled linseed oil and lamp black. Applied in 5 or 6 coats when hand applied, then hung to dry for 6 to 8 weeks before being stencilled and issued for use. Later, the process was mechanised by the use of roller dipping machines. The sheets would usually be fairly glossy and black when in use. By the time they were grey they were probably not waterproof and were sent back to the works for repair and redressing.
 

Spitfire2865

Western Thunderer
Been a productive weekend.
20181014_220350-1.jpg 20181014_220410.jpg 20181014_220402.jpg

As a diversion from the plans, Ive gone for 1mm maple sheeting for the hull with planking in the correct direction. Will have to fill and sand smooth still so youll never see it was planked, but Ill know.
I have also finally almost used up the stock of 7x1mm wood from 2016 that was cut by mistake when I was building my L&Y D3 van.

Ive also gone and bought some RC gear to hopefully fit. Not sure how well itll work, but..
I honestly know almost nothing about proper RC, so Im learning as I go on the sorta cheap. (Hopefully) All the RC bits for the boat minus battery (which Ill try to use my usual rechargable AA cells) for less than $100 shipped.
 

Spitfire2865

Western Thunderer
Im quite the modelling butterfly.
Boat work continues with the completion of the hull planking and a heavy coat of oil/enamel paint on the inside for waterproofing left to dry for however long it takes.
So with a couple hours left of the evening I decided to start on some trucks I won on ebay.
20181017_220119-1.jpg
A couple 'G gauge' trucks from a long defunct company. Quite the nice find.
At 1/22.5 they scale to about a 49" wheelbase, which while small can be justified for early periods. Especially with outer hung brakes.
But more importantly those wheelsets I bought do fit, both in journal size and tread.
20181017_220126.jpg
Obviously to get from 45mm to 64mm gauge I have to make my own bolsters.
A start at a representation of wooden bolster archbar trucks. Ill have to add the truss rods and drill a central hole for the bolster plate and kingpin.

20181017_220137.jpg
IMO the first looks pretty good so far. But what to do with the 45mm wheelsets? Ebay for a couple bucks?


While the narrow gauge bug is rearing its head again in the past few days, meter gauge isnt in my interest. Perhaps some Gn9 on a very micro layout is in my future?
 

Spitfire2865

Western Thunderer
I have the 3D prints ordered for the boxcar trucks I designed, and Im thinking this will be my last Shapeways order for at least a long while. Not happy with their changes.
But I also received some 1/8" lasercut ply for the framework, so Ive built up the ends with what little superglue I had left. Need to get more.
20181021_141404.jpg

And the lasercut steel parts arrived, so I now have two wrought iron link and pin couplers. Ive stuffed them with wood as I made a slight mistake during ordering and didnt give myself quite enough parts to do it as I wanted and the link needs a backstop so it doesnt slide too far into the coupler.

Im happy I was able to actually peen the coupler face onto the shafts rather than soldering. You may just be able to see the square flattened projections on the face. I do enjoy doing things prototypically when I can. 20181024_194224.jpg

And of course the coupler works as proper drawgear which is sprung in both compression and tension.

Should have the milled wood in the next 2 weeks. Just as the prototype, there will be almost no metal in the entire thing. Wheels, truck frames, truss rods, drawgear, and the minimum of strapping.
 

Spitfire2865

Western Thunderer
More glue ordered and on the way, but with the very last scrapes from inside the bottle, I was able to build one side of the Bastard Howe truss frame and get one inner end planked.
20181028_012148-1.jpg

Slow progress on the tugboat as well as Im still waiting for the RC parts, but I did make the cabin/wheelhouse and gave it all a coat of black oil paint to seal it before I plank it with coffee stirrers.
 

simond

Western Thunderer
I bought a rain machine for work some years back. You may know that things may have “IP” (ingress protection) ratings to show they’re waterproof. It was to test that.

The delivery address was near Krakow in Poland, and the supplier was in Portugal, near Lisbon. An easy, if long, truck ride.

When it didn’t turn up, I made enquiries and discovered that they had a Brazilian subsidiary, and they had actually built it near Rio. For reasons best known to their carriers, it got lost in Narita. We’ve no idea where else it went.

It finally arrived, damaged. Was “repaired” by their Portuguese engineering manager, and three days later, electrocuted my lab tech. Happily only a bit. Despite having the legal capabilities of a large multinational behind me, we decided not to fight, and simply scrapped it. I bought another one in Croatia, which worked perfectly, and didn’t injure my staff.

The Portuguese company didn’t get very good ratings on trip adviser after that...

Best
Simon
 
Top