A nervous first timer uses parts of a Wills U class to hopefully make a reasonable U

Duncan Chandler

Active Member
Hello

I wanted to share my build of 31618 with you, which has been ongoing for quite a time, but have hung back as posting on forums can feel like there is pressure to move things on at a pace like many on here. Work, family and anxiety can make getting on with modelling difficult as its often safer just to look at photos.

Anyway, my friend wanted 31618 as she was running in June 1961 ( that date is important as her tender was changed for a period of time after this from photos)

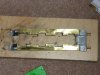
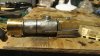
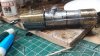
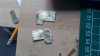
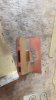
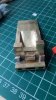
Having junked the tender this is what I was left with
index.php


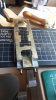
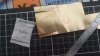
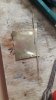
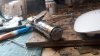
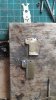
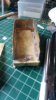
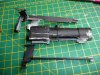
I did not like the cab so set out to make a replacement in brass
index.php


index.php


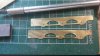
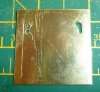
My preferred method is to either get and size a drawing or as I this case do a drawing myself, once done I then use spray mount and attach onto , (in this case) 10 thou brass. It was then fretted out and filed to shape.

index.php

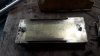
I will post more on how the footplate was next improved, well the honest truth is that having removed the cab the footplate, being from 1961 was looking very brittle so needed some work.

All the best Duncan
 

Attachments

  • P1000573 (2).JPG
    P1000573 (2).JPG
    512.9 KB · Views: 359
  • P1000574 (2).JPG
    P1000574 (2).JPG
    408.6 KB · Views: 354
  • P1000576 (2).JPG
    P1000576 (2).JPG
    492.8 KB · Views: 344
  • P1010253 (2).JPG
    P1010253 (2).JPG
    18 KB · Views: 342

Steph Dale

Western Thunderer
That's a great start, Duncan; you don't have the easiest raw materials to work with!

What are you doing for a chassis with this one, and which tender are you going for?

Steph
 

SLNCR57

Active Member
It’s not just me then! Anxiety gets in the way of modelling a lot....if you’re like me it can take a fair bit of talking to oneself to persuade me that cutting metal will not inexorably lead to disaster....nice work so far btw!
 

jonte

Western Thunderer
Hi Duncan and welcome.

You don’t mention whether it’s your first kit build or first time posting her - or even a bit of both ;)

In either case you’ve come to the right place. I’m taking my first nascent steps in kit-building and decided from the off to publish as not only is there a wealth of expertise here, but equally a willingness to share. I may be nearer the start of the build than the end, but I doubt I’d have been able to take those first tentative steps without the benefit of knowledge and generosity of spirit. Each time I (regularly) get stuck, there’s quickly a willingness to impart and problem solved.

And I wouldn’t worry about an expectation of a build at pace, as WT is one of the most laid back forums you will come across - if you dip sample one or two, you’ll be surprised at the longevity of the thread ;)

In my own case, I rarely find a generous window or two, and as I’m all or nothing, there tends to be a hiatus of some time between threads, so you won’t be alone.

I’m sure everyone’s eager to see the U.

Don’t be bashful.

Good luck

Jonte
 

Scanlon

Western Thunderer
Go for it Duncan, your fellow modelers will provide you with lots of help and constructive criticism, I know from experience!

According to the record card the final tender fitted to 31618 was number 1892, a 3500 gallon variant. This is the tender she was/is preserved with. Look at 1618 - Derek Hayward for a selection of photos including the tender.

Roger
 

Martin Shaw

Western Thunderer
Absolutely agree with all the sentiments, I've been pootling around with this stuff for the thick end of fifty years or more, it gets easier but I still have doubts and as others have commented there is a great deal of help and goodwill here, all power to your elbow. I can remember 1618's first time in steam at the Bluebell yonks ago, I will be interested to see how you progress.
Best wishes
Martin
 

Duncan Chandler

Active Member
Hi Steph, for the chassis is one of the excellent Finecast chassis. I did scratch build a tender but then could not find the axleboxes anywhere so found a Falcon Brass one to act as a method for probably scratch building (more of which later)

Cheers Jonte, I've built quite a few other kits but everything really stopped about 13 years ago and is only now really getting going.

Cheers Roger on the tender. The photos of the tender are perfect, I wish I'd not seen the one of the cab as its different to 31806, which I had photographed when it visited the SVR a few years ago. Ah well a few changes and you will never notice.

So on with the engine. As mentioned the 1961 footplate was a bit brittle, also there was no lip at the edge of the footplate so a piece of 10thou brass was cut out and glued having been clamped.

At the same time I the footplating at the from between the frames needed improving with the rivet detail and access hatch.

index.php


At the moment the openings are not finished. As you will see there is a small gap at the front where the measurements were out so that will have to be corrected. At the cab a piece of 10 thou was also cut and fashioned which includes a new dragbeam.

The boiler was next which to me looked wrong, it was missing the washout plugs at the front of the boiler and the detail on the firebox was limited.
A new smokebox wrapper has been cut, riveted using my GW models press and fitted.

The wrapper for the firebox was harder. Using thin paper a pattern was taken as can be seen below, the new washout plug holes were already drilled in preparation.
index.php

This was then drawn out on 5 thou brass, rivets added, this time using my rivet dropper tool. The cleats for the bands were made in 5 thou strip brass and were soldered only in the middle. The washout plugs were also drilled.
index.php

Finally it was fitted to the firebox. Next time I would use shim rather than 5 thou for ease of fitting.
index.php

Finally the new washout plugs were added (from the Alan Gibson range) the new boiler bands are from tape cut and fitted. I've now decided that the lack of the bottom of the boiler is going to have to be dealt with.

All the best for now

Duncan
 

Attachments

  • P1010252 (2).JPG
    P1010252 (2).JPG
    399.5 KB · Views: 11
  • 20200531_070233.jpg
    20200531_070233.jpg
    77 KB · Views: 256
  • 20200529_164808.jpg
    20200529_164808.jpg
    126.6 KB · Views: 254
  • 20200529_173334.jpg
    20200529_173334.jpg
    113.1 KB · Views: 242
  • 20200531_222133.jpg
    20200531_222133.jpg
    203 KB · Views: 243
I have too have been considering the differences between the cab layouts of 31618 and 31806 and can only conclude that some of this may be attributed to 31618 being an original build U whereas 31806 is a rebuilt K Class River tank.
Added to that, changes made during their working lives and in preservation may also contribute to differences.

31618 cab layout for reference sourced from the net. Photographer(s) unknown.
F966F767-F717-42C3-943E-A6A2207F5679.jpeg

3C902C82-7E28-46A4-8B34-F0609BC7E5C8.jpeg

31806 cab layout for reference from the net. Photographer(s) unknown.
D461D059-7FDF-4F7C-A3F8-2C444ED3E9C1.jpeg

IMG_4078.JPG

If these images breech copyright, moderators please remove.
Roger
 
Last edited:

AJC

Western Thunderer
An interesting project (a U is a long-term aspiration - Yeovil didn't have Ns, you see and Town shed would be the likely provider of power for my fictional Ilchester branch(es); realistically my ambitions should be limited to another pannier or an M7, but... and oh, I've realised that in the period I'm interested in most were rebuilt Rivers. Sigh). As for axleboxes, ABS used to do some - a very slim chance of getting hold of a set (but they were excellent), the Mainly Trains tender chassis used to come with some nice lost wax examples, but apparently no longer: MT253: Maunsell SR Tender Chassis Kit - Wizard Models Limited.

It would be worth looking at the RT Models Albert Goodall range: 4mm scale Albert Goodall West Country/Battle of Britain detailing parts. So far as I can see, they're a standard SR item (no. 4AGB0TA).

Hope that helps?

Adam
 
Last edited:

Duncan Chandler

Active Member
Thanks Roger, I had already started making the inside of the cab so the link by Roger S and your photos saved me before going too far. The photos from both of you are really helpful.

The Mainly trains etch under wizard is set up for the brakes as the were in later days. They do have etched shoes in the kit, but sadly not axleboxes, which oddly are not available easily in 4mm, although PDK will do sets by request. The frames are nice as they can be backdated for either a D1, E1 or L by using the Brassmasters C tender improvements etch, of which more at some later date.

There are a pair of N's acquired cheaply but in need of considerable TLC to come soon.

So with the wrappers on a start was made on the pipework, which has taken longer than expected. The feed pipe and clacks were built from a brassmasters turned clack set and square washers. The ejector pipe just took time in getting to sit right and the handrail was again just time. The smokebox door also got attention and an updated version , rather than the 1961 casting. Next up will be the tender which will be an interesting challenge. Before moving onto the frames, which are needed to set the splashers, boiler and final details.

index.php

index.php
 

Attachments

  • 20200611_130100.jpg
    20200611_130100.jpg
    186.8 KB · Views: 189
  • 20200611_130036.jpg
    20200611_130036.jpg
    154.2 KB · Views: 185

Duncan Chandler

Active Member
I decided before doing the chassis to get the smoke deflectors made and then move onto the tender before girding my loins for the chassis.
First up the smoke deflectors. A pattern was drawn, cut and pasted to 10 thou brass. Which can been seen in the previous photo part built
index.php

They were then cut out and holes drilled with the GE rivet press used for the rivets on the outside. A smaller strip was then prepared for the riveted strip on the inside of the smoke deflectors
index.php

Finally beading was added using 24 gauge half round brass wire which was soldered on, my first time using this and It worked ok. Finally the handrails were added
index.php

They still need a bit more cleaning up.

Next up the tender
 

Attachments

  • P1010739.JPG
    P1010739.JPG
    115.4 KB · Views: 156
  • 20200608_082915.jpg
    20200608_082915.jpg
    160 KB · Views: 153
  • 20200614_171818.jpg
    20200614_171818.jpg
    133.1 KB · Views: 151

Duncan Chandler

Active Member
I've put the engine to one side for now and decided to put the tender together. Originally one was scratch built, but the fittings were not available so that has been put to one side.

I bought a Falcon Brass 3500 gallon tender . You will note parts missing like the sides of the coal Shute, front side support on the platform, the frames are the wrong shape at the front and the inside tender frames were not even worth looking at and were thrown away!

What stuck me was how thin the etchings were. Much thinner than on an Ivatt 2-6-0 that was built some years ago.
index.php

For ease building started with the steps on the valences
index.php

Next the front was folded up, You will note how basic it is with lots of detail missing ant not in the kit, so that will have to be sorted.
index.php

The frames were marked up with my scriber and then cut out with the fret saw to make corrections.
index.php

And eventually after a lot of careful soldering to not distort the etchings the sides of the tender were put together. I noticed it was not strong enough to support the top so added a cross brace to support the top
index.php

Finally the tabs which were supposed to help but did not match up and using scrap brass as locators it was soldered in place at the sides and back. Next the top and front.
index.php
 

Attachments

  • 20200530_141723.jpg
    20200530_141723.jpg
    73.2 KB · Views: 114
  • 20200531_064924(0).jpg
    20200531_064924(0).jpg
    85.3 KB · Views: 113
  • 20200530_133024.jpg
    20200530_133024.jpg
    91.1 KB · Views: 110
  • 20200601_092106.jpg
    20200601_092106.jpg
    185.7 KB · Views: 110
  • 20200605_194521.jpg
    20200605_194521.jpg
    88.2 KB · Views: 7
  • 20200605_194534.jpg
    20200605_194534.jpg
    70.8 KB · Views: 106
  • 20200606_125216.jpg
    20200606_125216.jpg
    167.8 KB · Views: 108

oldravendale

Western Thunderer
You are a brave man, Duncan. You must really enjoy salvaging stuff! (Maybe there's a story there you could share?)

Good luck.

Brian
 

Duncan Chandler

Active Member
You are a brave man, Duncan. You must really enjoy salvaging stuff! (Maybe there's a story there you could share?)

Good luck.

Brian
I certainly do like getting something out of nothing, possibly from my student days a long time ago when money was very tight. Somehow doing it yourself, may take a lot longer than buying off a shelf, but it really is very satisfying.

So with the guides in place on the tender the body could be added
index.php

sorry for the dodgy photo. Now the front needed improving and the sandboxes building from scrap etch.
index.php

I realise they are not perfect match. The door on the shovel plate has been added. Still to go are the water valves and tops on the sandboxes.

I have now also made a start on the frames and the rods of which more in my next post

Stay safe
Duncan
 

Attachments

  • 20200607_103000.jpg
    20200607_103000.jpg
    60 KB · Views: 63
  • 20200607_102944.jpg
    20200607_102944.jpg
    98.4 KB · Views: 63
Top