You are using an out of date browser. It may not display this or other websites correctly.
You should upgrade or use an alternative browser.
You should upgrade or use an alternative browser.
A new Gauge 3 garden railway
- Thread starter Mike W
- Start date

Mike W
Western Thunderer
Time passes by so slowly ..... am embarrassed to see that it is 12 months since I last posted on this. No, the track is not complete but about 30% of the raised part is in place at ground level. Two more sections are on order so that the other end of the oval can be aligned and then I'll know how long the closing section needs to be. Then its just (ha ha!) a matter of marking out and bolting the legs in place, so the sections can be re-erected at the right height. Local laser cutters seem to be busy just now, so I just wait for the stainless sections.
Attachments
Jon Nazareth
Western Thunderer
Nice to see this update as I was wondering how you were getting on with this project, Mike.
Jon
Jon
Mike W
Western Thunderer
A few things got in the way of the railway - like a large tree and a wedding - so thought I should post some pictures of stock which is ready to run when it is done. Starting with the first G3 wagon I ever made. Started over Christmas 2002 and finished in 2003.
and a second version of the same kit.

and a second version of the same kit.


")
Mike W
Western Thunderer
In those days, before Gauge 3 really began its resurgence, we had to make (almost) everything. Axleboxes, buffers, couplings. Only the wheels were bought in as Slaters had made then exclusively for GRS a year or so earlier. In fact they were so new that some G3 Society members were suspicious of them, not helped by the curious GRS description of the scale a "G64" when "Gauge 3" had been in use for over 100 years.
Tim Hughes (Meteor Models) helped a lot with the initial design and even made some patterns, whilst Adrian Swain also made a couple and offered to do the w/m castings. I think he assumed we would only ever sell a dozen or so kits!


The initial plan was a dozen of each type and that was all. But then I remember a conversation with a prominent G3 stalwart and Thunderer which went something like:
HIM: why are they all LNWR?
ME: are there other railways(!) what do you want?
HIM: what about a GNR van?
ME: OK.
HIM: I wasn't serious!
ME: I was.
And so, a few months later we started learning about other railways, of which more later ....
Mike
Tim Hughes (Meteor Models) helped a lot with the initial design and even made some patterns, whilst Adrian Swain also made a couple and offered to do the w/m castings. I think he assumed we would only ever sell a dozen or so kits!
The initial plan was a dozen of each type and that was all. But then I remember a conversation with a prominent G3 stalwart and Thunderer which went something like:
HIM: why are they all LNWR?
ME: are there other railways(!) what do you want?
HIM: what about a GNR van?
ME: OK.
HIM: I wasn't serious!
ME: I was.
And so, a few months later we started learning about other railways, of which more later ....
Mike
geoff_nicholls
Western Thunderer
well I'm about to order a dozen sets of your smaller LNWR axleboxes with matching springs, just for my own projects, so things have certainly moved on. I would never have considered migrating to G3 without the stuff produced by GRS. And I'd still be struggling with their rather basic castings if it weren't for Williams Models. It is a lovely scale where you can see the detail without needing a magnifying glass. Witness the typical LNWR square nuts on the cattle wagon. But it's down to you that I'm lugging round a loco weighing 5 Kilos. Though it is a rather nice loco, if I say it myself.I think he assumed we would only ever sell a dozen or so kits!
Mike W
Western Thunderer
Thank you Geoff. This is what came out of the discussion over GNR vans. Here's the body pattern with a photo of the real one that I used as reference


This time they were mainly coachbolts which are easy! And this time a different W iron arrangement to make a running sub-unit including the V hanger making it easier to get them in the exact right place.
And of course another set f new axleboxes, buffers etc.

Mike
This time they were mainly coachbolts which are easy! And this time a different W iron arrangement to make a running sub-unit including the V hanger making it easier to get them in the exact right place.
And of course another set f new axleboxes, buffers etc.
Mike


midnightmiller
Active Member
I abandoned the stainless steel baseboard design, mainly because the fabricators were unable to make it without distortion from the heat of welding. At least, they were unable to do so without increasing the thickness and therefore weight and cost too. So, this is plan B which seems to work much better.
Laser cut stainless steel strips with holes for crossbars. By varying the pitch of the holes in front and rear fascias the assembly takes up a curve. So, not being clever enough to calculate said pitch mathematically, I drew it all on CAD and let the software sort it out.
A set of parts for 6ft board is: front fascia, rear fascia, 5 x crossbars, 2 x end crossbars. The crossbars are designed so that some can be fixed flat and others vertical, but their top face/edge will always be the same height. That means the boards will sit flat whichever way they are bolted together. All parts are 3mm stainless. End crossbars not yet View attachment 76950 used on the test frame photographed.
The only problem so far is my inability to countersink the holes in the fascia for M6 stainless countersunk cap screws, in spite of buying new countersink bits for the purpose, so I will have to take those parts back to the laser cutters for them to do. That is why the temporary bolts are visible.
Hello Mike , Stainless can be a pig to do any machining on , try a slow speed and some coolant .
geoff_nicholls
Western Thunderer
That is very good news, I'm pleased to hear you've cut the first sod. Looking forward to seeing a bit of track and a contractor's loco on it.
Mike W
Western Thunderer
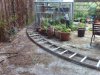
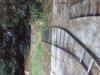
Coming back to the railway itself, I bit the bullet recently and bolted some of it together. There is a pinch pint at one end of the oval where a large Horse Chestnut and a 150 year old Yew make the alignment critical. There comes a time where no amount of measuring and drawing will help and I need to see on the ground - well, 2ft up in the air actually. So, temporary poles bashed into the ground and the first two frames sort of in place:

Here's the view from the other end:

There is room to move it slightly and I'll have to because here's the end - pointing at the trunk of the Yew:

I'll need to adjust the whole two or three sections together so the positioning is exact and after that the remainder is straight forward - I think. There is actually about five feet to that Yew, so not as bad as the picture suggests.
When I started this I was 95% sure that it would fit. After two years and this try out I am ... 95% sure it will fit!
Mike
Here's the view from the other end:
There is room to move it slightly and I'll have to because here's the end - pointing at the trunk of the Yew:
I'll need to adjust the whole two or three sections together so the positioning is exact and after that the remainder is straight forward - I think. There is actually about five feet to that Yew, so not as bad as the picture suggests.
When I started this I was 95% sure that it would fit. After two years and this try out I am ... 95% sure it will fit!
Mike
oldravendale
Western Thunderer
Just have to be lots of check rails, Mike.
Brian
Brian