7mm First Attempt, JLTRT GWR 57xx

Darren B

New Member
Hi,

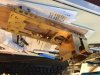
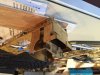
This is not only my first post on the forum but also my first attempt at a loco kit; my only other attempt at brass kits building a skill builder "Loriot" by Jim Mcgeown - a fantastic kit. After looking around I chose a JLTRT 57xx. I know there are various posts on this forum already, but if I can ask a few questions that would be great!

My first one is what is the best method to clean up brass? I am using an RSU so there is little to clean up but where I am using a soldering iron it seems that i get a lot of solder and also a lot of residue from flux left? I am using minimum solder and maximum flux. What is the best way to clean it off?

My second is in relation to this specific kit. I have found the other threads on the famous bunker fitting, however many are from a long time ago. Has anyone found any better way?

Many thanks

Darren B
 

Attachments

  • image1.JPG
    image1.JPG
    207.5 KB · Views: 93
  • image2.JPG
    image2.JPG
    184 KB · Views: 92
  • image3.JPG
    image3.JPG
    179.4 KB · Views: 94

mickoo

Western Thunderer
Depends what flux your using, paste or liquid and what brand, some wash off in warm water, others require something a little more aggressive like a domestic cleaner, Viakal works but can dis-colour the metal if left to soak too long, doesn't matter as it's going to be painted, just visually looks a bit odd. Some cleaners also require a good scrub later before painting as they leave a film on the metal which can have an adverse effect on paint adhesion.

Either way, and looking at your photos, despite how frugal you think you are being your probably still using too much solder ;), possibly too much flux as well. I use a liquid flux and brush it on with a small paint brush direct to the joint. The more flux you have the more chance the solder has to run where ever the flux is.

Rather than take the solder to the job on the end of the tip, try carving a sliver off with a knife and placing on the work at the required joint, then place the soldering iron tip close to the solder on the metal work, once hot enough the solder will wick into the joint.

I went through several types of solder and flux in the first months until I settled on a combination that I was comfortable with, after that it's just a case of fine tuning your skill base.

For a first attempt, it's looking pretty good so you must be doing something right :thumbs:

Mick D
 

adrian

Flying Squad
Hi Darren,

Thanks for posting - it'll be interesting to see how you get on.

As for soldering and cleaning up - brass is always challenging. It needs to be scrupulously clean and plenty of heat is needed to get a neat joint, which is why I always prefer nickel-silver if possible.

I've had a quick look for a couple of photos to show my methods but I can't find anything suitable at the moment so I'll try and post something this next week. I use carrs 179 solder cream - they claim it's "no clean" Solder Creams/Paint - C & L Finescale but I would disagree, it does leave some residue but it's not difficult to clean up, and although it says it has flux I use it in combination with Building O Gauge Online - Water Based Safety Flux and an ERSA RDS-80 soldering iron ( I've tried an RSU in the past but I couldn't get on with it so sold it on!).

After soldering I use a combination of methods to remove the excess solder. In my experience there is no one solution you have to use a combination of tools. I have a triangular scraper as my main tool, but then use a variety of scalpels, steel burnishing brush, old needle files, garryflex blocks to scrape away the excess. One notable absence from my toolbox is the fibreglass brush - again in my opinion but they are horrible implements of torture - you'll spend more time picking the fibres out of your fingers than cleaning your model!
 

Ian@StEnochs

Western Thunderer
Hi Darren,

I have built a couple of these kits, they are very straightforward and went together very well. There is a good level of detail supplied with lots of nice detail castings which should let you personalise your model.

However as you raise the question of the bunker corners I have to tell you they do need a bit of careful work. There is an additional etch supplied which is a bit longer than that on the main etch, this forms the curved back piece. I found it useful to use some of the waste etch to form a ledge inside to align the filler piece. The straight bits about 3mm wide on the outside of the sheet, cut into strips which fit from side to side and protruding into the space by about 1mm. Solder with 188 solder and clean up.

The cast brass corners now need to be cleaned up and fitted, take care not to remove the rivet detail. If you do spoil a rivet head you can replace it by drilling a tiny hole and fitting a bit of wire, tedious but effective. Holding in place while soldering is tricky but I found that a piece of 1mm brass wire soldered onto the back with 188, bent into a 'J' and used as a handle up through the bunker made it a wee bit easier. I used 145 solder to fix the casting and as a filler. Carefull cleaning and removing the handle finishes the job.

Hope this helps. Happy modelling,

Ian
 

JimG

Western Thunderer
I would go along with what Mickoo has said. I use a paste flux - Templar's Mild Telux - and 22swg 60/40 cored solder. It's what I've used for some years now and I know what it does. The Telux flux does not oxidise after use so you don't need to clean it off unless you want to paint the area. Also you will find, if cutting off small bits of the solder and placing them along the joint, that if your solder bolt is hot enough and transferring enough heat, then the solder will melt and chase the heat as you move the tip along the joint area, giving a small neat fillet all the way along the joint which rfequires the minimum of cleaning up afterwards. If your soldering bolt doesn't transfer enough heat into the joint area to do this, then you might consider using a small torch to supply the heat.

I got a small pot of "No Clean" solder paste off Ebay last year and I've been tending to use it as much as I can, principally because I suspect that it might go hard before I've used it all and I want to get my money's worth. :):):) This paste is a fraction of the cost of similar products from UK suppliers and I find it gives extremely neat solder joints with very little excess solder left around which is easily removed with a scraper.

Burnishing Tool | Western Thunder

...is a previous message from me with details of the product. I keep it in the fridge and it's still perfectly workable after about eight months. It might not be the best bet for doing long seams since applying the paste neatly along a joint might be difficult, but the small silver content in the paste means that it does wick along a joint if there's enough heat there.

Jim.
 
Top