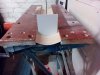
I made a start on the underframe for the 2nd class carriage which I am building out of styrene. Some people don't like styrene but I do. I find it easy to work with and very forgiving. These are the axle guards made up of two etches sweated together, which went very well. The spring is a casting from a pattern that I made up some years ago and had cast in Australia. I know, a long way to go but someone recommended the chap to me and I had seen some of his work before hence Australia. Being whitemetal, it's very fragile where the spring meets the hanger. To give it some strength, I'm going to drill a couple of holes in the vertical legs of the axleguards and some corresponding ones in the back of the spring. I'm then going to glue in some pins into the spring and these will locate into the axleguard holes previously drilled. All will be fixed with araldite after lining up. Jon
Here is the almost complete underframe for the 2nd Class carriage and the colour here is it's final colour. I thought that I'd chosen a more mahogany colour but this is what I got and three cans of it so, not wanting to waste the paint, this is what I'll use on the body of the 2nd, the 1st and a brake 2nd that's also waiting in the wings. I'm very pleased with how the build of the underframe went but I've been having a lot of problems with the building of the body due, I think, to the thinness of the etches. When ordering, I should have asked for thicker brass but, hey ho, can't do anything about it now. For the roof, I did glue it to a piece of formed aluminium but it just wouldn't take on the shape that I wanted it to so, it's a bit wavy. Not sure that I want to show the work in progress pictures and will just show a long shot of the carriage when I get to that stage. Jon
Go on Jon. I love your posts that are all doom and gloom that something hasn't gone quite right and somehow you finish up with an absolute masterpiece every time! I can just see that this will be the same again. Mike
, this time, Mike, it's true, honest. I won't go into the details but I found the building of the body very frustrating indeed. Armed with the knowledge picked up from this build, I'm hoping that the 1st Class carriage will turn out a lot better. Speaking of the 1st Class, the Mansell wheels that I made all of those Posts ago, are for this carriage so, I'm hoping that i can make a decent job of it. Jon
Here's a dilemma. The second class carriage in the picture is sprayed with a paint that has a gloss finish. I also sprayed the card with the same paint as a test. I masked off part of the test card and sprayed it with a matt varnish which is what I would do in order to get the transfer's backing to blend in and almost disappear. I would normally spray my wagons with a gloss finish, apply the transfers and then finish with the matt varnish; this works fine as I don't want to see a shiny finish on them. It can be seen that when the test is sprayed with the matt varnish, it changes colour making it look like red oxide primer and a much lighter shade, not what I wanted. What do other folk do in this situation i.e., with the finishing of coaches? Jon
What would happen to the test card if you spayed it again with gloss varnish,If you do that to seal in the transfers, would it make it look good again. May be worth a try.
The replacement lamps have arrived already, Shapeways are really quick at the moment. They originally said that they would leave the factory on the 30th and they arrived today. This picture shows the new lamps with one from modelu of the correct size. Comparison with the first order. Jon
I've finished the 2nd Class Carriage as far as I can go and here are a few pictures. I'm not sure why, I have checked and twiddled with knobs and screws, but my set of rollers always produce roofs of this shape, hey ho. Re the colour. I experimented with different shades and sprayed them all with matt varnish but in the end, I have stuck with the original colour. I even masked off one half vertically of my colour samples and sprayed them with matt varnish. This produced some interesting effects and if I had done this at the beginning, the coach colour would have been different. I have over two rattle cans of paint left and it would be a shame and a waste of money not to use them. I have the First Class Carriage and a passenger Brake to finish/make up and the paint will be used on these. It would be good if I could sort out the roller problem but I think that I've done all that I can and experimenting on pieces of sheet ali can be expensive. Jon P.S. I'm waiting for the number plates to fit onto the solebar.
I have the same problem with my rollers. I think it's because they bend in the middle when rolling stiff metals. I put an extra layer brass sheet outside the roof piece, in the middle, to counteract the problem. If you use too thick a piece, you will find the curve in the middle will be a tighter radius than the outer edges.
I have seen a good trick for roofs on a 16mm web site, What they did was to put either a metal or wooden roof , Into the grooves and in between the clamps of a workmate bench,
If anyone is making up an etch in .020" brass or nickel and have some spare space on it, could I please ask that they include 16 of these steps. I did have enough but they seem to be hiding from me! Jon
I'm not sure, it's a while since I last did it, probably 0.4mm/18thou because that would bend easily. About three inches wide? You might even find you can use card.
Here are a couple of pictures of the finished underframe for the First Class carriage. It's almost the same as the second class but has only three steps and a set of Mansell wheels. These are the wheels that I made back in 2016 just for this project. They had a few years to wait until they were used . The making of the wheels is in the G3 file of WT if anyone is interested. Jon