4mm LUMSDONIA ¦Layout and Website

TimberSurf

Active Member
Hello, I am the owner of the LUMSDONIA Railway Company. A fictitious railway with a very real website Lumsdonia.co.uk, containing the architecture of the grand plan and some (hopefully) useful guides and tips on railway Modelling. I know very little about railways (although I have travelled on probably half the Heritage lines in the country) but as an Engineer, I have lots of electrical experience and have done railway modelling most of my life. I have a very minor YouTube channel too, just to share my workbench projects called TimberSurf's Channel

My favourite period is late steam, green and blue Diesels, no interest in everything else since!

My involvement in another forum and my unusual (for my age) dexterity with PC's and the web (I have had a website for 20 years) has led to the development of a website for my musings and general spasmodic updates about my layout. But over the last year or two, it has rapidly become a Model Railways resource of info! I also have a complimentary Youtube channel (please subscribe as I have half a dozen projects in the pipeline) , mostly about investigating new animated features for my layout.

Sections include my layout, guides for beginners, ever expanding "How to's", tips, glossary and guides and even a shop section of FREE downloadable pdf's

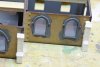
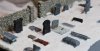
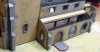
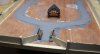
Only two sections of the layout in UP4CS have been built so far (12ft x 2ft) with the 8 carriage station and TMD. Lot's more piccies of the build in the Gallery

Across the junction.jpg

Sandycombe West view.jpg


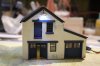
In the absence of a room (house) big enough to take the full layout, I am building up my techniques by investigating cheap alternative construction materials and making buildings/animotion/diorama's that can be integrated into the master plan later.
 
Wigan FS Expo 2018

TimberSurf

Active Member
Wifey et moi, went to the Wigan Fine scale exhibition. Not disappointed, some great layouts with fantastic detail. Lots of traders, so picked up some bargains as you do and some missing colours of paint for the production line.
I took some video on my phone (so rubbish quality as usual), anyone recommend a good blogging DSLR? I am looking at the Canon EOS 200D but I am having difficulty swallowing the price! :(
Here is a taster, lots of O gauge in the video for you big guys ;)

Wigan 2018 bridge.jpg Wigan 2018 garden.jpg
 
Last edited:

TimberSurf

Active Member
Having taken some rubbish video at the Wigan exhibition the other week, I decided to buy a better camera, a superdooper DSLR
icon_surprised.gif

One of the cool features is stop motion, so as ever, game to try anything, have a peek at my first attempt!
It's set on part of a 600mm x 400mm diorama I am building (an exercise in testing out my scenery building skills) and is an ideal subject to practice my photography on.
The diorama is a windmill and barn that has been converted to a holiday let, set on a hill with a Styrofoam base that will eventually be incorporated into my layout.

It will feature a 3 motor driven working Windmill, 4 sets of independently controlled lights and realistic smoke!
 

TimberSurf

Active Member
Ah - but will you be able to pour wheat or corn into the top and mill it into flour...... it'll make a change from coal hopper loading and discharging.
:(

Eeerrrmmm.... I could scatter some white around the doorway? Great Idea, I 'll watch you make one first ;), as it was your idea! I wouldn't want to steal your Thunder (pun intended)

Here is a snippet of whats to come, a working car arriving for his Holidays
 

TimberSurf

Active Member
I am branching out (pun intended
icon_e_wink.gif
) into video versions of my webpage "How to's"
panachz.gif

With a new found confidence in the output of my new super camera and some tripod/clamp/bencharmyajigs, I have documented one of my more graphical methods of tips - How To make removable loads (semi-auto). It has taken a lot of editing. I doubt I am up there on Luke Towens level, but its a vast improvement on my earlier vids and hopefully more of a useful tutorial rather than my previous, 'look what I did' type.

It's a learning curve!

Please, please, give me any feedback, I cant improve rubbish, if I don't know it is!
icon_redface.gif


P.S. If the music 'dose your'e nut in!' (as some biased peeps have mention) please let me know!

How To make a removable Mineral Wagon Load
 

Dog Star

Western Thunderer
Clear and concise visual, please check your spelling in the captions - hint, "intil".

As for the music, not a fan of the style although better than listening to my son's computer games.
 

TimberSurf

Active Member
OMG! Keyboard finger slip!
So glad you found my deliberate mistake :thumbs:;););), shows your paying attention LOL
You will be happy know I have composed a new piece of music for the next video, that you will hate even more!!!
YouTube does have a mute button after all!
 

TimberSurf

Active Member
I went to the Wrexham Hobbies and Model Railway Show today. I took some video and loaded to Youtube, but as usual, it was a buying session. These days I don't tend to buy much at shows, I have enough rolling stock, so it is usually more the modelling side I pick up. This year I found a few bargains. Some coaches that are for a (secret) scratch build project, at £3 a pop and 120 metal wheels loose in a box for 30p each!
icon_surprised.gif


Result!!!
icon_biggrin.gif


That means I think I now have enough wheels to electrically light my whole coach stock!
 

TimberSurf

Active Member
So just to complicate my life further, to add to the many workbench projects currently on the go, I have now embarked on the third module of my layout. It is not a contiguous module, just a random one, but a highly complex build, so I am doing it now, in anticipation of incorporating it into the grand scheme when I get a room/house big enough to accommodate the final layout!
So, first of all, you need to understand my love of bridges, second the layout was always designed to be two levels to allow for as many bridge/tunnels as possible. Having seen many exhibition and Youtube examples of a layout section that is much lower than the main surface, I decided I should have one. It will be incorporated in the final design later (I will MAKE it fit!
sdesole.gif
) but at present. will be standalone.
It will consist of a sandstone cliff on the left, with a canal by its side at minus 300mm level, a road running parallel to it and a river slightly lower defining the bottom of the valley, with the opposite side of the valley being a gentle slope. Over these will be a road stone arched bridge (completely scratch built) at a minus 200mm level, emanating from a tunnel in the cliff, then winding up the slope back up to board level (0mm) on the right.
A modified bow steel bridge (half kit half scratch) will cross at board level from the cliff edge to midway and a further two sets of lower arch steel bridges will span the other half to meet the right board. A completely bespoke scratch build 'Cable-stayed' bridge will span the two boards with a small overlap at each end, at a 100mm level and will be 1,200mm long! (yes, 4 feet long!
Three Bridge valleyV41c.jpg
 
Three Bridge Valley - Stone road bridge beginnings

TimberSurf

Active Member
The stayed cable bridge has been fully cabled, the deck is made and prepared for all the cables. Stone bridge has one side completely covered. All 5 steel bridges are made and painted.
First, the stone bridge, a look at the brickwork, rolled on with texture roller. Applied when soft to the underside.The corner stones are laid on after and grooved. This is the back (unseen side) that serves as the first go, I have yet to tackle the other side. I am not sure I like the corner sides sticking out proud (it was a quick fix to lay DAS on, after the sides had been applied).
I have yet to decide if I can stomach routing out a rebate into the brick after laying the brick, although I could do it by cutting when soft when I lay the bricks on the other side.
Yes I know the bricks ain't very even, but this was a test. Obviously rolling the pattern is good on a flat surface, but moving it to the bridge, inevitably allows stretch and misshaping before it lands! I am not sure that rolling on the bridge won't produce an undulating surface!
Stone bridge wall frame 2.jpg
Stone bridge underside 1.jpg
Bridge back side.jpg
Bridge Canal clearance.jpg
 

TimberSurf

Active Member
So after cracking the process of transferring the clay to final position using greased proof paper, the build progressed. I still had to do a lot of remedial work to basically hand trowel the corner stones in place later on and re scribe all the mortar lines then add the inner walls, coping stones and road surface. I used a base coat of cream for the mortar and a couple of colours for the dry brushing (probably about 5-6) and voila, worthy of a video!

Three Bridge Valley Stone Bridge build Video

Watch to the bitter end for the outtakes!
 

TimberSurf

Active Member
As I now have 100 followers (Subscribers) on my Youtube channel, I will be sheepishly follow the Youtube trend and have a competition!
A rare opportunity to 'hear' me in my 'narrator's' mode, I sound like the old guy from 'The Gadget Show' :confused:
A small bespoke prize is up for grab's, to celebrate the 100 subscriber milestone.
Take a gander, join the fun and take part! You never know, you might win!


100 Youtube Subs Competition announcement :p
 

TimberSurf

Active Member
There are not many suppliers who sell screen printed white window surround/bared acetate sheets, of the few, even less that suite Linka window tiles, and it struck me that not all windows are white! Unfortunately, home PC printers cannot print white, but they can do all other colours.
This means that black windows (meaning those with leaded lights) can be done and so too, all the other colours!
Given that I have the advantage of manipulating graphics accurately with CAD, it struck me that rather than trying to create each window pattern individually in a graphics package, I could mass produce the design in CAD quite easily.
Given that I can make a vast array of designs, that can be downloaded from the net and printed on a home printer, I have opted to share with everyone, like my tarpaulins, on my website. It has taken me much more time and effort to upload and create the web pages, than it did to actually design them all! :lol:
The first batch (two pages) are for Linka Brick buildings, but could equally be used in other types of buildings or scratch built ones. I intend to add more for Linka stone. At the moment, there is a range of plain, Georgian, Georgian with bulls eyes in, some with a central mullion and a few Jail bars!
I will do the same for the stone, but will get around to adding leaded lights for suburban homes and Church Lancet. I will also make some 100% cover sheets for scratch builders and some resized versions for use in other scales.

Linka brick demo.jpg

Linka Brick Leaded

Linka Brick Coloured


Once a pdf is downloaded, a paper print can be made for testing (or used as is with clear acetate over the front) and then an acetate sheet can be printed and used.

Feel free to give me feedback and any suggestions for the future
 

TimberSurf

Active Member
Not posted much recently, but lost mojo for 6 months, so little progress has occurred, but been to quite a few exhibitions and the purchase of some kits have spurred me on and although I have many projects on the go, I have been dying to have a go at a Petite Properties build for a few years and finally bit the bullet and purchased two at the Stafford show.
The first is a garage, but mine will be a farmers workshop/store
 

Attachments

  • All lit Img_0996s.jpg
    All lit Img_0996s.jpg
    113.4 KB · Views: 21
  • Back Img_0987.jpg
    Back Img_0987.jpg
    96.3 KB · Views: 21
  • Electrics Img_0970s.jpg
    Electrics Img_0970s.jpg
    149.3 KB · Views: 21
  • Front Img_0991s.jpg
    Front Img_0991s.jpg
    138.8 KB · Views: 21
  • Front lit Img_0981s.jpg
    Front lit Img_0981s.jpg
    117.9 KB · Views: 22

TimberSurf

Active Member
The second, I am making, is a church diorama, it will feature a host of novel features and sit in a tapered frame that will allow it to be incorporated into my layout but be removable for maintenance.

Boasting 5 separate lighting circuits, a wedding scene and a funeral scene, it will have two animations and a further attribute, doubtfully seen before!

The core of the church is from "Petite Properties", but not being happy with the buttresses, I have created a master and cast my own, the 6mm ply base is edged with a home made wall and I have added a spire.

I am about 3 weeks in and it is progressing well, if only very slowly (detail takes time!) I will eventually make a video showing both the features and the build, but for now, here are some teasers . . . . .
2 Teaser Img_1058.jpg
1 Teaser Img_1055.jpg 2 Teaser Img_1058.jpg 4 Teaser 1037.jpg 5 Teaser 1029.jpg 6 Teaser 1036.jpg 7 Teaser Img_1054.jpg 8 Teaser 1040.jpg 9 Teaser Img_1045.jpg
 

Attachments

  • 1 Teaser Img_1055.jpg
    1 Teaser Img_1055.jpg
    166.1 KB · Views: 8
  • 2 Teaser Img_1058.jpg
    2 Teaser Img_1058.jpg
    141.5 KB · Views: 9
  • 4 Teaser 1037.jpg
    4 Teaser 1037.jpg
    115.6 KB · Views: 8
  • 5 Teaser 1029.jpg
    5 Teaser 1029.jpg
    59.1 KB · Views: 8
  • 6 Teaser 1036.jpg
    6 Teaser 1036.jpg
    112.3 KB · Views: 8
  • 7 Teaser Img_1054.jpg
    7 Teaser Img_1054.jpg
    85.7 KB · Views: 8
  • 8 Teaser 1040.jpg
    8 Teaser 1040.jpg
    168.1 KB · Views: 8
  • 9 Teaser Img_1045.jpg
    9 Teaser Img_1045.jpg
    82.1 KB · Views: 8
Top