Resin Cast Coach Sides-- Maybe

jamiepage

Western Thunderer
Don't know whether this may be of interest; if so, I will update with warts and all. As a potential alternative to using pantograph milled components I am making up some patterns with the intention of having them resin cast. The prototype coaches were typical pre- grouping and heavily panelled, and I'm trying to cut down on the repetition which leads to boredom which leads to messy work which leads to yet another unfinished model.
It should be possible to pantograph mill the all the various layers but I am struggling with manually maintaining an adequate register between layers such that, for instance, 0.5 mm bolections remain true all round. Haven't given up, but I'm also trying this casting route in parallel.
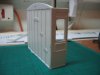
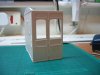
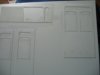
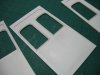
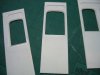
Pictures show four patterns (handed ends, a door, and a double window panel),being made up which between them would allow all All- third coach to be produced if built up piece by piece. The components will be quite chunky, depth- wise, which will hopefully make assemble easy, strong and straight..well, that's the hope.
Beading layers have been cut and mounted to produce an outer side which will in turn be mounted on shaped main panels. The rear face is designed to be vertical to keep things simple but I'll scribe inside panelling, planking etc in the hope that the castings will pick it up. Glazing pockets are formed.
 

Attachments

  • IMG_3905.JPG
    IMG_3905.JPG
    77.1 KB · Views: 85
  • IMG_3907.JPG
    IMG_3907.JPG
    160.8 KB · Views: 84
  • IMG_3908.JPG
    IMG_3908.JPG
    181.6 KB · Views: 84
  • IMG_3909.JPG
    IMG_3909.JPG
    210.2 KB · Views: 82

Dog Star

Western Thunderer
Looks familiar, rather like the productions from Richard De Camin and Jigsaw Bits - although I do not recollect Richard doing anything with pre-group stock.
 

jamiepage

Western Thunderer
Phil,
I don't know to be honest. I would prefer to have them professionally done, but that would depend on the quote.
 

28ten

Guv'nor
If you can get the casting to work it should save quite a bit of time. I have never had any success building anything by cut and shut methods - I always end up with a sawtooth profile, but in fairness im rubbish at that sort of thing:oops::))
Ill be interested to see how you get on:thumbs:
 

jamiepage

Western Thunderer
Guv'nor, I definitely recognise the problem having struggled with cut and pasting Slaters MR coach sides in the past. Problems were caused by an inability to cut straight, exacerbated by the thinness of the sides as moulded.
I hope to reduce the problem by making the modules chunkily thick to give good sized mating surfaces, and to have shaped the outlines on the mill to give perpendicularity. We'll see.
Attached photos were taken mainly to flag up scuffy bits that need fettling; shows an end module and door module leant up against the main end, all standing unaided. Just a bit more to do, then some inserts that will hopefully push in to trap the glazing then off to find a casting company. Whether I take it any further will depend on the quotes.
 

Attachments

  • IMG_3913.JPG
    IMG_3913.JPG
    156.5 KB · Views: 64
  • IMG_3915.JPG
    IMG_3915.JPG
    162.3 KB · Views: 64

BrushType4

Western Thunderer
The problem I have found with resin is that it seems very difficult to produce lots of identical copies. That's fine for some things such as seats for coaches, but that may not be so good for the accuracy you will be looking for.

I guess that will depend on who produces your resin copies.

Your masters are excellent though!
 

28ten

Guv'nor
Agreed the masters do look nice, as I have found, you need to polish a few turds before you find one that shines, but that is half the fun isnt it? :cool:
 

jamiepage

Western Thunderer
Sample castings have arrived from CMA (no connection) for the G3 coach parts, and I must admit to being very pleased with the standard. The Company have done a good job with all detail picked up, no measurable distortion or warp, no measurable shrinkage, only a small amount of flash (photo shows the worst window, and it really is completely superficial needing just a quick scrape), and crisp around the edges including some thin (c. 1mm) edges.
Enough arrived to shuffle into a 5 compartment all third body side, so I will clean them up later and see if it all keeps straight as it gets stuck together.
No new techniques here with this I know, but it has given me a good start for a rake of 6 wheelers.
IMG_4090.JPG
IMG_4091.JPGIMG_4088.JPG
 

jamiepage

Western Thunderer
Well, that's very decent of you both, thanks. The coach side as shown is iro 15 in. long, a 6 compartment prototype will be about 18 in. (Which follows, come to think of it). IMG_4093.JPGView attachment 9878 The panels are c. 3.5 in. high, body width c. 4.25 in.
 

Pugsley

Western Thunderer
Those look superb.

I hope you don't mind me asking, was it very expensive? I'll need to get some parts resin cast at some point and haven't yet decided if doing it myself is the way forward, or whether to contract it out to CMA, or similar. They'd be much smaller parts than yours, so I guess it may not be worth it.
 

jamiepage

Western Thunderer
What swung it for me was the fact that the coaches I wanted to model had a curved detail to the top of each window and door panel rather than a straight horizontal cut between rounded corners. The large scale meant this would need addressing to my mind; hand working would mean each aperture would need to be filed back to shape with a consistency I was just incapable of. Etching would require drafting skills I also don't have so I tried this casting business as an experiment. I thought about casting myself but can't think I would have been any good at that either so bit the bullet, and as said am pleased I did.
I will have enough bits for most of a decent rake; some coaches had different window spacings (3rd/ 1st etc) and the differing sections will each either require a new mould (all the blanks have been machined ready) if needed in numbers, or scratchbuilt originals just used 'in the raw' if not.
Was it worth it? To me, yes it was to get the degree of consistency I don't have the skills or attention span to get in other ways.
 

jamiepage

Western Thunderer
Thank you both; yes, quite pleased so far. Very pleased with CMA, a bit annoyed with myself in that the first side seemed to be harder work than it should have been to keep square. Each new bit needed varying amounts shaved off to keep perpendicular. Couldn't see why it was such hard going until eventually decided to check the straightedge. Sure enough, it wasn't. It had taken up a slight, very slight, S shape along its length which I was therefore trying to emulate with the coach side. Not much, but even 1/2 degree per edge takes time and effort to bed in with butt joints.
Anyway, a satisfying couple of hours were then spent with a proper straightedge to produce sides for a 6 compartment all third, a 5 compartment all third, and most of a 3rd/ brake.
So it worked for me- this time anyway. The thickness of each section coupled with careful milling to keep the masters square meant they went together well after all. Floor and roof will build in more support should it be needed although the glued surfaces are reasonably substantial.
There is some slight variation of size of one or two bits, but really not much at all. Importantly, all are square, crisp and with little or no distortion.
Floors next, then underframes- wood strip (well filled with shellac and sanded), with mild steel flitch plates.
After that, the internals so will make up a master for seat squabs.
I will also send masters for 3rd/ 1st and 1st/ 1st window sections, which will open up a few other prototypes .
 

Mike W

Western Thunderer
Very nice Jamie - and all your own work to your design which must be satisfying. Well done. I look forward to seeing them in the flesh.
Mike
 
Top