You are using an out of date browser. It may not display this or other websites correctly.
You should upgrade or use an alternative browser.
You should upgrade or use an alternative browser.
Thingiverse 3D print Diesel
- Thread starter Tom Insole
- Start date
Tom Insole
Western Thunderer
Tom,
being picky, there’s something else that stands out, and I’m sorry to mention it, because the diorama is most effective.
The lintel over the door is not higher than the loco cab. Can you move the green roller shutter box up a few mm?
Atb
Simon
Yep, It bugs me, I may still concider moving it yet. even though I'd put the idea aside.
Could I suggest a little chemical black for the loco wheels.
It's the only thing that stands out on a great model.
JB.
I've not seen this process before so I'm going to spend a little time reading about this. Sounds like a brilliant idea though, and a great way to make them not look so "new".
Tom Insole
Western Thunderer
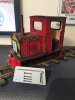
Today the builders were in making alterations to the shed, so the little diesel was shunted up the other end of the shed whilst work was done

Soon after a test fit was made to check the new rolled doors were fit for the job!


Happy with the new height some progress was made on the shed roof!

Some snap latches will hold it on eventually so I can safely transport the diesel for running days with a pretty little display when not in use. Tomorrow the decorators are in to touch up the mess after the builders have left the shed in a bit of a state!
Soon after a test fit was made to check the new rolled doors were fit for the job!
Happy with the new height some progress was made on the shed roof!
Some snap latches will hold it on eventually so I can safely transport the diesel for running days with a pretty little display when not in use. Tomorrow the decorators are in to touch up the mess after the builders have left the shed in a bit of a state!
Tom Insole
Western Thunderer
Probably the last update for a couple of weeks as progress will be delayed by moving home...
this morning I started fitting snap latches


So I can lift it and move it around and then made up some padding for transporting to prevent it tipping over

Can safely transport it about. Mid March i’ll Take it for a test run on our local club track
this morning I started fitting snap latches
So I can lift it and move it around and then made up some padding for transporting to prevent it tipping over
Can safely transport it about. Mid March i’ll Take it for a test run on our local club track
Tom Insole
Western Thunderer
So with all this COVID-19 buisness I've not even had a chance to go do a test run up on the local club track. Not entirely sure when I'll even get to do that!
So I decided the best plan of action was work on my next project that I wanted to do completely from scratch!
I set myself the plan of asking other owners of a similar loco on the 16mmngm facebook group and someone who's very local to me was a saint and replied with an abundence of measurements to get me started... I soon got some basic measurements down on Solidworks and put toether a mock model to see how they panned out but soon discovered a few of my guestimations were out...

I've soon realised my bonet is far too tall and some of the cab measurements for the windows and doors were a bit out... so I've now set to making an assembly of bits so each of my parts are adjustable as there's so many tangents or deriving measuremtents on this "one piece" part that I can't just go back and adjust the measurements of one bit as it throws out a lot of errors and tell's me I've broken my part!
It seems my images are too big to add more than one so I'll split my posts up and show in the next post what I've come to so far")
So I decided the best plan of action was work on my next project that I wanted to do completely from scratch!
I set myself the plan of asking other owners of a similar loco on the 16mmngm facebook group and someone who's very local to me was a saint and replied with an abundence of measurements to get me started... I soon got some basic measurements down on Solidworks and put toether a mock model to see how they panned out but soon discovered a few of my guestimations were out...
I've soon realised my bonet is far too tall and some of the cab measurements for the windows and doors were a bit out... so I've now set to making an assembly of bits so each of my parts are adjustable as there's so many tangents or deriving measuremtents on this "one piece" part that I can't just go back and adjust the measurements of one bit as it throws out a lot of errors and tell's me I've broken my part!
It seems my images are too big to add more than one so I'll split my posts up and show in the next post what I've come to so far
Tom Insole
Western Thunderer

So this is the so far efforts. Ive a long way to go adding bits slowly part by part.. It's also now in a format that I can make each part and assemble it when ready in a kit form. I'll probably have time to add bits to it as I'm "self isolating" at the moment because I fall into the high risk category and work have encouraged anyone who can to work from home!
I'll leave you all to guess what locomotive I'm modelling!
Tom Insole
Western Thunderer
I feel I have neglected this thread in a while since hitting a rather large obsitcle in making my next loco. I was a little shocked to see it was taken on by a professional who had real dimentions. So with wanting to go down a route nobody had ventured I stopped production of mine.
I know I shouldn't get beat up by it but I could never compete with a pro model maker and I'd of only been picking flaws in my own work all the time.
Instead I have slowly been browsing the net when I get a spare 5-10mins for something else to model and build and who would have thought when looking at images I would come across a very similar looking loco to the 3D printed one. (the same one I'd searched for ages to see if it resembled anything) It turns out I was looking in the wrong places and one post of this image...

It was lurking unnamed and unknown on a Flickr members photos only titled with a location and that it was narrow gauge industrial serving builders in Germany. the title was "Dortmund / DASA: narrow gauge diesel locomotive" which shed no light what so ever what it was and its original purpose in life!
Not long after sharing with a group on facebook all about industrial locomotives I had a name and hp that matched the little 3D printed logo exactly!
Beyhold the wonders of a Gmeinder 10/12 hp loco... and there's some mighty fine examples people have made!

Above one in real life... Below the fine models people have made. particularly impressed by the brass and scale motor built one (exposed motor one looks to be maybe 5"!)
![P1030107[1].JPG](https://www.westernthunder.co.uk/data/attachments/124/124634-08e18830ba1088dd6fb294eabd117ddd.jpg "P1030107[1].JPG")


I think this has inspired me to make a open cab version with a lot more detail and correct to the real thing version. Time to find all the files again and start putting the odd print on out of hours at work!
I know I shouldn't get beat up by it but I could never compete with a pro model maker and I'd of only been picking flaws in my own work all the time.
Instead I have slowly been browsing the net when I get a spare 5-10mins for something else to model and build and who would have thought when looking at images I would come across a very similar looking loco to the 3D printed one. (the same one I'd searched for ages to see if it resembled anything) It turns out I was looking in the wrong places and one post of this image...
It was lurking unnamed and unknown on a Flickr members photos only titled with a location and that it was narrow gauge industrial serving builders in Germany. the title was "Dortmund / DASA: narrow gauge diesel locomotive" which shed no light what so ever what it was and its original purpose in life!
Not long after sharing with a group on facebook all about industrial locomotives I had a name and hp that matched the little 3D printed logo exactly!
Beyhold the wonders of a Gmeinder 10/12 hp loco... and there's some mighty fine examples people have made!
Above one in real life... Below the fine models people have made. particularly impressed by the brass and scale motor built one (exposed motor one looks to be maybe 5"!)
I think this has inspired me to make a open cab version with a lot more detail and correct to the real thing version. Time to find all the files again and start putting the odd print on out of hours at work!
Tom Insole
Western Thunderer
Not too much has happened of late but I have found a lovely set of 1:24 drawings, carefully printed and I’ve already had s bash at a buffer beam! I forgot to print screen my CAD of it but i’ll do that in the morning!
Isn’t she a beauty...

Watch this space... I’m hoping i’ll Get some printer time soon!
Isn’t she a beauty...
Watch this space... I’m hoping i’ll Get some printer time soon!
simond
Western Thunderer
Eye of the beholder, Tom!
don’t beat yourself up about what others do, do your own thing, enjoy, learn and do even better on the next one. If we all waited til we could do something that compares with the best on here (or any other forum) there would be very little done and nothing to read...
Atb
Simon
don’t beat yourself up about what others do, do your own thing, enjoy, learn and do even better on the next one. If we all waited til we could do something that compares with the best on here (or any other forum) there would be very little done and nothing to read...
Atb
Simon
Tom Insole
Western Thunderer
Thank you Simon for such kind words!
For now I've put the little Tally diesel on the back burner to have a bash at this little open cab Gmiender 15/18hp and feel I'm going to enjoy making something I can get better access to technical drawings and dimensions.
Yesterday's progress I found various great sources of info including some lovely drawings of various motor assemblies, buffer beams, brake lines (all in German though!)
One example I took advantage of....

Some careful tracing and measuring using the diagram I had printed on my desk..

Before I knew it I had a buffer beam that I am rather pleased with how it looks!
For now I've put the little Tally diesel on the back burner to have a bash at this little open cab Gmiender 15/18hp and feel I'm going to enjoy making something I can get better access to technical drawings and dimensions.
Yesterday's progress I found various great sources of info including some lovely drawings of various motor assemblies, buffer beams, brake lines (all in German though!)
One example I took advantage of....
Some careful tracing and measuring using the diagram I had printed on my desk..
Before I knew it I had a buffer beam that I am rather pleased with how it looks!
Tom Insole
Western Thunderer
Got a little printer time today so on with a test print of what I drew up!

It’s a touch different to the Thingiverse version and will need a few tiny tweaks but very happy how well it’s come out!


Now Printing some frame work and if there’s a printer free tomorrow night some bonnet bits will go on too!
Fingers crossed!!
It’s a touch different to the Thingiverse version and will need a few tiny tweaks but very happy how well it’s come out!
Now Printing some frame work and if there’s a printer free tomorrow night some bonnet bits will go on too!
Fingers crossed!!
Attachments

Tom Insole
Western Thunderer
Hot off the print bed this morning the 1st frame parts are mocked in place beside (I know it’s not in German). The shed plate protecting the build. 
Sat on a wad of my business cards and buffer beam blutacked on! There’s a few bits i’ll Have to address like whether I should fettle the dimensions of my buffer to widen it or narrow the whole model to match my scaled buffer beam? For the moment there’s a slight width difference

Sat beside my first attempt of printing the “Gmeinder” plate. That might get printed in Resin to preserve the detail though as the FDM print heads are just not up to the job it seems!
The outline of the name is there but you can’t read it sadly! It’s ether that or I may be asking for some laser etch advice")
Sat on a wad of my business cards and buffer beam blutacked on! There’s a few bits i’ll Have to address like whether I should fettle the dimensions of my buffer to widen it or narrow the whole model to match my scaled buffer beam? For the moment there’s a slight width difference
Sat beside my first attempt of printing the “Gmeinder” plate. That might get printed in Resin to preserve the detail though as the FDM print heads are just not up to the job it seems!
The outline of the name is there but you can’t read it sadly! It’s ether that or I may be asking for some laser etch advice
Tom Insole
Western Thunderer
Additional update of the day,
Motor chassis arrived around mid day leaving the shed team some more work to do

After a successful trial fit the staff were satisfied with fitting and laid it back up with a wagon they found when searching the stores for a part that wasn’t used on the last build.

More on the print bed tonight so hopefully another workshop session tomorrow morning!
Motor chassis arrived around mid day leaving the shed team some more work to do
After a successful trial fit the staff were satisfied with fitting and laid it back up with a wagon they found when searching the stores for a part that wasn’t used on the last build.
More on the print bed tonight so hopefully another workshop session tomorrow morning!
Tom Insole
Western Thunderer
Motive team don't hang about when it comes to trial fitting everything together!

Seen early in the sidings the boys and girls were making good progress and got Mr. Grumpy to pull it into the shed to test the bonnet on

There seeems to be a lot of work ahead... for now it's been shunted back into the sidings to "weather".

A few minor tweaks need to be made to the running gear and base plate to make it functional before final assembly. so the "not to be moved" sign will stay on the loco for a while it seems.
 Amazing how much more you can fit on the bed when there isn't a second half to the cab to print. I've now time to start planning how I'm going to make the cab as I want to make the controls and gearbox from scratch.
Seen early in the sidings the boys and girls were making good progress and got Mr. Grumpy to pull it into the shed to test the bonnet on
There seeems to be a lot of work ahead... for now it's been shunted back into the sidings to "weather".
A few minor tweaks need to be made to the running gear and base plate to make it functional before final assembly. so the "not to be moved" sign will stay on the loco for a while it seems.
Amazing how much more you can fit on the bed when there isn't a second half to the cab to print. I've now time to start planning how I'm going to make the cab as I want to make the controls and gearbox from scratch.Tom Insole
Western Thunderer
Rather than spam with 3posts in one day I’ve saved some of the smaller details till today.
Currently sat doing nothing for the weekend on the one piece of track I have on its temporary plastic wheels in this state

Some of the small details added are brass hand rails made from 1.9mm brass rod I had floating around bent into shape using a vice

Then cut with a Dremel cutting disk


The other detail added was 1mm acrylic laser etched with a grid patten and then cut to size for a step and footplate.

I’ve plastic primer sprayed them since but forgot to photograph that up close. They turned out much better than I expected them to. The footplate one will later be cut up to accept the gearbox and any other controls I add and the rear section will hide the battery pack so that’s why that part isn’t covered with the laser cut board

Next week i’ll Draw up a mock of a gearbox am work out where holes need to be cut to make the controls work. I also need to work out how much of a throw a lever would make on a gear to turn a 1 turn potentiometer. I’ll sketch my idea and see if some of the brains on here can save me some frantic googling and head scratching!
Currently sat doing nothing for the weekend on the one piece of track I have on its temporary plastic wheels in this state
Some of the small details added are brass hand rails made from 1.9mm brass rod I had floating around bent into shape using a vice
Then cut with a Dremel cutting disk
The other detail added was 1mm acrylic laser etched with a grid patten and then cut to size for a step and footplate.
I’ve plastic primer sprayed them since but forgot to photograph that up close. They turned out much better than I expected them to. The footplate one will later be cut up to accept the gearbox and any other controls I add and the rear section will hide the battery pack so that’s why that part isn’t covered with the laser cut board
Next week i’ll Draw up a mock of a gearbox am work out where holes need to be cut to make the controls work. I also need to work out how much of a throw a lever would make on a gear to turn a 1 turn potentiometer. I’ll sketch my idea and see if some of the brains on here can save me some frantic googling and head scratching!
Tom Insole
Western Thunderer
As promised here’s my sketched idea 
My theory 1/4 turn to a full turn (if the gears are not way to big to fit underneath the bonnet). My knowledge of gear ratios to make it work though isn’t good in the slightest!
EDIT:
Might of found my answer... if I can make it work the same way

Might work.. just gotta do some clever stuff or trial and error!
My theory 1/4 turn to a full turn (if the gears are not way to big to fit underneath the bonnet). My knowledge of gear ratios to make it work though isn’t good in the slightest!
EDIT:
Might of found my answer... if I can make it work the same way
Might work.. just gotta do some clever stuff or trial and error!
Last edited:
Tom Insole
Western Thunderer
This morning the motive department tried to be clever and move a pallet of parts around without supervision. Results were they knocked one of the tippers off the rails

Once the gaffer had drunk his morning coffee and inspected the situation he soon set the team to tidying up their mess and inspecting the tipper frames for damage.
First job today was to lift the loco off its chassis and paint it, prepare new shims and holes ready for the reverser switch fitting at a later date


The wheels are still temporary but have been black coated to see how they look. I won’t properly know if black looks right against the paint scheme. Time will tell.


Once back on its chassis and on the rails we experimented with doors on the side. This one evidently looked way to thick so a temporary bashed out quickly example was made to test a thinner print. The quality was drastically rubbish but I was happy with the thickness so i’ll reprint and fit properly at a later date.
Next on the job list was a gearbox and the results came out really superb!


This also shows nicely the footplate and step in primer!
Once the gaffer had drunk his morning coffee and inspected the situation he soon set the team to tidying up their mess and inspecting the tipper frames for damage.
First job today was to lift the loco off its chassis and paint it, prepare new shims and holes ready for the reverser switch fitting at a later date
The wheels are still temporary but have been black coated to see how they look. I won’t properly know if black looks right against the paint scheme. Time will tell.
Once back on its chassis and on the rails we experimented with doors on the side. This one evidently looked way to thick so a temporary bashed out quickly example was made to test a thinner print. The quality was drastically rubbish but I was happy with the thickness so i’ll reprint and fit properly at a later date.
Next on the job list was a gearbox and the results came out really superb!
This also shows nicely the footplate and step in primer!
Last edited:
Tom Insole
Western Thunderer
Not too much to report visually today other than reprinted door that’s now been attached to the side panel with wire. Was a painstaking business carefully drilling into a 2mm thick printed part hoping the layers wouldn’t delaminate.

Amazingly it was a success with a small filled section to wrap the wire round internally incase I need to replace the door for any reason. Minor gaps but I think I can live with that!
All together the loco looked better for a nicer looking door


The other thing I did was bolt on the shims and chassis (minus the motor and permanent wheels). With a cutout to fit the reverser switch underneath the floor of the cab. There’s also plenty of space above the wheels to run a small channel of wires for the battery pack that will be located underneath a “seat box” in the cab.

Amazingly it was a success with a small filled section to wrap the wire round internally incase I need to replace the door for any reason.
Minor gaps but I think I can live with that!All together the loco looked better for a nicer looking door
The other thing I did was bolt on the shims and chassis (minus the motor and permanent wheels). With a cutout to fit the reverser switch underneath the floor of the cab. There’s also plenty of space above the wheels to run a small channel of wires for the battery pack that will be located underneath a “seat box” in the cab.
Tom Insole
Western Thunderer
Mesh grill fitted today


It ain’t leaps and bounds but I’m happy with it.
The other thing I did today was find a bag of cog wheels and try a fairly close to 1:4 ratio and jigged up a gearbox.

I’m in two minds about it as the size of the gearbox vs pulling it into action... it’s stiff and a lot bigger than I would like it to be.
I know there’s s little yellow diesel in the same scale that has a little wire lever out the window on the side... just a research game trying to work out what it is and see if I can make that work...
It ain’t leaps and bounds but I’m happy with it.
The other thing I did today was find a bag of cog wheels and try a fairly close to 1:4 ratio and jigged up a gearbox.
I’m in two minds about it as the size of the gearbox vs pulling it into action... it’s stiff and a lot bigger than I would like it to be.
I know there’s s little yellow diesel in the same scale that has a little wire lever out the window on the side... just a research game trying to work out what it is and see if I can make that work...