paratom

Western Thunderer
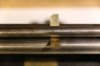
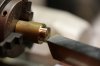
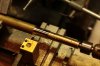
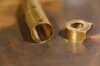
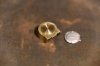
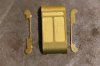
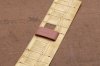
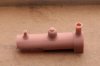
Getting back into the hang of this soldering now. Decided to use the liquid flux instead of the paste as it seems to give better results, The boiler has now been soldered at the seam (fig.5) which got me thinking how I was going to do this as it can be a bit tricky making sure the seam comes together correctly and then holding it to solder. There were two methods I had in mind, one was the traditional way of doing it with a soldering iron and soldering at the seam or resistance soldering. In the end I opted for resistance soldering by sweating a tined piece of nickel silver to the inside of the seam. I felt this would give me a stronger joint. In order to do this I needed to turn a piece of brass (fig.3) that was just under the inside boiler diameter. This was clamped on the vice with the etched boiler inserted over the brass with the tined nickel silver under the seam. A piece of paper was inserted under the nickel silver, the seamed closed and resistance soldered (fig.4). I was happy with the results and the joint is holding. The kit came with an etched riveted smoke box rapper (fig.1) that needed rolling. I wanted a Johnson smoke box without the rivets so I filed them off then turned the part using the non riveted side as the outside. It would have been a lot easier if the rivets had been press out ones then there would have been no filing involved. To accompany the smokebox I needed a Johnson smoke box door which did not come with the kit and so I had to turn one (fig.6). Not so difficult as I thought it would be and all it required was a large HSS toolbit to shape the end of the correct diameter bar. The toolbit was packed up on the cross slide until it was the correct height then held by hand to turn the radius (fig.2). Having done these jobs I would be interested to know what modellers preferences are to solder paste as apposed to tinning when it comes to resistance soldering and anything they may have done differently to the way I have done it.
 

Attachments

  • Fig.1.JPG
    Fig.1.JPG
    99.2 KB · Views: 45
  • Fig.2.JPG
    Fig.2.JPG
    90 KB · Views: 44
  • Fig.3.JPG
    Fig.3.JPG
    136.3 KB · Views: 44
  • Fig.4.JPG
    Fig.4.JPG
    120.2 KB · Views: 44
  • Fig.5.JPG
    Fig.5.JPG
    109.8 KB · Views: 44
  • Fig.6.JPG
    Fig.6.JPG
    132.1 KB · Views: 44

paratom

Western Thunderer
I have put the loco kit aside for the time being and concentrating on finishing a 51L kit and the masters for CamKits. Decided to try and print out a look out for the 5L Models 25ft MR Brake Van I’m trying to put together. The etched brass one is so delicate and one of the ends has almost broken in half. Soldering the two ends to the side and getting a nice clean joint would be challenging for me.
137187-4f458c8b5116e70217465507f173f183.jpg

Pleased with the printed one and I might try and do one in clear resin so I don’t have to put the glazing in.
137188-8bdfe5f00c7efcccf593e0750f954b14.jpg

Another project is for CamKits Midland Railway A Class 0-6-0 kit which will have a resin casting for the main body.
137189-21146a22f767ada9033e293234f84bf1.jpg

The 3D print will be the master, unfortunately this one isn’t quite right as the cab end of the boiler tapers in slightly. I will have to make a slight alteration to the model to give the inside boiler lateral support so that it doesn’t taper in when printing.
137190-a1c553fdcb48ff43c39f1d17593aaec8.jpg
 

Attachments

  • Look out.jpeg
    Look out.jpeg
    179.1 KB · Views: 31
  • Printed Look Out.JPG
    Printed Look Out.JPG
    184 KB · Views: 31
  • 1103A at Brecon - Copy.jpg
    1103A at Brecon - Copy.jpg
    208.1 KB · Views: 33
  • MR A Class.JPG
    MR A Class.JPG
    126.9 KB · Views: 32

michael mott

Western Thunderer
Tom I like using this kit, clean flux and tiny snips of solder placed along the joint apply the hot air and watch the solder flash then point the gun away. Admittedly it relies on the notion that to un-solder the adjacent materials takes more heat, so far have had good luck.

Michael
 
Top