Rewanui (1940 NZR in 1:64 and other distractions)

Lawrence Boul

Western Thunderer
Does everyone do this?: In every model I make I always find one or two features that I find disproportionately attractive and give me more satisfaction than other bits.

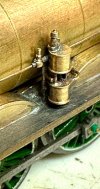
On We375 the safety valves resonate for some reason. Cut from the sprue, dropped into the etched holes and they just sit there perfect (though I see the near one needs to be tweaked straight). It's a silly enlargement, but they still look cool (to me anyway).


_HLB2709.jpg
 

Lawrence Boul

Western Thunderer
Indeed Lawrence, one can spend an inordinate amount of time on something that really can’t be seen. But God and you know it’s there.
View attachment 267868
I am truly amazed at the castings you are making.

Tim
Castings are great when it all goes well. You don't see the tears when it doesn't!

I scratchbuilt a pattern for that pump years ago in 1:64, so I know how tricky that must have been in 2mm. It's the doing, not the seeing though :)
 

Lawrence Boul

Western Thunderer
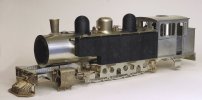
Staying with We375 for another instalment.

The mechanicals are still a little way off, so it's all been about sorting the 'pretty' bits, checking, rechecking and sorting what can be sorted. Everything is either press fit or just placed.
We375-1.jpg

Sand domes were printed and are a bit high. I went with the drawing, but twixt top and bottom castings is a sheetmetal band. I didn't have the measurement for the We, but went with it's parent the B. Unfortunately they are 4" or so too high, but easy fixed. The lids are separate, which is neat as I can fix them slightly askew. But the real benefit is they drain of resin after printing which saves a mess. Almost all the remaining parts are on hand, but their assembly and fitting can wait. There is a lot to go on and it's like a pile of spaghetti, but nothing fit critical.

Pipework and valve gear (Walschaerts) are slightly problematic as I don't have stock of wire, pins and tube appropriate to 9mm. This is slowly being accumulated though.

Sub assemblies like brake hangers are also done. Brake cylinders and cranks are soldered in. Handrails were a gentle press fit in the tanks. These are castings based on the We drawing, so dead right.

If tyres don't arrive, it will be the bogies next. They need tyres too, but the front one is still a bit of a black box. It's a simple looking thing though so should be OK.

The crosshead is a clip together assembly, the slide bars have been touched up with files and the whole thing lapped in with diamond paste. The clip arrangement is a fiddle in 1:64, but a breeze in 9mm. Piston rods still to be added, and the assembly will be honed again after that.

We crosshead.png
This is the crosshead from behind. The blue part is a press fit and is shaped to positively locate in the main crosshead part. This only works with really accurate castings, and this was pretty simple. If necessary (and as a late step) the blue part can be invisibly solder fixed via the through holes shown here.

 
Last edited:

Lawrence Boul

Western Thunderer
Back to Rewanui in 1:64, while 375 awaits some castings:

An earlier post discussed means to model tarpaulins. That exercise got put on hold for a bit as a) I got a bit jaded with the process and b) I had etches on the way that are needed to complete the wagons. But @Overseer came up with the definitive image, so I was always coming back to it.

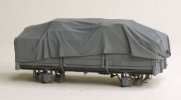
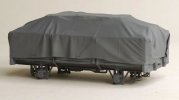
Here's the first real attempt in undercoat. This is a 2 piece print around about the size of your average open in 4mm (being 1:64 to a more restricted loading gauge). Body + headstocks, and underframe. The W irons are etched and clip in place before a dab of CA secures them. There's spring suspension units to drop in behind as well. A bit of lead (easily disguised here) adds some mass.
Tarped-L1_2.jpg
There's an etched handbrake lever and a couple of little etch/cast details to complete as well.
Tarped-L1_1.jpg

The missing lashing rings will be added from wire and the ties added using scale rope. I've had a go at using the correct knots and it is quite feasible. Not that kosher knots were used on the real thing that much if the photos I have are typical. Aside from the printing, there's about 15 minutes worth of effort in this so far.

This one's primarily proof of concept. Now I know how, future examples will be much easier at the digital end (though maybe not that quick as it's a bit involved).

The main practical problem with these is that they are just too good in the fabric department and thus almost impossible to clean up and remove uncured resin. The next version will have those unseen voids filled, which will simplify things.
 

Lawrence Boul

Western Thunderer
A brief hiatus on the tarped wagons. @KrustySimplex has provided records to link underframe/axlebox/hornstay/side height (4/5 board) and a few other variations to wagon number and tare. It's beholden on me to get these things correct, so there's been some decisions and sorting to match available decals with tarp candidates. Also reprinting the bodies at a higher resolution to reduce the layering in the tarp as it approaches horizontal.

_HLB2720.jpg

But while that was happening the courier showed up with the latest castings, which enabled me to fiddle with 375 a bit more. The rods were discussed earlier, but here's a set finished. The leading rod castings has a slight misalignment at the crankpin, but that will be hidden by the con rod.

The centre brass is cast in, but the leading and trailing are separate and can slide in slots in the rod ends. This enables them to be set to the correct length in a jig and then soldered up. Pretty simple to do and a good result.
 

Lawrence Boul

Western Thunderer
Castings of late have been noticeably improved. This is all out of my hands and my contractor is not transparent about the details, but I'm not complaining.

NZR engines typically have all the pipework visible and there's quite a bit of it. Things like brake air pipes are 1 1/4", so in 1:64 that's 0.5mm. Not a problem for straight runs, but unions are trickier. I've long had cast unions in the arsenal, but their success rate has been very poor.

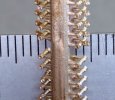
But things are improving (mm scale)!

unions2.jpgunions1.jpg

All well and good, but drilling these things out to take wire 'piping' is painful.

I tried a new approach on the last engine, which was to cast these unions with spigots and to use Albion Alloys 0.5mm tube for the pipe. This is a LOT easier and a great saving in broken drills and swear jar contributions.

9mm-unions.jpg
This is the 9mm version (for 0.9/1mm tube). I need to rework the patterns a bit. While these are very usable there has been a lot of investment failure. There's a fine gap between the hex faces and this resolves in the printing and investment. BUT it's fragile and the inrushing metal snaps off the fine structures resulting in a loss of sharpness and porosity. Easy to fix for the future.
 
Top