J68 for Monks Eleigh

Heather Kay

Western Thunderer
Eileen's Emporium and Squires also supply copper wire on reels. I have a stock here that Best Beloved bought for his electronics hobby, but more often finds its way into my modelling. :thumbs:
 

Eastsidepilot

Western Thunderer
Next up are the number and shed plates, these are from Guilplates, they need a little clean up around the edges with a fine needle file before being glued in position.
This a Stratford based loco, 30A, which may seem strange for Monks Eleigh but the shed that covered that area would have been Ipswich and the only J68 I could find on record was a shunter version which did not have the condensing tanks( the raised postion on top of the side tanks). So I have assumed that the resident J68 has been exchanged for this passenger tank while in for re-fit.
DSCF2967.JPG
DSCF2969.JPG
Transfers or decals as they are also known come in different forms, I have used methfix for the lettering and waterslide for the numbers. This is purely because it's what I had in stock although I find that the numbers are always a quicker easier job if they are water slide.
DSCF2970.JPG So first the lettering, 10" BRITISH RAILWAYS, cut the transfers out of the sheet and then cut right up close to the bottom edge of the lettering and trim around the rest as close as you like.
DSCF2971.JPG We need 3 parts meths to 1 part water and a nice soft brush.
Mark out, very lightly, the bottom edge and extreme ends of the lettering on the model with a soft sharp pencil, peal the backing paper from the decal and place it in position, hold it down and dab some meths mix on with brush, you'l find it will hold itself down once flooded with the meths.
To be continued.
 

Attachments

  • DSCF2972.JPG
    DSCF2972.JPG
    560.6 KB · Views: 13
  • DSCF2973.JPG
    DSCF2973.JPG
    625.3 KB · Views: 13

Eastsidepilot

Western Thunderer
DSCF2975.JPG
DSCF2976.JPG So making sure the transfer is down flat and no wrinkles and in position properly leave it to dry, say 10 mins is usually about right. Now dampen the tissue backing with plain water, tease up one end with a scalpel and peel it off with a pair of tweezers.
DSCF2978.JPG
DSCF2979.JPG
The pencil marks can be carfully rubbed away with a cotton bud, but please use a soft leaded pencil, HB works well but don't press down hard or you'll mark the paint!
Next the numbers and these are Fox waterslide, again I use guide lines marked with pencil and the spacing can be got by using dividers between each numeral as you apply each number.
I dampen the area first with plain water, place the transfer roughly in position, dampen the transfer on top, you'll see the backing paper darken, give it 2-3 min's to soak then use a pair of fine tweezers to hold the backing and a cocktail stick to slip the transfer off the paper, correct the position. I there is too much water and it's making the transfer float about just dab it with a brush to take up some of the water.
Once in position blot it with a cotton bud held upright, this will help clear any air trapped under the transfer.
Proceed with the other numerals and leave too dry completely before do any thing else to it.
DSCF2981.JPGDSCF2982.JPG
The works pilot pulls the finished loco from the paint shop.
DSCF2984.JPG In the next post I will detail the weathering which will not be a severe mullering :D but it will be given a finish appropriate for a loco that has only been out on the road for a couple of weeks.

Col.
 

7mmMick

Western Thunderer
Hi Col,

I'm really enjoying the way this thread is going mate. A big thankyou from me for the step by step guide as its great to see how you do it and I can already see several things I can adopt :thumbs: Also the several pictures are extremely informative as we can see what tools and techniques are used and IMHO this can not be as well covered in plain text, thanks for taking the time to balance the camera whilst brush in hand etc :) I'm really looking forward to the weathering section as for me it's the one thing that brings the model to life and I desperately need to improve my loco weathering.

ATB Mick
 

Eastsidepilot

Western Thunderer
We start with an ex works loco..........
DSCF2985.JPG
I set the airbrush pressure to 15psi and load with 50-50 Hunbrol 29 Dark Earth and 33 Matt Black.
Spray around the chassis, buffer beams up the front and rear and down each side, we are not aiming to coat with solid colour just a dusting to take the gloss off the works finish.
DSCF2986.JPG
DSCF2987.JPG
DSCF2988.JPG
Now clean out the gun and re-load with Matt black and coat all the top surfaces including the front and rear of the cab, don;t worry about the windows just dust them over, don't mask them off, we will deal with these later.
Work from the chimney backwards.
DSCF2990.JPG
DSCF2991.JPG
Now coat half the roof with with acrylic matt black using a large brush and dust it with black powder, I do half at a time as the acrylic drys quicker , enamel takes a lot longer.
DSCF2992.JPG
Do the same with the chimney top and any other upper surface you think would get a covering of soot. Use photo's for research.
Below is how we end up at this stage
DSCF2993.JPG Put the kettle on and let this all dry.
We've not finished yet.
ATB, Col
 

7mmMick

Western Thunderer
So that's how you do it :) what type of acrylic do you use on the roof? I need to rush out and buy some :thumbs:

ATB Mick
 

P-J.S.

Active Member
Dunno what else I can say that hasn't been said, but wow! Would you mind if I saved a copy of this to take into my modelling den to have a go at attempting please?
 

dibateg

Western Thunderer
Interesting to see the use of powder Colin - something I've shied away from. I must try it.

Tony
 

Eastsidepilot

Western Thunderer
Great stuff Colin. What do you use as your black powder?

Rob,
The powder I have was given to me some years ago, I hav'nt a clue what it's made from. Not having had to buy any recently I assume there are powders available from various sources.

Col.
 

Eastsidepilot

Western Thunderer
So that's how you do it :) what type of acrylic do you use on the roof? I need to rush out and buy some :thumbs:

ATB Mick
Mick,
Lifecolor acrylic's mate, Peter Hunt stocks them, I like there rust and flesh colours and they have quite a wide range .

Col.
 

Steph Dale

Western Thunderer
Rob,
The powder I have was given to me some years ago, I hav'nt a clue what it's made from. Not having had to buy any recently I assume there are powders available from various sources.

Col.

Looking at it I wondered if was just good old powder paint?

Steph
 

Eastsidepilot

Western Thunderer
Now the paint's dried, I left it over night, I polished the sides and rear of the loco in vertical strokes with a dry cotton bud.
DSCF2996.JPG
DSCF2997.JPG 
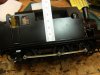
The buffer beams have most of the grime wpied off with a cotton bud dampened with white spirit, don't soak it, just dip it in the spirit and then roll it on some kitchen towel.
The idea is to leave the grime coloured paint in all the corners around the fittings on the beam.
DSCF2999.JPG

On the tank sides below the tank fillers I dry brushed some Humbrol Metalcote 27004 Gunmetal in downward direction splaying out slightly at the bottom.
This will give the impression of water staining from the water over flowing when the fireman has put the bag in.
DSCF3001.JPG Use the brush very dry, I dip the brush in the paint, wipe most of it off and then wipe it on some kitchen towel, the less the better, we just want a hint on the surface. Let it dry thoroughly before touching it again which we will later.


More to follow
Col.
 

Eastsidepilot

Western Thunderer
Too the wheels and coupling rods now and I use some Lifecolor acrylic "Oil" TSC 207 weathering agent.
Some around the knuckles of the rods and some brushed in random radial strokes on the wheels, you often see this on steam loco wheels where the oil is splayed out where it has seeped from the crank pin bearings.
DSCF3002.JPG
Back to the body and more Metalcote Gumetal dry brushed on the handrails, step treads and top of the foot plate where the crew have clambered and left scuff marks in the dirt
DSCF3003.JPG
DSCF3011.JPG
DSCF3013.JPG
Once dry polish all this with a dry cotton bud and it will look like the sheen left on the egdes and surfaces that are created by constant wear.
Another post shortly, Col.
 

Eastsidepilot

Western Thunderer
Don't forget the tank tops around the filler lids, a little Gunmetal left to dry and then polished. Touch up any sooty areas that are shiny with a dab of matt black.
DSCF3016.JPG

Now here's the brave and very cautious bit, put a polishing mop in the mini drill and polish the paintwork on the sides of the tanks and rear corners on the bunker, DON'T press down with any pressure just let it glide over don't try and polish into the corners of the footplate, we want the dirt left there and be very careful not to hit any fittings.
This is also when you'll find out if you've applied the transfers properly:eek:. All should be ok.
DSCF3019.JPG
DSCF3020.JPG
DSCF3021.JPG The effect is of a reasonably clean surface that is just starting to collect the patina of a working loco.

Col.
 

Heather Kay

Western Thunderer
This is a brilliant thread, Colin. It's always a pleasure to be let in to see a master at work.

One question: do you varnish to protect the transfers at any stage?
 

Ressaldar

Western Thunderer
a great thread Col, very enjoyable. Have you tried using Kleer for the water overflow? it has worked for me in the past.

cheers

Mike
 

Eastsidepilot

Western Thunderer
This is a brilliant thread, Colin. It's always a pleasure to be let in to see a master at work.

One question: do you varnish to protect the transfers at any stage?
Heather,
I don't normally varnish over transfers as I've not found the need to, with weathering you get some sealing, on a pristine job it may well be best to give the whole job a coat of satin varnish but I find varnish can give the model a bit of an overall bland finish if that makes sense.

Col.
 
Top