7mm Ressaldar's kit building swansong - verse the second - D6320

Ressaldar

Western Thunderer
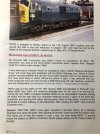
Not much progress this week except that the light positions were drilled out and the 2mm lighthouse LEDs tried for fit and clearance

P1010918.JPG

;A' end with bottom right & centre 'whites

P1010919.JPG

and 'B' end with upper centre & lower centre whites.

I have discovered that there is sufficient clearance to fit these lighthouse LEDs 'as supplied' but will have to insert a 20 thou piece of black plasticard immediately behind the front face to act as a light baffle which will bring the protruding part of the lighthouse back to a more reasonable length, it can also be filed round if needed.

Last night I took both 22s down to the Club to see how they performed 'double headed'


scope for some more trials me thinks!!

regards

Mike
 

Boxbrownie

Western Thunderer
Looking good, and a nice read of the build up…..I miss building the JLTRT kits……but come on…..it’s 7mm what’s with the two tiddly little sugar cube speakers…..I put the biggest speakers into a bass box I could find in mine, get that roof rattling! :D
 

Ressaldar

Western Thunderer
Hear what you BB but don’t forget, this is a ‘baby’ Warship after all is said and done!:)):)):)):thumbs: and there isn’t that much space available.

cheers

Mike
 

Boxbrownie

Western Thunderer
It’s a baby sure, but you shouldn’t JUST hear it screaming :))

I still have an unbuilt JLTRT class 40 all boxed up…….if and when, I will still be squeezing speakers in that belong in a HiFi system…..I wish!;)
 

Ressaldar

Western Thunderer
Further (slow) progress made over the past week, with the end fittings now in place, some after the primer was applied.

P1010922.JPG

P1010923.JPG

also fitted the console controls, chairs and a bearded driver followed by further trial fitting of cabs to main body

P1010920.JPG

P1010921.JPG

which fortunately, don't look too bad.

Ali window surrounds painted next followed by window installation, the lights and then the console table/floor section can be inserted and the cabs can be joined onto the body.

More to follow soon.

regards

Mike
 

Ressaldar

Western Thunderer
Hi Matt,

many thanks for asking, the short answer is - no.

My mojo stalled quite quickly after the last post, mainly due to outside problems but thankfully, they seem to be over now and coincidently, I will be picking up the pieces on the workbench this morning. I had taken the loco to the Club for checking purposes having fitted the lights into their respective sockets in the nose and discovered that at one end the desk console was not tight home with the bottom of the windows and this gave a light leak. Fortunately I had used Glue and Glaze rather than super glue and it was fairly easy to cut through the bottom glue joints and remove the floor/console unit and I shall start todays efforts with re-fixing the unit and seeing if I get a light tight joint as I have at the other end.

The next task will be to ensure a flush fit all round of the cab unit to the main body shell prior to super gluing these units on. After that, there is not much left to complete the model prior to painting. So it may well be completed soon - fingers crossed.

regards

Mike
 

Ressaldar

Western Thunderer
So I actually made it into the workshop this morning and it turned to be quite productive in as much as I refitted the desk console/floor unit in number 1 end, having first re-fixed the lighthouse LEDs and followed this up with fixing the cabs to the main body

P1010940.JPG

which turned out not too bad (no worse than the first build), a bit of judicious filling should sort things out.

I then concentrated on the bringing down brightness of the LEDs, I had already put resistors onto the + blue leads but thought that they were still too bright, so I introduced 5k resistor to each line immediately before the wires went into the terminal block on the decoder.

P1010941.JPG
P1010942.JPG
P1010943.JPG
P1010944.JPG

I still think that they may be too bright, but the bigger concern in the overspill on the white lights, again, this may reduce if I put larger resistors in but I think that I may have to insert a sliver of blue-tac or the like to contain the light behind the disc without giving the appearance that the disc is 'solid'.

The next task is to get the filler in and get some weight into the body in the form of self adhesive wheel balance weights and then think about painting.

regards

Mike
 

Vulcan47

Member
Hi Mike,

Thank you for the update. Pleased that you’ve got your modelling mojo back and we can continue to enjoy your excellent ‘Baby Warship’ build.

Appreciate ready to run has a place in our hobby and some excellent layouts have evolved as a result. However, maybe it’s just me, but most of the rolling stock (particularly modern traction), now appears the same because we’ve lost a lot of the individuality you get from kit building; so it’s very refreshing to read about your exploits with the MM1 Class 22.

I look forward to more progress and seeing the finished model in due course.

Best regards,

Matt.
 

Ressaldar

Western Thunderer
A productive morning in as much as I was able to bur down and clean up the filler that I applied the other day and also sort out the 'overspill' lighting problem associated with the white running lights.

My initial thoughts were to insert a plasticard wedge but that was soon discarded as I remembered that I had some 2mm id plastic tube and realised that as there was at least 1mm of the lighthouse protruding out of the front and that there was no way that I could get into the back to change the lighthouse if it failed, I hit on the idea to put the tube over the end and superglue it in place, having first cut it just overlong to be a snug fit behind the disc itself.

The single top light was tackled first and things were going too well as I soon discovered that when the disc was placed over the tube, some of the outside of the tube was showing beyond the disc. First try at remediation was to file down the opposite side of the tube but not having a very thick wall to begin with, the amount removed was insufficient to solve the problem, The lost wax casting of the disc has quite a large piece on the back for fixing purposes so I rigged up the drill with a slitting disc on the end of the flexible shaft and holding the disc firmly in a trusty pair of pliers I ran the slitting disc along the fixing pad effectively reducing the width by half and this together with the trimming of the tube brought the edge of the tube well inside the disc rim. I tidied up all surfaces applied superglue to the model and maneuvered the disc in place ensuring the the hole in the disc was directly over the end of the LED and that the representation of the hinge was vertical. Waited a few minutes for the glue to set and connected the body up to the chassis, applied power and was very satisfied with the result, The 'B' end was then tackled in the same way.

P1010946.JPG
'A' end
P1010945.JPG
'B' end

the body is only resting on the chassis hence the list. What looks like 'light overspill' is in fact where I filed the old superglue residue off and had to go down to the bare body to clean it off completely. The body will be re-primed immediately prior to painting.

regards

Mike
 

Ressaldar

Western Thunderer
A question if I may,

P1010944-001.JPG

I am finishing my model with small yellow panels on the ends and I am unsure as to what colour the backs of the route discs should be when in the closed position as above - they are all within the yellow panel so should they be yellow to merge in or are they green as the general body colour?

Worried of Wirral
 

Muddysblues

Western Thunderer
Hello Mike, hope you and everyone on WT is safe & well ? okay finally found the written info about original liveries, this is taken from the “British Railways Class 22, a second pictorial salute to the British Rail (NBL) Class 22”, page 27 screen shot below: picture copyright Howard Bolton, written text copyright of the Project Class 22

Best regards
Craig
 

Attachments

  • A84443E7-9120-428E-93CC-CFDC5FC40884.jpeg
    A84443E7-9120-428E-93CC-CFDC5FC40884.jpeg
    173 KB · Views: 23

Muddysblues

Western Thunderer
Hello Mike, just to add to further though to previous suggestions on the lower stripe, when looking at many pictures, colour shading is very much an individual observation.

It’s common knowledge everyone’s eyes see colours differently, and colour varies in different exposure, and the fading of liveries through chemicals, weathering and bleaching soon sees the livery in a multitude of varying colour hues & fading.

Best regards
Craig
 

Ressaldar

Western Thunderer
Hello Mike, just to add to further though to previous suggestions on the lower stripe, when looking at many pictures, colour shading is very much an individual observation.

It’s common knowledge everyone’s eyes see colours differently, and colour varies in different exposure, and the fading of liveries through chemicals, weathering and bleaching soon sees the livery in a multitude of varying colour hues & fading.

Best regards
Craig
Hi Craig,

I totally agree with you on the 'perception' aspects and will go with the suggestion of using the Acid8 primer option by just masking off the stripe, it will get 'fudged' with the weathering anyway, so we will wait and see. I must admit that Duck Egg GREY is a new one on me!

Stay safe and well

regards

Mike
 

Ressaldar

Western Thunderer
The camera always shows up the errors......................

P1010962.JPG

somehow, the D has gone 'awol' between my den and the workshop, so that will be rectified when I return from the Club later this afternoon.

P1010963.JPG

P1010964.JPG

P1010966.JPG

P1010967.JPG

P1010970.JPG

all in all, I am quite pleased with the outcome so I will keep the tools on the workbench, especially as I am waiting for the postie to deliver a small package from Skipton expected later today - more of this soon.

regards

Mike
 
Top