You are using an out of date browser. It may not display this or other websites correctly.
You should upgrade or use an alternative browser.
You should upgrade or use an alternative browser.
Dan's Workbench - D1031 Western Rifleman
- Thread starter Dan Randall
- Start date
Phill Dyson
Western Thunderer
I'm a die hard enamels user too Dan, but acrylics are ideal for figures as you can use the same brush for all colours (with a cup of water to rinse between colours of course) & they dry in minutes so all the colours needed for figures can be painted in the same sessionDan Randall said:Acrylics versus enamels - I have about 50 or 60 bottles or tins of enamel knocking around and I'm very comfortable using them, to be honest.

Cheers Phill :wave:
Dan Randall
Western Thunderer
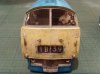
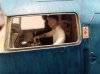
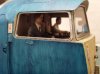
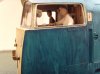
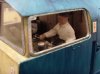
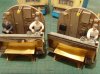
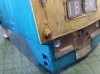
Some major progress on Rifleman this afternoon - I've finally installed the seats & crew and can now cross two more things off the list.
Here are a few piccies, but please bear in mind the fact that they're cruel enlargements and things look a lot better to the naked eye") ...
...
[attachment=6:l7z3mdhe]SNV33277.JPG[/attachment:l7z3mdhe]
[attachment=5:l7z3mdhe]SNV33278.JPG[/attachment:l7z3mdhe]
[attachment=4:l7z3mdhe]SNV33279.JPG[/attachment:l7z3mdhe]
[attachment=3:l7z3mdhe]SNV33281.JPG[/attachment:l7z3mdhe]
[attachment=2:l7z3mdhe]SNV33282.JPG[/attachment:l7z3mdhe]
[attachment=1:l7z3mdhe]SNV33283.JPG[/attachment:l7z3mdhe]
[attachment=0:l7z3mdhe]SNV33284.JPG[/attachment:l7z3mdhe]
I'm actually quite pleased with the final appearance and now feel like there's a light at the end of the tunnel.") I've been putting off assembling the cabs/body until the crew and seats were in and can now crack on with this, but may just finish off some other jobs on the cabs before final assembly.
I've been putting off assembling the cabs/body until the crew and seats were in and can now crack on with this, but may just finish off some other jobs on the cabs before final assembly.
I still have to do the windscreen wipers, marker light lenses, front handrails and cab side windows and feel this would be easier without the rest of the body attached.
More updates as and when.
Regards
Dan
Here are a few piccies, but please bear in mind the fact that they're cruel enlargements and things look a lot better to the naked eye
...[attachment=6:l7z3mdhe]SNV33277.JPG[/attachment:l7z3mdhe]
[attachment=5:l7z3mdhe]SNV33278.JPG[/attachment:l7z3mdhe]
[attachment=4:l7z3mdhe]SNV33279.JPG[/attachment:l7z3mdhe]
[attachment=3:l7z3mdhe]SNV33281.JPG[/attachment:l7z3mdhe]
[attachment=2:l7z3mdhe]SNV33282.JPG[/attachment:l7z3mdhe]
[attachment=1:l7z3mdhe]SNV33283.JPG[/attachment:l7z3mdhe]
[attachment=0:l7z3mdhe]SNV33284.JPG[/attachment:l7z3mdhe]
I'm actually quite pleased with the final appearance and now feel like there's a light at the end of the tunnel.
I've been putting off assembling the cabs/body until the crew and seats were in and can now crack on with this, but may just finish off some other jobs on the cabs before final assembly.I still have to do the windscreen wipers, marker light lenses, front handrails and cab side windows and feel this would be easier without the rest of the body attached.
More updates as and when.
Regards
Dan
Attachments
-
 SNV33278.JPG207.1 KB · Views: 51
 -
 SNV33284.JPG176.7 KB · Views: 50
 -
 SNV33283.JPG186.8 KB · Views: 49
 -
 SNV33282.JPG201.8 KB · Views: 51
 -
 SNV33281.JPG188 KB · Views: 51
 -
 SNV33279.JPG183.1 KB · Views: 50
 -
 SNV33278.JPG207.1 KB · Views: 50
 -
 SNV33284.JPG176.7 KB · Views: 51
 -
 SNV33283.JPG186.8 KB · Views: 50
 -
 SNV33282.JPG201.8 KB · Views: 52
 -
 SNV33281.JPG188 KB · Views: 52
 -
 SNV33279.JPG183.1 KB · Views: 51
 -
 SNV33277.JPG183.5 KB · Views: 52
 -
 SNV33277.JPG183.5 KB · Views: 49
lancer1027
Western Thunderer
Looking Great Dan
Simon
Flying Squad
Dan Randall said:Some major progress on Rifleman this afternoon - I've finally installed the seats & crew and can now cross two more things off the list.
Here are a few piccies, but please bear in mind the fact that they're cruel enlargements and things look a lot better to the naked eye
I'm actually quite pleased with the final appearance and now feel like there's a light at the end of the tunnel.
I still have to do the windscreen wipers, marker light lenses, front handrails and cab side windows and feel this would be easier without the rest of the body attached.
More updates as and when.
Regards
Dan
They look just the job to me, this whole project is a truly amazing piece of work

Dan Randall
Western Thunderer
lancer1027 said:Looking Great Dan
Thanks Rob.
28ten said:Are you going to paint the rubber surrounds on the cab windows?
I might have a bash at it as they're quite noticeable. Perhaps I'll hold fire and see what your's turn out like. :lol:
Simon said:They look just the job to me, this whole project is a truly amazing piece of work
Thanks Simon.
Out of interest, are Gauge 1 figures any better than those in the smaller scales?Regards
Dan
Scale7JB
Western Thunderer
Dan Randall said:Here are a few piccies, but please bear in mind the fact that they're cruel enlargements and things look a lot better to the naked eye
I think it all looks pretty spectacular in the cruel enlargements..
JB.
Dan Randall
Western Thunderer
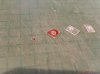
I thought I?d have a go at the marker lights on Rifleman today. The first job was to try and make some lenses. I had an automatic centre punch in my tool box that is rarely used. By twisting the body, the amount of force needed to activate the punch can be varied. With a piece of lead flashing underneath, I tried punching some 10 thou clear Evergreen styrene. Once I was happy with the amount the styrene was embossed by, I modified the shape of the punch tip to be more rounded rather than pointy. Having ascertained the lens shape was now satisfactory, it was time to start work.
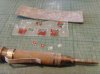
For the red lenses, some of the styrene is coloured with an overhead projector pen. Here are the tools and materials and between the punch and the styrene, can be seen some satisfactory lenses?.
[attachment=5:3lgy282y]SNV33291.JPG[/attachment:3lgy282y]
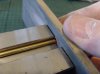
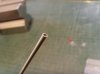
Using a piece of 2mm inside diameter tube and a little spit, one of the lenses is picked up and it and the tube are laid horizontally in a V-block. The tube/lens are pushed hard against an abrasive stick, which in turn is pushed hard against the V-block , whilst moving the sanding stick back and forth?.
[attachment=4:3lgy282y]SNV33292.JPG[/attachment:3lgy282y]
Once the surplus styrene is sanded away, this is what remains?.
[attachment=3:3lgy282y]SNV33293.JPG[/attachment:3lgy282y]
Any dust from the abrasive paper is removed from the inside of the lens and the inside of the lens is re-coloured if necessary. Here it is, ready for use?.
[attachment=2:3lgy282y]SNV33294.JPG[/attachment:3lgy282y]
And held in place with a little canopy glue?.
[attachment=1:3lgy282y]SNV33295.JPG[/attachment:3lgy282y]
A few minutes later and the white lens is done?.
[attachment=0:3lgy282y]SNV33296.JPG[/attachment:3lgy282y]
For the red lenses, some of the styrene is coloured with an overhead projector pen. Here are the tools and materials and between the punch and the styrene, can be seen some satisfactory lenses?.
[attachment=5:3lgy282y]SNV33291.JPG[/attachment:3lgy282y]
Using a piece of 2mm inside diameter tube and a little spit, one of the lenses is picked up and it and the tube are laid horizontally in a V-block. The tube/lens are pushed hard against an abrasive stick, which in turn is pushed hard against the V-block , whilst moving the sanding stick back and forth?.
[attachment=4:3lgy282y]SNV33292.JPG[/attachment:3lgy282y]
Once the surplus styrene is sanded away, this is what remains?.
[attachment=3:3lgy282y]SNV33293.JPG[/attachment:3lgy282y]
Any dust from the abrasive paper is removed from the inside of the lens and the inside of the lens is re-coloured if necessary. Here it is, ready for use?.
[attachment=2:3lgy282y]SNV33294.JPG[/attachment:3lgy282y]
And held in place with a little canopy glue?.
[attachment=1:3lgy282y]SNV33295.JPG[/attachment:3lgy282y]
A few minutes later and the white lens is done?.
[attachment=0:3lgy282y]SNV33296.JPG[/attachment:3lgy282y]
Attachments
Dan Randall
Western Thunderer
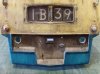
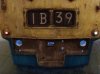
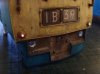
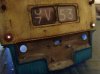
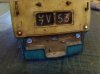
Hold on, it?s getting dark?.
[attachment=3:14vey8ba]SNV33312.JPG[/attachment:14vey8ba]
[attachment=2:14vey8ba]SNV33313.JPG[/attachment:14vey8ba]
[attachment=1:14vey8ba]SNV33314.JPG[/attachment:14vey8ba]
[attachment=0:14vey8ba]SNV33316.JPG[/attachment:14vey8ba]
The actual light source (as some of you already know), is from LEDs via fibre optic cables. For photographic purposes, I just shone a torch down the fibre optic cables, so the white light looks a little harsh. It looks better in the flesh and the end of this particular fibre optic cable has a smear of yellow from an OHP pen, which gives it a nice tungsten glow.
That?s all for now ? I?m just off to cross this job from the list.
Regards
Dan
Attachments
Phill Dyson
Western Thunderer
Clever stuff Dan :scratch: & well worth the effort 
Phill
Phill
Dan Randall
Western Thunderer
Scale7JB said:Fantastic!
Ready for Telford ?
I hope so - I need an excuse to buy another kit. :lol:
Phill Dyson said:Clever stuff Dan :scratch: & well worth the effort
Phill
Thanks Phill - I meant to say, I think it was the late Guy Williams who had the idea of embossing lenses, except he was fitting them to oil lamps on steam locos. He probably knocked up a proper tool in the lathe as well, unlike me, trashing a perfectly good centre punch. :lol:
Regards
Dan
Phill Dyson
Western Thunderer
28ten said:Im already thinking about d1016
Would that be D1016 MFYE ?

Phill :wave:
28ten
Guv'nor
Phill Dyson said:[quote=""28ten"":3nfi0qbv] Im already thinking about d1016
Would that be D1016 MFYE ?
Phill :wave:[/quote:3nfi0qbv]
Yes
lancer1027
Western Thunderer
EXELLENT Dan. I am seriously thinking fibre optic route for my lighting on the next one. There is a lot of wires in the body so fibre optics would reduce that. Where can i get optic cable from and whats the best size for the headcode/lights?
Rob
Where can i get optic cable from and whats the best size for the headcode/lights?Rob
28ten
Guv'nor
I think mine are 1.5mm. I got them from eBay, I can look up tha name of the supplier, but they are top of the fibre optic search!lancer1027 said:EXELLENT Dan. I am seriously thinking fibre optic route for my lighting on the next one. There is a lot of wires in the body so fibre optics would reduce that.
Rob
Dan Randall
Western Thunderer
lancer1027 said:EXELLENT Dan. I am seriously thinking fibre optic route for my lighting on the next one. There is a lot of wires in the body so fibre optics would reduce that.
Rob
Hi Rob. I got my fibre optics from a company called Starscape:
http://www.starceiling.co.uk/
I bought about four different diameters for appraisal, but the one I ended up using was approx 0.5 mm diameter I think (well, I've fed it through a piece of 0.85 mm I/D aluminium tube, so I think that's about right).
My original ramblings on fibre optics can be found here (but you'll have to scroll down a bit)
http://www.westernthunder.co.uk/danthread/
Regards
Dan