You are using an out of date browser. It may not display this or other websites correctly.
You should upgrade or use an alternative browser.
You should upgrade or use an alternative browser.
A SR Z Class loco - Nick Dunhill's Workbench
- Thread starter Nick Dunhill
- Start date
adrian
Flying Squad
I suspect it'd be even more economic, quicker, easier and accurate if he skipped buying the kit and build them from scratch.I hate kits whose parts don’t fit, so you have my sympathies. Curiously, a pal quite enjoys the challenge of some of the more, er, esoteric, kits out there. He claims the key advantage is economic,
mickoo
Western Thunderer
Funnily enough I have told one client that if he see's anything from certain vendors to walk by and just let me know. I say that from a commercial prospective in protection of the overall fiscal fee, not as a modeller because as we all know, modellers time is free....something I vehemently disagree with.I suspect it'd be even more economic, quicker, easier and accurate if he skipped buying the kit and build them from scratch.
On the 72xx all that shaded red on the body is from the kit, the rest was scratch built and in reality I should have done the cab front as well.

If I had know before hand that so much needed replacing I would have etched it, there were enough warning signs along the way but I persevered with scribe, saw and file.....never again.
The trick comes with part scratch builds is knowing when to junk the crap and build new, more often than not you get part way through a bit and realise it's only going to look
 when it's finished. The problem is, once you build one new bit then nothing else in the kit fits it so you end up building most of it from scratch from that point on.
If you can get a good idea ahead of the game then a set of etched parts speeds things up no end, yes there is an initial outlay but you know everything fits and it speeds the build up no end.
Nick Dunhill
Western Thunderer
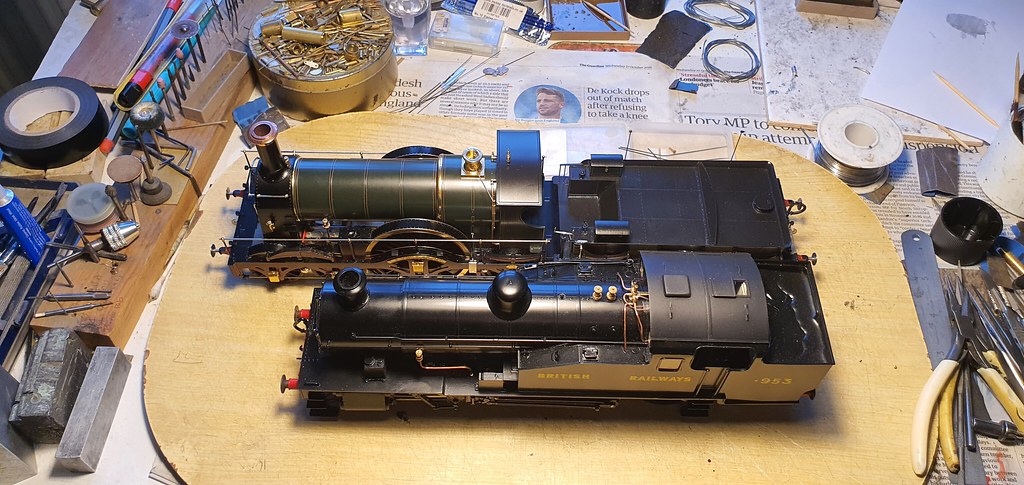
You can see in an earlier post how the boiler was rolled into an interesting interpretation of a cylinder. Also it was cut away to match the top edge and front of the tanks, presumably betraying it's 4 mm origins to contain a motor. Also when I began lifting dimensions from the etch to locate the steam fountain, SVs and other bits I noticed that the pre etched holes for the vacuum ejector pipe brackets were on the wrong side! Or maybe it had been rolled the wrong way round.....I don't know, and it's in the scrap bin now.
There is only one circular former supplied, and the idea of the kit is to build the smokebox first, using the circular former for the front. Then put a wrapper round it, then a collar round the rear of the smokebox to give the step up to the boiler (clothing.) There is no former for the rear of the smokebox so any uncircularity (not a word - I know!) in the rear of the smokebox will be transferrred into the boiler. I could only wonder who has a soldering iron capable of putting enough heat into so many layers of brass sheet such that you can solder without distortion. ''It'll be so much quicker, easier and better to make a new boiler from scratch,'' I figured.
I cut two formers for the smokebox plus a third for the smokebox front which sits slightly proud of the wrapper with a radiused edge. I also cut two formers for the boiler and firebox. These are the two structures soldered up.

I made cuts in the rear of the boiler so I could flare out the material to form the firebox sides, although I didn't take too much trouble to get this bit exactly right as it's really invisible on the finished model. I was really looking for the firebox front so that the motor and gearbox will be out of sight. Anyway here it is all joined up and with boiler bands, chimney and dome.

The white metal castings in the kit were actually quite good, although the chimney wasn't hollow. Being cast in white metal did make it possible to open out though.
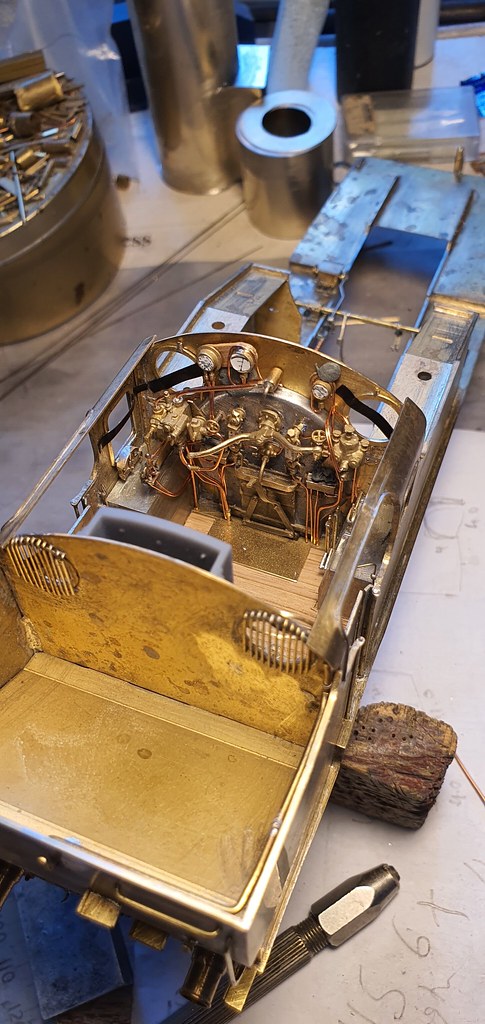
Some castings turned up from Laurie and I was able to complete and mock up the cab interior.

And then it was back to detailing and mounting up the boiler.


You can see there's a boiler stay mounted at the end of the water tank.

I'm within touching distance now, just the boiler handrails, ejector pipe, steam fountain and injectors to go.
There is only one circular former supplied, and the idea of the kit is to build the smokebox first, using the circular former for the front. Then put a wrapper round it, then a collar round the rear of the smokebox to give the step up to the boiler (clothing.) There is no former for the rear of the smokebox so any uncircularity (not a word - I know!) in the rear of the smokebox will be transferrred into the boiler. I could only wonder who has a soldering iron capable of putting enough heat into so many layers of brass sheet such that you can solder without distortion. ''It'll be so much quicker, easier and better to make a new boiler from scratch,'' I figured.
I cut two formers for the smokebox plus a third for the smokebox front which sits slightly proud of the wrapper with a radiused edge. I also cut two formers for the boiler and firebox. These are the two structures soldered up.
I made cuts in the rear of the boiler so I could flare out the material to form the firebox sides, although I didn't take too much trouble to get this bit exactly right as it's really invisible on the finished model. I was really looking for the firebox front so that the motor and gearbox will be out of sight. Anyway here it is all joined up and with boiler bands, chimney and dome.
The white metal castings in the kit were actually quite good, although the chimney wasn't hollow. Being cast in white metal did make it possible to open out though.
Some castings turned up from Laurie and I was able to complete and mock up the cab interior.
And then it was back to detailing and mounting up the boiler.
You can see there's a boiler stay mounted at the end of the water tank.
I'm within touching distance now, just the boiler handrails, ejector pipe, steam fountain and injectors to go.
Nick Dunhill
Western Thunderer
Could any of you Southern buffs shed some light on the colour scheme? It's going to be late 40s in black with BRITISH RAILWAYS on the tank in the SR typeface with s953 number. Would the frames on view between the cylinder block and firebox stay be red? And if so would the horn guides with their bolt plates and webbing, springs and hangers be black or red?
Jack P
Active Member
Nick, that Z looks wizard! all the extra work has definitely been worth it.
953 went in for a general 17/02/1948 and had its boiler swapped + s953 applied (the only Z to get an 'S' prefix).
From my understanding, originally the inside frames were red all over. I can't find anything that suggests that would've changed?
Appreciate that isn't 100% airtight, but it may be of some help?
Nick Dunhill
Western Thunderer
And so this week, after a marathon build, I came to the last small left-over panel of etches and sprue of castings, good feeling isn't it? Ha, well the etches concerned were for the smokebox side lamp irons. (SR 6 Cambrian 1) As usual with this kit the etches were ****ing useless, but at least I repurposed the fret.

Then it was just the fitting of all the handrails, ejector pipe, oil/steam pipes and the injector system. The cast injectors provided were very good (whoop whoop) but the steam fountain, whilst a nice casting only represented about half the real thing. Luckily I was able to repurpose some Scorpio castings from a previous job.


I had to make a smokebox saddle from the etches in the kit. To be fair to the casting in the kit it was quite good but was never going to fit between the repositioned frames. The rear of the saddle is curved, so the etches needed some modification. The curve turns out to be essential as it produces space for the operating reach rod between the front sand boxes, either side of the smokebox.
So that's the build done, well almost as I (still) haven't had a motor/gearbox delivery yet, and there seems little point in mocking it up for a few photos only to have to tear it down to fit the motor and mounts. I'll post pics when the motor is fitted.
I'd give the kit a 4.5/10. I made life difficult for myself by not accepting the shortcomings of the kit, however. Once you venture so far off piste the parts were never going to fit. I'm currently doing a quickie building someone a chassis for a Finney7 V2 and that is just falling together so easily, so kits can be designed with fidelity and accuracy within. There are plenty of people who have built a Z for themselves from this kit and seem delighted with it so who am I to judge.
There's more pics here;
nick dunhill
including some of a Victor Special that my son and myself managed to finish before he shot off to University.
Then it was just the fitting of all the handrails, ejector pipe, oil/steam pipes and the injector system. The cast injectors provided were very good (whoop whoop) but the steam fountain, whilst a nice casting only represented about half the real thing. Luckily I was able to repurpose some Scorpio castings from a previous job.
I had to make a smokebox saddle from the etches in the kit. To be fair to the casting in the kit it was quite good but was never going to fit between the repositioned frames. The rear of the saddle is curved, so the etches needed some modification. The curve turns out to be essential as it produces space for the operating reach rod between the front sand boxes, either side of the smokebox.
So that's the build done, well almost as I (still) haven't had a motor/gearbox delivery yet, and there seems little point in mocking it up for a few photos only to have to tear it down to fit the motor and mounts. I'll post pics when the motor is fitted.
I'd give the kit a 4.5/10. I made life difficult for myself by not accepting the shortcomings of the kit, however. Once you venture so far off piste the parts were never going to fit. I'm currently doing a quickie building someone a chassis for a Finney7 V2 and that is just falling together so easily, so kits can be designed with fidelity and accuracy within. There are plenty of people who have built a Z for themselves from this kit and seem delighted with it so who am I to judge.
There's more pics here;
nick dunhill
including some of a Victor Special that my son and myself managed to finish before he shot off to University.
Last edited:
Nick Dunhill
Western Thunderer
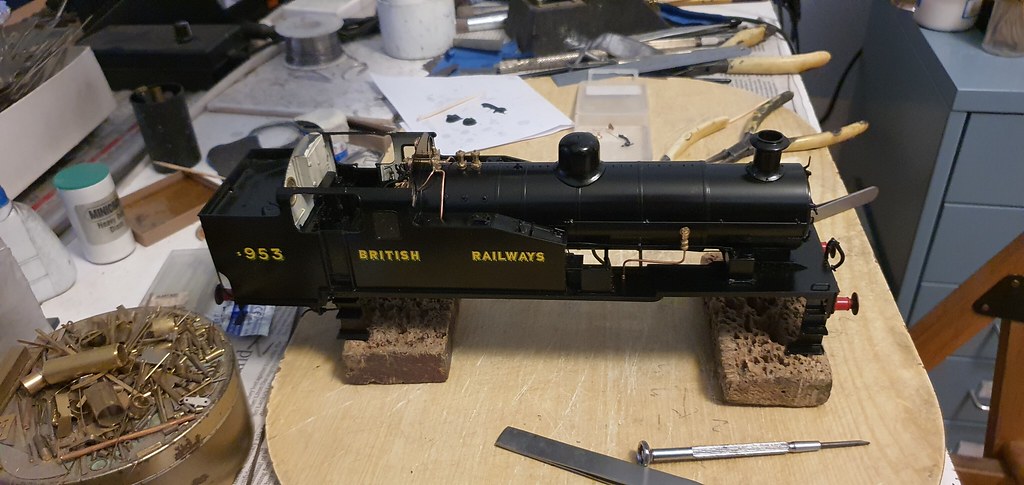
The Z is back from paint. It took a little longer than normal as we had to wait for some specially commissioned transfers to appear from Fox.
As you can see all is painted and the chassis has also been weathered. Warren felt that it was best to reassemble the body before he applied the weathering effects, so here's a few shots of the state of play.
Here I'm cleaning all the paint off the bearing surfaces.
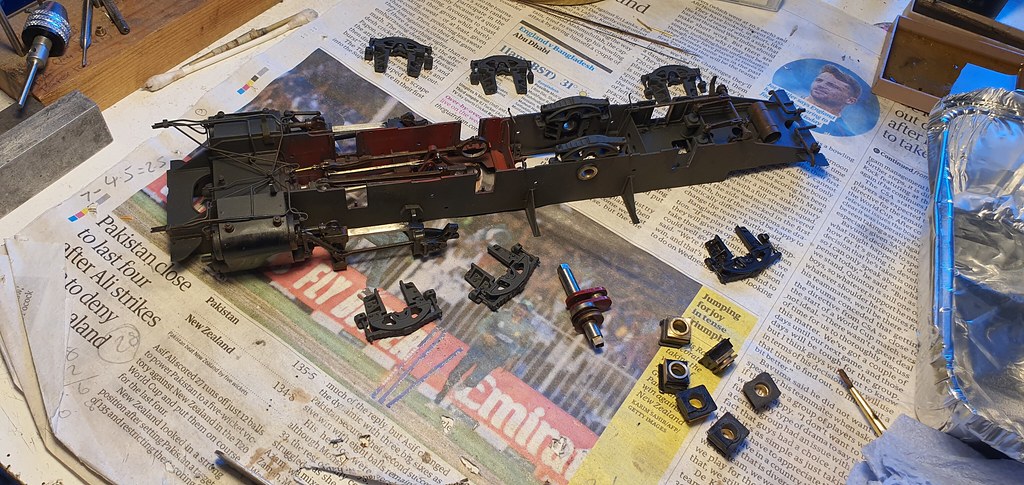
And here is the chassis assembled.


Here's the upperworks assembled.
So next week I'll button the Z up and then I have to reassemble a BG GWR Rover post paint. The pair, together with the Queen I have been building, will all then go to Modelyard in Leeds to have the DCC decoders tuned in. Then the Z will go to Warren's for more muck.
There's a few more snaps here; nick dunhill
As you can see all is painted and the chassis has also been weathered. Warren felt that it was best to reassemble the body before he applied the weathering effects, so here's a few shots of the state of play.
Here I'm cleaning all the paint off the bearing surfaces.
And here is the chassis assembled.
Here's the upperworks assembled.
So next week I'll button the Z up and then I have to reassemble a BG GWR Rover post paint. The pair, together with the Queen I have been building, will all then go to Modelyard in Leeds to have the DCC decoders tuned in. Then the Z will go to Warren's for more muck.
There's a few more snaps here; nick dunhill
Nick Dunhill
Western Thunderer
The next step in this mammoth reassembly job was the oil pipes from the mechanical lubricator to the axleboxes. This takes a lot of patience, especially when it came to making the P-clips!


It's a bit dusty in this shot!
Then I reassembled the loco and got the DCC decoder tuned in to match the motor requirements and sync the chuffs. Now it's back with Crayons Haywood for the application of the rest of the muck.


Hopefully more pics soon of the finished loco. There's more here; nick dunhill
It's a bit dusty in this shot!
Then I reassembled the loco and got the DCC decoder tuned in to match the motor requirements and sync the chuffs. Now it's back with Crayons Haywood for the application of the rest of the muck.
Hopefully more pics soon of the finished loco. There's more here; nick dunhill
Nick Dunhill
Western Thunderer
And lurking in the background.


spikey faz
Western Thunderer
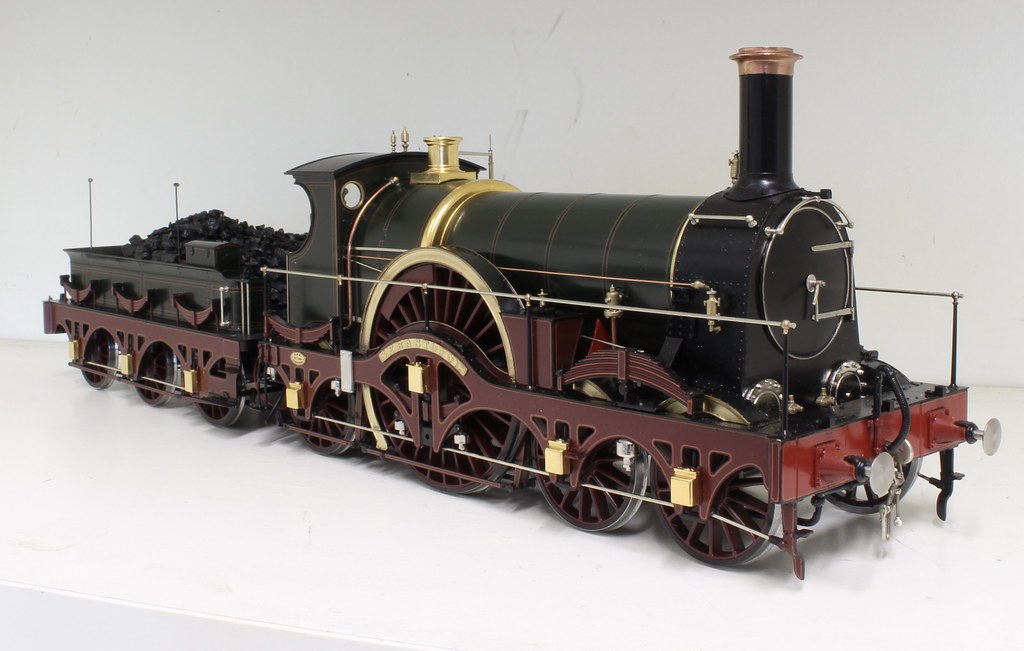
That Z Class looks stunning! Love the sunshine BR livery - really suits the loco.
I built a 4mm Z Class about 40 years ago from a Milholme Models kit and that was a battle. But what you have done with your model is something else.
Mike
I built a 4mm Z Class about 40 years ago from a Milholme Models kit and that was a battle. But what you have done with your model is something else.
Mike
Phil Harding
Member
Nick, lovely model of the Z class, much better than my attempt, but I have to confess I never saw one that clean at Exeter Central during my spotting days.The next step in this mammoth reassembly job was the oil pipes from the mechanical lubricator to the axleboxes. This takes a lot of patience, especially when it came to making the P-clips!
It's a bit dusty in this shot!
Then I reassembled the loco and got the DCC decoder tuned in to match the motor requirements and sync the chuffs. Now it's back with Crayons Haywood for the application of the rest of the muck.
Hopefully more pics soon of the finished loco. There's more here; nick dunhill
Nick Dunhill
Western Thunderer
Here's a couple of pictures of the Z after all the muck has been applied by Warren Haywood. The loco just needs some coal and a crew.


warren haywood
Western Thunderer
And that nasty fingerprint on the cylinder has been sorted
adrian
Flying Squad
Was going to say there's probably enough of a partial print there to unlock your phone!And that nasty fingerprint on the cylinder has been sorted
warren haywood
Western Thunderer
I had to pick it up somehow, rather that than drop the bloody thingWas going to say there's probably enough of a partial print there to unlock your phone!

now that would have been expensive

Nick Dunhill
Western Thunderer
Here's a few shots of the finished GWR BG Rover. I made it and Warren Haywood painted it. The few pictures I have of the loco all have the same driver in the cab (W Sansom apparently!) Andrew Stadden made me a custom figure of the driver and a fireman, and Evan Griffiths painted them for me.