Cutting brass sheet for wagon floors

Dog Star

Western Thunderer
The scope of interest here is wagon floors for 7mm models of open goods wagons, typicalling those wagons with an overall body length of circa 16'0" to 17'6" and an overall body width of circa 7'6". The intention is to make the wagon floor in two layers, one brass and one plastic... the (visible) plastic layer for body detail and the (non-visible) brass layer for weight and rigidity.

Current idea is to make the plastic layer of around 0.75mm and that can be cut / finished to size with the normal hand tools to be found on most modellers' workbenches (or maybe as a 3DP part). The brass layer to be cut from 0.9mm or 1.00mm sheet... and that is where my confidence takes a shaky turn - how to cut the brass to the desired / finished size easily, accurately, repeatably (say ten or twenty parts). A piercing saw ought to work although maybe not the quickest option. Etching ought to meet the desirable attributes, probably at a price that is going upwards. How about CAD / CAM as a route to the final product using the approaches demonstrated here by Jim (@JimG)?

What might be your way of making the part in the quantities that are required?

thank you, Graham
 
Last edited:

Arun Sharma

Western Thunderer
I should have thought a guillotine [as were sold by Metalsmith in days of old] if repeatability is the name of the game. The one I have was fairly expensive ten or more years ago but they may appear on the second hand market - probably worth looking on model engineering websites if no joy on model railway ones.
Alternatively, someone on here with such a device would probably chop up the metal for you if asked nicely.......
 

adrian

Flying Squad
The intention is to make the wagon floor in two layers, one brass and one plastic... the (visible) plastic layer for interior detail and the (non-visible) brass layer for weight and rigidity.
Rather curious to understand the reason for considering 2 layers? My worry with multiple layers is the potential for warping and distortion - especially with 2 different materials.

Personally for me my take would be for steel wagons then a single sheet of nickel-silver (detest brass sheet!) or if wooden then a single sheet of ply, (laser cut for the detail)
 

Brian McKenzie

Western Thunderer
I wouldn't want to cut out so many 0.9 or 1mm thick panels with a piercing saw :eek: .

Whatever approach is taken to obtain marginally oversized/unfinished blanks, I would bring to final size by milling.

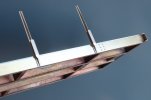
The photo shows 0.3mm brass, guillotined as close as I dare above finished size, then milled edge up, to get it crisp and truly parallel. For larger pieces than shown, I use longer and heavier bars to support the material (gripping thin overhanging pieces with pliers is not recommended ;) ).

Milling width of 0.3mm brass_1404a.jpg

0.022" nickel silver gets used for floors in my O gauge wagons (since acquiring a huge sheet of it decades ago from Smith & Sons, when in St John's Square, Clerkenwell EC1 ). Friends of J Smith & Sons Clerkenwell Ltd
R wagon side stanchions_1263a.jpg Work in progress

-Brian McK.
 

simond

Western Thunderer
I wanted to cut a strip of brass 2.5 mm wide & 1mm thick on Wednesday for my loco suspension, i scrawked it til I could “see” through it, folded once to break the remaining and the cleaned up with a file. I absolutely wouldn’t want to do it more than once, and, whilst you could scrawk less with wagon-floor-sized sheets, it’s still tedious.

Guillotine, I suggest.
 

Richard Gawler

Western Thunderer
A quick look on eBay shows a few firms who will supply sheet brass cut to size. Might be worth dropping a line to one or more of these, i.e. use their guillotine.

I searched eBay for "brass sheet cut to size".
 

Mike W

Western Thunderer
I'd agree with Richard about buying sheet cut to size. I do that for aluminium roofs. Better still, you probably have a steel fabrications firm nearby who will doubtless do it for a small amount of cash. Might be a good idea to foster relations with them anyway - they could be useful!

But also the detail on top of wagon floor is very fine. The boards were not chamfered and the joints were tight, so after a lot of dirt hardly visible.

Mike
 

GrahamMc

Western Thunderer
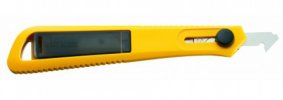
I'm using an Olfa plastic and laminate cutter as a scrawker, usually on 0.56mm and thinner nickel silver. I find that 10 cuts either side of the 0.56 mm allow me to create a clean snap. That's nowhere near the whole way through. With accurate marking only a little filing is needed to clean up. The awkward bit, for me, is keeping everything straight so I clamp a straight steel edge to the sheet as a guide or use the clamp shown below and then cut. I tried making home made scrawkers but I couldn't make anything as good as the blades I buy which seem to last well even though they're meant for plastic. The cutter is £6-7 and the blades £3-4 a pack. I'm not using the blade shown.
I'm not finding it tedious now I know how few cuts I need to make to get a clean break without distorting the nickel silver.

olfa-pc-s-1-700x700.jpg
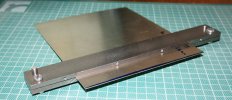
I use the clamping/bending bars shown below for snapping off the sheet, it means I can do fewer cuts while not distorting the sheet when bending it to snap it off. I can also hold the sheet with it while scrawking. It's just two bits of bright mild steel bar with bolts in the end to hold it together. Alignment is done with the silver steel rods in the ends that go into 6mm reamed holes, but that could be considered a bit over the top.
I find scrawking quick and easy now, but whether or not it's worth making this depends how much scrawking you need to do. That said, they're useful just as bending bars.

IMG_2337 at 9 res.jpg
 
Last edited:

GrahamMc

Western Thunderer
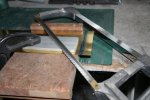
A quick simple way is to use a hacksaw with 32 tpi, (.8mm spacing approx.) a standard size, with a set up as shown below. The more sheets of brass you can do at once the smoother the cut will probably be and the less time it will take to do 20. It's just the wooden bit, with the bit screwed on at the back as a stop, with the brass clamped between some scrap aluminium and the jig and bench. It's not posh but it works and it's quick and cheap.
As you can see from the edge of the bench and cutting mat I do this quite often... :oops:

IMG_2339 2.jpg
 
Last edited:

simond

Western Thunderer
The tedious bit was scrawling right through 1mm brass. The bit I was breaking off was 2.5mm wide, and I difnt want to twist it.
 

GrahamMc

Western Thunderer
The tedious bit was scrawling right through 1mm brass. The bit I was breaking off was 2.5mm wide, and I difnt want to twist it.
I know where you're coming from Simon, it took me a while to figure out the best way of doing this, very difficult to do with such a narrow strip and a deep cut as the one you had to do.
 

Giles

Western Thunderer
I have one of these little things which cuts up to 1mm - and its brilliant! I use it for exactly this sort of job, or making NS strip for things.... I've never used the folder yet though - although that may be coming into action soon. It lives on the floor, and it's small enough to pick up and put on the bench when needed.


Mike W

Western Thunderer
Giles, I have the bigger version of that, with casters fixed at each corner so I can wheel it across the workshop floor! Must admit that I'm not expert at setting it up to cut cleanly. Some say that its a cheap make but it does the job very well.
Mike
 

Dog Star

Western Thunderer
How about scribing the brass with a scrawker, snapping along the scribed line and finishing with a file?
Effort and accuracy come to mind as a concern given that the need is for a kit of parts for circa 20 wagons.

I should have thought a guillotine.......
Does this process give a right angle edge on 1mm sheet?

Rather curious to understand the reason for considering 2 layers.
There is a considered reason for the mixed media layers... a scale thickness 3DP floor is the underlying issue.

My worry with multiple layers is the potential for warping and distortion - especially with 2 different materials.
Do you think that 0.75mm plastic is going to warp/distort when stuck to 1mm brass?

Personally for me my take would be or if wooden then a single sheet of ply, (laser cut for the detail)
Ply was my initial thought... and then I was reminded by others that the original, full thickness floor had details on the curb rail / end rail, such not being possible with a wood floor.

A look on eBay shows a few firms who will supply sheet brass cut to size. I searched eBay for "brass sheet cut to size".
Thank you, this suggestion looks like having legs.

Another idea might be to find someone with pantograph milling machine.
Yes, true, or any other vertical milling machine as illustrated by Brian.


Background to the topic. We are making a batch of "kits" for a wagon type that is required in number and the current thinking for the body is a 3DP part for sides/ends with a seperate 3DP part for the floor. There are sheet reeves along and under the curb / end rails... and there is underframe detail included on the underside of the floor.

Experience to date with the floor is that the 3DP part has unwanted lines on top / bottom surfaces and warps, along / across the piece, over time. We have sought advice from Mickoo... results yet to be forthcoming.... and please note that this topic is not about how to 3DP parts.

In the meantime, an emerging requirement to increase the weight of the intended model makes us think about including a metal plate under (or in) the floor; hence the two layer multi-media approach where the brass plate sits into a recess within a 3DP floor. All required detail is part of the 3DP... the brass plate in the model is "invisible" (other than a change in colour of material).

Why brass? No corrosion concern. Density is greater than steel. No facilities for handling DU. No DU!

OK, so the S7 modellers in B'stoke are a tad mad, just pushing boundaries, just pushing.
 
Top