You are using an out of date browser. It may not display this or other websites correctly.
You should upgrade or use an alternative browser.
You should upgrade or use an alternative browser.
7mm Dan's S7 Workbench - Hawksworth Full Brake
- Thread starter Dan Randall
- Start date
Dan Randall
Western Thunderer
3rd May 2015
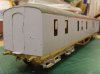
I’ve managed to grab a couple of hours at the workbench here and there recently and have managed to draw-up, print and attach the self-adhesive overlays for the corridor side. Here’s what it looked like before work began….


Then after….


With the overlays in place, they were given a coat of protective varnish....


A couple of days later, the gutter overlay was applied and varnished. Last night, it was time to apply the Archer 3D printed rivets. Here’s the finished job, after some more protective varnish had been applied….


The eagle-eyed may notice that the rivets aren't centralised within the printed alignment circles. This is simply because I hadn't engaged my brain properly when applying the overlays in the first place. However, because the pitch of the printed rivets is consistent, as long as you position the first rivet where it's actually wanted, the others on the strip, by default, end up in the right place too.
That's all for now - happy modelling.")
Regards
Dan
I’ve managed to grab a couple of hours at the workbench here and there recently and have managed to draw-up, print and attach the self-adhesive overlays for the corridor side. Here’s what it looked like before work began….
Then after….
With the overlays in place, they were given a coat of protective varnish....
A couple of days later, the gutter overlay was applied and varnished. Last night, it was time to apply the Archer 3D printed rivets. Here’s the finished job, after some more protective varnish had been applied….
The eagle-eyed may notice that the rivets aren't centralised within the printed alignment circles. This is simply because I hadn't engaged my brain properly when applying the overlays in the first place. However, because the pitch of the printed rivets is consistent, as long as you position the first rivet where it's actually wanted, the others on the strip, by default, end up in the right place too.
That's all for now - happy modelling.
Regards
Dan
Attachments
Last edited:
Len Cattley
Western Thunderer
Hi Dan that looks good, where can you purchase the Archer rivets as I need some?
Len
Len
Dan Randall
Western Thunderer
Hi Dan that looks good, where can you purchase the Archer rivets as I need some?
Len
Hi Len - I got mine from DCC Supplies, in Worcester.
Regards
Dan
Len Cattley
Western Thunderer
oldravendale
Western Thunderer
mickoo
Western Thunderer
There's a lot to choose from
You could spend a lot of money and still not get the size you need.
oldravendale
Western Thunderer
True, Mick, but I started with a pack of mixed sizes which gave me the options I needed for 7mm.There's a lot to choose from
You could spend a lot of money and still not get the size you need.
B
Dan Randall
Western Thunderer
19th May 2015
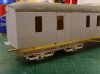
I managed to grab a few hours at the workbench yesterday and having recently finished the printed self-adhesive panel overlays for the roof, it was time to fit them. Here they are before work began….


Whilst I knew about the transverse rivets at the edge of the roof panels, the staggered rivets are as a result of seeing a photo of a Hornby Hawksworth roof on the internet. I’ve no idea if they’re correct, but I do like all the clutter that’s usually to be found on roofs, especially when emphasised by dirt and grime, so I decided they were going on! Once again, it was Archer 3D printed rivets to the rescue (sheet AR 88073 in this case) and my rivets were plotted to the correct pitch to aid their positioning….


Here’s a plain paper roof panel in position against the gutter to check the concept….

Wrapped across the roof, it meets the other gutter nicely….

Time for the real thing….

Next comes the bridging piece which (hopefully), accurately spaces the panels as they progress along the roof….

Followed by the next panel and bridging piece….

Incidentally, the staggered rivets (according to Hornby), go from one end of the roof to the other, but I decided not to print them on the roof panels for the sake of clarity and will apply them freehand using the simple printed lines. As the roof panels are applied, the bridging pieces are carefully peeled off and the printed lines that align the staggered rivets are continued across the gaps with a simple biro line….

All done and again, given a coat of protective varnish….


It wasn’t all plain sailing as I found a couple of panels needed a teeny strip trimmed from their edges once they reached the other gutter, but overall, I think it’s been a successful, though time consuming exercise. I can’t wait to see it all riveted and painted!
It turns out I hadn’t finished as I’d forgotten to apply the capping strips to the very ends of the roof! These were done this morning and the varnish is drying as I type this….


That’s all for now.
Regards
Dan
I managed to grab a few hours at the workbench yesterday and having recently finished the printed self-adhesive panel overlays for the roof, it was time to fit them. Here they are before work began….
Whilst I knew about the transverse rivets at the edge of the roof panels, the staggered rivets are as a result of seeing a photo of a Hornby Hawksworth roof on the internet. I’ve no idea if they’re correct, but I do like all the clutter that’s usually to be found on roofs, especially when emphasised by dirt and grime, so I decided they were going on! Once again, it was Archer 3D printed rivets to the rescue (sheet AR 88073 in this case) and my rivets were plotted to the correct pitch to aid their positioning….
Here’s a plain paper roof panel in position against the gutter to check the concept….
Wrapped across the roof, it meets the other gutter nicely….
Time for the real thing….
Next comes the bridging piece which (hopefully), accurately spaces the panels as they progress along the roof….
Followed by the next panel and bridging piece….
Incidentally, the staggered rivets (according to Hornby), go from one end of the roof to the other, but I decided not to print them on the roof panels for the sake of clarity and will apply them freehand using the simple printed lines. As the roof panels are applied, the bridging pieces are carefully peeled off and the printed lines that align the staggered rivets are continued across the gaps with a simple biro line….
All done and again, given a coat of protective varnish….
It wasn’t all plain sailing as I found a couple of panels needed a teeny strip trimmed from their edges once they reached the other gutter, but overall, I think it’s been a successful, though time consuming exercise. I can’t wait to see it all riveted and painted!
It turns out I hadn’t finished as I’d forgotten to apply the capping strips to the very ends of the roof! These were done this morning and the varnish is drying as I type this….
That’s all for now.
Regards
Dan
Last edited:
Dan Randall
Western Thunderer
27th May 2015
I managed to grab a few hours at the workbench on Friday before setting off for work and decided to have a go at applying the Archer 3D rivets to the roof, starting with the staggered lengthways ones....


Looking good! I managed to get halfway along the roof before having to pack up and go to work.
The following evening, after a most enjoyable day at Railex, I decided to have a go at the transverse rivets on one of the raised panels and the adjacent end capping strip....


Although there are printed circles on the raised panels to aid positioning the rivets, these were drawn before I realised there were lengthways rivets to go on as well. The transverse rivets and lengthways rivets form a "square" at their intersection. Because the latter rivets are staggered, it means the former rivets will not necessarily correspond to the printed circles at the panel edges, making some of them rather redundant. This shows up well in the last picture!
I'm very pleased with how things are looking and hope to do a little more soon, though having to get up for work between 01:00 and 03:00 this week, is severely ruining any evening that's left after my daughter's are tucked up in bed.
That’s all for now.
Regards
Dan
p.s. Just noticed a dodgy rivet on the end capping strip - I'll have to do something about that!
I managed to grab a few hours at the workbench on Friday before setting off for work and decided to have a go at applying the Archer 3D rivets to the roof, starting with the staggered lengthways ones....
Looking good!
I managed to get halfway along the roof before having to pack up and go to work.The following evening, after a most enjoyable day at Railex, I decided to have a go at the transverse rivets on one of the raised panels and the adjacent end capping strip....
Although there are printed circles on the raised panels to aid positioning the rivets, these were drawn before I realised there were lengthways rivets to go on as well. The transverse rivets and lengthways rivets form a "square" at their intersection. Because the latter rivets are staggered, it means the former rivets will not necessarily correspond to the printed circles at the panel edges, making some of them rather redundant. This shows up well in the last picture!
I'm very pleased with how things are looking and hope to do a little more soon, though having to get up for work between 01:00 and 03:00 this week, is severely ruining any evening that's left after my daughter's are tucked up in bed.
That’s all for now.
Regards
Dan
p.s. Just noticed a dodgy rivet on the end capping strip - I'll have to do something about that!
Last edited:
Dan Randall
Western Thunderer
22nd June 2015
Workbench activity has been a bit thin on the ground lately, as I've really been getting into several ongoing 3D CAD projects. However, I did finally get around to finishing the rivets on the Hawksworth's roof a week or so ago....


It took a while, but even at this stage, I think the effort was worthwhile. It should really come together once painted, but that won't happen until I've found some better shell vents than the ones supplied with the kit (with apologies for the poor focus)....


They're a bit proud of the surface, as I've not trimmed the spigots enough. If I can't find a suitable alternative, I might attempt to draw some and get them 3D printed.
That's all for now - I've more 3D stuff to be getting on with.
Regards
Dan
Workbench activity has been a bit thin on the ground lately, as I've really been getting into several ongoing 3D CAD projects. However, I did finally get around to finishing the rivets on the Hawksworth's roof a week or so ago....
It took a while, but even at this stage, I think the effort was worthwhile. It should really come together once painted, but that won't happen until I've found some better shell vents than the ones supplied with the kit (with apologies for the poor focus)....
They're a bit proud of the surface, as I've not trimmed the spigots enough. If I can't find a suitable alternative, I might attempt to draw some and get them 3D printed.
That's all for now - I've more 3D stuff to be getting on with.
Regards
Dan
Dan Randall
Western Thunderer
Hi Mersey Man - I’ve sent you a PM.I dont suppose any knows if this kit is still available. And if so could they point me in right direction please?
Cheers,
Regards
Dan
simon.bolton
Active Member
A lovely model Dan, great detailing! Can you show us the present state of play?
Cheers
Simon
Cheers
Simon
Dan Randall
Western Thunderer
Thanks Simon, but I’m ashamed to say, it’s sat on the shelf of doom, in exactly the same condition!A lovely model Dan, great detailing! Can you show us the present state of play?
Cheers
Simon
)")
Regards
Dan