Mike G's Workspace.

Mike Garwood

Western Thunderer
Turns out today that we had no Grand children - I knew it was called Good Friday for another reason :) - so after the usual Friday jobs had been completed I found myself back at the bench.

I thought it was time to complete the tender chassis. I broke out the Gibson brakes...so having taken my time to fettle them after cutting them out of the sprue, it was time to fit the wheels. Two things occurred: the first was that the brakes did not fit the profile of the wheels - by a country mile - so more fettling would be needed :rant:. Another brain cell flashed and I remembered that I'd completed the etched brakes, which fitted without any problems. Great!
So, soldered the lot on and the the chassis ran nicely. Then the second problem reared its head. The compensated wheels were not aligned properly to the chassis, the fixed wheels at the rear were spot on, but there was a significant slant to the other axles! Words fail me! I have thought of a solution (other than stamping on the chassis).

GWR 6810 tender chassis complete.jpg

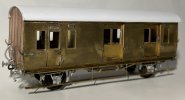
I had given the tender kit to Morgan for him to make the flare at the sides...only to find that he had completed the build of the tender! Gob smacked!! An absolutely cracking job and I am really grateful for the work.

GWR 6810 tender complete.jpg

GWR 6810 tender complete 1.jpg

So there we are, 2 steps forward and 3 steps back. Having had the chance to reflect on what I did wrong when I built the chassis, I have to admit that I have no idea how I cocked this up...hey ho, move on and get the amendments done. And if they don't work, I have a Perserverance chassis (remember them?) that'll do the job.

Stay safe

Mike.
 

Bulldog3444

Active Member
Mike,

By slanted do you mean that the chassis is a bit down at the front? If so, is that because the compensation beam is bent at too sharp an angle? Looking at your picture at post 757 I am a bit surprised how sharp the angles in the beam are.

Morgan’s work on the body is great.

Ian
 

Mike Garwood

Western Thunderer
Apologies Ian, I hadn't answered your question..no the axles are pi@@ed to the chassis sides. Turns out that I had a rogue etch ( I guess a problem at the etchers? Never ever had a problem with an MM kit) and one side of the axles was not in the same place as the other side. So despite all my good intentions I was flogging a dead horse to start with.

So last Friday I visited Barrow Road. Lovely day. Robin has been a busy lad...the yard now has appropriate lighting - which works.

Barrow Rd shed yard 1.jpg

He has also put the tram road in, that moved the remains of the firebox from one end of the yard to another. The little trucks are 3D printed courtesy of Justin @ Rumney Models. I did suggest that we motorised one, apparently the wheels are glued in!

Barrow Rd shed yard 2.jpg

Ozzing atmosphere of a busy yard. And this is what it looks like when the shed has it's lights turned off.

Barrow Rd at night.jpg

If you want to see this with a running train, head over to @MikeGarwood2498 on Youtube - there's a short clip to enjoy.

As for my own modeling...the 3 remaining coaches have received their transfers and today were given a top coat of gloss varnish. Glazing and finishing touches await. The Grange awaits wheels - which have been prepared - but, I think I need to add weight to the body first. This is a job I hate. I get glue everywhere and I get really worried that I'll ruin the paint job. Still, grasp the nettle and crack on.

I've taken delivery of my next project, which is specifically for this layout.

Stay safe

Mike.
(I must say I'm impressed with the camera on my new phone!)
 

Mike Garwood

Western Thunderer
So as usual I've opted for a different model other than the one that I had planned. I was going to do an LMS Engineers saloon, but a recent flea bay purchase caught my imagination. This is my first BlackSmith kit. This is the range that Mark Seward has taken over and re-newing.

GWR Milk van O13.jpg

First a few words of warning...a lot of the half etched lines are over etched and need strengthening. The doors on the guards compartment being a prime example. The instructions are not great, the saving grace being there are some goods diagrams that give up most of what you need to do. Also, giving thought to the order in which you attach pieces will be really useful and save a load of grief! - don't ask! This is a kit of a different age where most (if not all of it) was hand drawn and from that perspective it's not bad at all. Oh, and the roof is a piece of complete fiction, fortunately it's formed from brass.

GWR Milk van 1.jpg

You have to form the tumblehome but as the brass is so soft - this isn't a major problem. What is a problem is the fit of the 4 doors. Even with a tumblehome formed they are still too long to fit. So I opted for the path of least resistance and took out the very bottom of the door aperture, filed down the top part it then becoming a case of file and fit, until it does nicely.
The sole bars need some prep work before they will fit, thinning the tags on both sides of the etches really helps and opening out the slots with a scalpel blade is really advised.
Despite all these problems I'm enjoying the build. It's certainly engaged my problem solving skills. There are whitemetal castings but the ones for the springs and oil boxes are less than I am willing to accept. I shall be contacting Mr Newitt shortly (I couldn't see anything in the MJT range that was suitable). This is an old piece of rolling stock, the last one to go to the torch went in 1967, so a long lived van.

This is where I am at the close of play this evening.

GWR Milk van 2.jpg

I've already bent up the ends and they fit nicely. The kit provides for a compensated affair, luckily I have a last set of some Bill Bedford sprung W irons, which will be fitted instead. This will also mean that the van will need some lead added to make the springs work.

What I'd like to know is...that given that there was a guards compartment, did this act as a brake van at the end of the train? And, given that these were used in BR days, was it lined? I'm assuming that they would have been painted into maroon. Any help with these questions would be gratefully received.

There has been some progress with the Grange, but that will have to go into another update. 2 weeks to go until SWMBO is away for the weekend, you can guess what that is going to lead to :) . And in other news, the M set coaches have been completed.

Stay safe

Mike.
 

daifly

Western Thunderer
Mike

Have you seen @simond's 7mm version under construction here:

Dave
 

Nick Rogers

Western Thunderer
Greetings Mike,

Lovely to see you on Saturday. I hope you enjoyed the show.

I have an O13 amongst many other kits currently tucked away in the maturing box(!), so I will be watching your build with great interest!

Best wishes,
 

Bulldog3444

Active Member
Mike,

There's a picture of 1399 as W1399 in unlined maroon with yellow lettering - the picture taken by Mike Longridge is in both Great Western Coaches Appendix Vol 2 by Jim Russell and the HMRS Great Western Siphons book by Jack Slinn and Bernard Clarke. I doubt that any of the O13s received lining.

Three of the O13 brakes were withdrawn around 1960 (1397 in 1959, 1398 in 1961, 1400 in 1950). The fourth, 1399, was downgraded to Engineering Department use in 1948, and is now preserved.

Hope that helps,
Ian
 

Mike Garwood

Western Thunderer
Thanks Ian, that's really helpful.

On to today's progress...

Oh how I laughed, when I looked at SimonD's model! Not really, not even a bit, not even a smirk. But thank you Dave for pointing me in that direction. This will teach me too look at diagrams with the appropriate glasses on!
If you haven't caught on yet...the doors are recessed in their openings and I'd built them as flush. It isn't that long a go that I'd have given this up as a bad job. But, experience is a wonderful thing.

Cranked up the music to ten, and then un-soldered those lovely flush doors, straightened the tumblehome, I had so carefully put in, and set about re-doing them. Many hours passed till the doors were back in.

GWR Milk van 3.jpg

I've also got the ends soldered in and the pesky little steps. What a faff these were. The openings in the etch were way too small to accommodate the etched steps, so all 8 steps had to be thinned and the width of the etch made narrower a real PIA. Mind you I wasn't exactly in the mood for things that didn't fit!

State of play for today...

GWR Milk van 4.jpg

Despite the battles it's turning out ok.
Next steps will be to add the sprung W irons and then commence work on the brakes. If you ever get to build one of these, wait till you see the WM blobs that are in fact brakes, these did make me laugh :) , can't be a grumpy sod all the time, I try though.

As I cleaned this up before typing this, the other guards door decided to part with it's half etched line...sometimes you really do have to laugh.

Stay safe

Mike
 

simond

Western Thunderer
Mike,

it’s coming on nicely. My suggestion would be to lose the bulkheads above the cantrails and 3DP the roof former.

None of the 7mm kit fitted in that area!

any questions, just shout.
atb
Simon
 

Mike Garwood

Western Thunderer
Mike,

it’s coming on nicely. My suggestion would be to lose the bulkheads above the cantrails and 3DP the roof former.

None of the 7mm kit fitted in that area!

any questions, just shout.
atb
Simon
Simon
Was your model from the same source? If so then our kits are either enlargements or reductions of the original.
I don’t have a 3D printer and am absolutely a beginner with Fusion. 2d I’m not bad at.
The etch I have for roof the is too long and too wide. The outline is off but the brass is so soft it’s easy to manipulate.
I could get a line from the ends and turn that into a pdf and then pop that into auto CAD to draw length and width. I’d then have to have a word with my friendly 3d print expert.

Mike
 

simond

Western Thunderer
Mike,

Mine is a Blacksmith too. I had no idea they did 4mm.

I have CAD for a 3DP roof inner to which you are welcome, scaling it shouldn’t be an issue

I can post it on resources or email it to you.

It was printed on a Bambu FDP. I then used cartridge paper to make the visible surfaces.

Let me know
Atb
Simon
 

Mike Garwood

Western Thunderer
Mike,

Mine is a Blacksmith too. I had no idea they did 4mm.

I have CAD for a 3DP roof inner to which you are welcome, scaling it shouldn’t be an issue

I can post it on resources or email it to you.

It was printed on a Bambu FDP. I then used cartridge paper to make the visible surfaces.

Let me know
Atb
Simon
That is most kind of you. I shall drop you a PM with my email details.

Thanks again

Mike
 

Mike Garwood

Western Thunderer
After a very hectic day, I've had an hour to get the W irons springing units made and glued in place.

GWR Milk van 5.jpg

I really miss Eileens, these were my last pair of these and now I'm a bit stumped where to replenish my stock. These are so useful for older chassis such as this.
Tomorrow evening will see the lead go into the body and hopefully make a start on the brake gear and the rest of the gubbins.

Many thanks to SimonD for sharing his artwork. I do wish I was more proficient in 3D modeling.

Stay safe

Mike.
 

timbowales

Western Thunderer
After a very hectic day, I've had an hour to get the W irons springing units made and glued in place.

View attachment 240323

I really miss Eileens, these were my last pair of these and now I'm a bit stumped where to replenish my stock. These are so useful for older chassis such as this.
Tomorrow evening will see the lead go into the body and hopefully make a start on the brake gear and the rest of the gubbins.

Many thanks to SimonD for sharing his artwork. I do wish I was more proficient in 3D modeling.

Stay safe

Mike.
Mike, apparently, if they are the Bill Bedford or Mousa Models ones, they are available from the Scalefour Sores?
I haven't checked yet.
 

ullypug

Western Thunderer
Interesting to see your progress Mike. It’s looking good. Sorry you had issues with the doors. I’ve built one and I didn’t but the kit was definitely challenging!
I got mine off the bring and buy at Expo one year. The kit I had didn’t have brakes or buffers so I assume they have been robbed out. It did have a plastic roof though. I haven’t fixed it in place yet but do echo Simons comment about the fit.
I don’t think the NPCS w irons are in the stores range. The originals had a problem in that the wheels would ground on the cross piece. Don’t know if it was ever redrawn. I remember Mark Tatlow talking about this with me. I used rocking irons with mine.
 

Attachments

  • IMG_8105.jpeg
    IMG_8105.jpeg
    181.4 KB · Views: 21

Mike Garwood

Western Thunderer
Interesting to see your progress Mike. It’s looking good. Sorry you had issues with the doors. I’ve built one and I didn’t but the kit was definitely challenging!
I got mine off the bring and buy at Expo one year. The kit I had didn’t have brakes or buffers so I assume they have been robbed out. It did have a plastic roof though. I haven’t fixed it in place yet but do echo Simons comment about the fit.
I don’t think the NPCS w irons are in the stores range. The originals had a problem in that the wheels would ground on the cross piece. Don’t know if it was ever redrawn. I remember Mark Tatlow talking about this with me. I used rocking irons with mine.
If mine turns out half as good as that I shall be well pleased!
I missed seeing you at Expo EM. Probably because I was in a world of my own!
What have you got on your bench now?

Regards

Mike
 

Nick Rogers

Western Thunderer
After a very hectic day, I've had an hour to get the W irons springing units made and glued in place.

View attachment 240323

I really miss Eileens, these were my last pair of these and now I'm a bit stumped where to replenish my stock. These are so useful for older chassis such as this.
Tomorrow evening will see the lead go into the body and hopefully make a start on the brake gear and the rest of the gubbins.

Many thanks to SimonD for sharing his artwork. I do wish I was more proficient in 3D modeling.

Stay safe

Mike.

Hi Mike,

I think the Scalefour Society Stores have the Bill Bedford wagon w-irons in stock. I'm hoping they bring the coach bogies back too.

I must confess, I swear by Mike Clarke's Masokits w-irons. These come with standard 3ft springs, but he also supplies springs for coach wheels too. 5DCE56D9-160B-4735-93D2-99121D736F36.jpg

73C096CF-4FB6-49FE-8499-3978F4C2E9A7.JPG

IMG_7556.jpg

Almost all the wagons in the following clips have Masokits units.

Green 33 and the Hymek are both mine, hauling most of my van stock.

And they go backwards well too! One of my Mitchell 45xx's propelling a lenghtly train over our B7 cross-overs on TT2.

It is worth mentioning that TT2's track is appalling! So it shows how well the springing system works.

Lastly, some running on Rod and John's P4 version of Balcombe (now scrapped - it didn't cope well in storage during lockdown), but again a lengthy train with almost all of my then 4-wheelers running with a 47 (very prototypical!!).


I'm a big believer in Mike's stuff! It is a tad fiddly, but the running trumps the other arguments in my view.

All the best,

Nick.
 

Mike Garwood

Western Thunderer
Nick
How much weight do you need to get the springs to work?
Rumney models recommend 50 gms…

Last time I spoke to Jeremy he had the 8’6” chassis and was still waiting for the 9 footers - that was a year ago.

Mike
Lovely clips BTW
 
Top