This week I have been building the upperworks and finishing the chassis. Some 3D parts came in the post (thanks again Mick D) so I attached them to the chassis. They were springs and hangers, horn guide detail and a pair of sand boxes. They fitted with a minimum of manipulation and finish the chassis nicely. While I was at it I fitted the Loksound V5 decoder, Keep-Alive and speaker. All worked well on test.
View attachment 248349
View attachment 248357
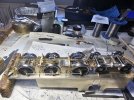
You can see from the second photo that I added a lot of detail to the cab sides before building the structure. I did the cab opening surrounds and the cab doors. I also added the upstands for the coal rails. The back of the cab has a window with grills over it, so I sorted those out as well. All these things are much easier to solder onto the body parts before final assembly.
View attachment 248351
Then the basic structure was tacked to the footplate, checked several times for alignment, adjusted accordingly and soldered up. It went well, and I was able to add the sloping section of the cab rear and the bunker rear. Both were cut from 0.3 mm thickness NS to make the forming process easier.
View attachment 248352
The coal rails were made from......old coal rails from a Gladiator GCR tender that have been sitting in the bottom of my bits box for a couple of decades. The horizontal strips were exactly the right width and were cut from the old etch and soldered to the upstands using brass rods and drills as spacing jigs.
View attachment 248353
I added the cab floor and the cab side lockers/structures.
View attachment 248354
You can see that I had to cut the cab floor in half to get it in, but it will be covered by planking soon.
The last job of the week was making the cab roof. Of course the one in the kit didn't fit, and the ribs were too wobbly (at least sharpen your pencil if you're going to hand draw etches).
I cut the basic rectangle from 0.3 mm NS and had to hand cut all the ribs. This was done by soldering a wide strip of NS across the top of the cab front/rear and scribing the shape of the cab top. This was cut out and soldered to the roof. I then scribed the top of the rib with dividers (my vernier!) and cut that. It is a long tedious process but the finished cab looks good. The middle ribs are taller and slightly different from the end ribs. They had to be cut out very carefully before fitting. It's amazing how much work goes into a roof. It took a whole day, and I still have to fit a vent panel (the GA suggests some existed) and som ribs underneath to locate the roof on the cab.
View attachment 248355
View attachment 248356
So the above pic shows where I got to this week, and the count of kit parts used remains at 8. On Monday I'll finish the roof, do the cab door handrails and either make the boiler or backhead (that might take the whole week!). This weekend I will fix an(other) oil leak on my Rickman and go and tut at the SWFC chairman.
")