Rivermead Central

40057

Western Thunderer
I suppose it is inevitable when building a layout that plans have to be changed as you go.

First, only on Thursday, I ordered a couple of kits from Intentio for two different small buildings one of which I intended would go next to the sleeper-built fence (see post #556). After a bit of testing, I’m of the view that both the Intentio buildings are going to be a little too large for the space. Although there is actually enough room, either would be quite close to the point lever and, on reflection, I think it would look ‘crowded’. The Intentio buildings will certainly find a home on the layout, but somewhere else. So I’m scratch-building a small storage shed which, crucially, is about 10 mm narrower than even the smaller Intentio kit.

This afternoon I cut out the front and end elevations from some vintage ‘plank effect’ plywood:

9787989F-3457-40AE-992C-540397574DBA.jpeg

The building is, clearly, going to be wood, but as a lean-to against a ‘brick’ wall. I’ll cut out a small window somewhere. The plywood impressed with planks is the same vintage material previously used for doors. I’ll update as the building takes shape. It’s roughly 50 mm (= just over 7’) long and 38 mm (= nearly 5’ 6”) wide, not including the back (brick) wall.

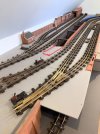
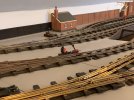
The other change I think I will have to make is rather more significant. It relates to the position of platform 1 at Cairnie Junction:

62DD67C1-52E1-4B3A-9C54-F55AD8467562.jpeg

The section of platform 1 already partly built (centre of photo) is adjacent to straight track. From the start, the platform was always going to be longer (total length c. 10’) continuing around the curve at the north end of the room — as shown by the blue line. The station building would be on the curved section at the north end, for three reasons: the platform would be wider, the building then wouldn’t obstruct access to the sidings behind the station, the building would lift off to give access to that part of the Cavendish Goods branch. The radius of the curved track is 3’ 6” and testing with a 4-4-0 indicated clearance could be provided without the platform being absurdly far from the track. When the testing was done, a 4-4-0 was the worst I had in terms of the front of the loco projecting beyond the track on a sharp curve.

The finding the other day that the more recently acquired Duchess is even worse than a 4-4-0 is forcing me to look at alternatives. Specifically, extending platform 1 in the opposite direction, as shown in red above. There wouldn’t be a clearance issue with the platform being ‘inside’ the curve. The platform would have to be much shorter than previously planned (really too short). Having the station building on the straight part of the platform is not ideal (see above). The kit purchased for the platform 1 building makes up into a building that is too wide for the straight part of the platform. So plenty of reasons not to change from the original plan — but I might conclude I have to or have a platform that looks ridiculous.

It’s not too late to change the position of the platform. Very little work would be wasted. Overall, I’m inclined to think my previous plan (for all its advantages) is simply incompatible with running very large locos on such small radius curves.

Martin
 

John R Smith

Western Thunderer
Overall, I’m inclined to think my previous plan (for all its advantages) is simply incompatible with running very large locos on such small radius curves.

Platforms on curves, although common on the real railway (think Bristol Temple Meads), are usually a problem in model form. Our curves, especially in coarse-scale, are simply too sharp a radius. I can understand your concerns about blocking the yard behind with a station building (or platform canopies or any other clutter). Despite excercising due caution, when operating clockwork locos there are inevitably times when I get it wrong and it is necessary to make a hasty grab at the train to avert disaster. And of course, if the engine runs out of "puff" then you need to be able to reach over to wield the key and give it a few winds. All part of the fun!

My own railway is simply too small for very large engines, so I have a limit of 18 inches overall. So I am just OK with a "Scot", but I turned down the chance of a nice clockwork Duchess some time ago.

John
 

andi4x4

Member
I understand your problems with the platform clearances. I have come to the conclusion, however, that, viewing point is to be taken into account here. In my own case, I have long accepted that if the large clearances are on the opposite side of the train from where it is intended to be viewed, I consider it hidden from view and try to not let it bother me. On the front, viewing side, I find it a little harder to tolerate, and do my utmost to avoid them.
 

40057

Western Thunderer
I understand your problems with the platform clearances. I have come to the conclusion, however, that, viewing point is to be taken into account here. In my own case, I have long accepted that if the large clearances are on the opposite side of the train from where it is intended to be viewed, I consider it hidden from view and try to not let it bother me. On the front, viewing side, I find it a little harder to tolerate, and do my utmost to avoid them.
That’s a good point about not being able to see the gap because the train is blocking the view. That would certainly be true of platform 1 at Cairnie Junction. The gap between the rails and the platform would show when there was no train, of course. When I get to building/finishing platform 1, I will do a mock-up to see what it actually looks like; maybe I go in both directions from the current straight section, but perhaps only 1’ or 18” round the north curve. I can probably/may have to live with a short length of platform adjacent to the 3’ 6” radius curve at the north end, or the platform will be not much over 5’ long, which is much to short.

Thanks.

Martin
 

40057

Western Thunderer
I refer to my post #556 and the filthy dirty buffer stop illustrated therein.

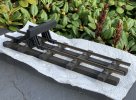
All it needed was a wash. Since this morning was sunny with a light breeze — ideal drying weather — I used a soft brush and some tepid water to give it one. Here it is drying off outside at lunchtime:

8C6870F6-4B12-4038-A405-7C4ABFCEA326.jpeg

Now cleaned, it’s in near-perfect condition.

If you don’t mind a bit of cleaning, dirt can be your friend, as here. Looked a mess, so cost only a few pounds — dirt cheap, in fact. Superficially dirty but intact vintage items are often much less expensive than a clean but damaged example of the same model. The dirty one is the good buy.

That’s my fifth rail built ‘stop on post-WW2 Scale Permanent Way. I can use sleeper-built ‘stops for the rest of the sidings at Cavendish Goods.
 

Attachments

  • 2FC799D2-626B-4A57-A454-396BF7799611.jpeg
    2FC799D2-626B-4A57-A454-396BF7799611.jpeg
    372.5 KB · Views: 2

40057

Western Thunderer
An update on road vehicles

Back in my post #118, I showed a picture of a Minic lorry, the first road vehicle obtained for Rivermead Central. Until my wife gave me the lorry, I had given no thought at all to road vehicles for the layout. Probably this reflects my complete lack of interest in the real thing.

Anyway, with the lorry came the realisation that the layout would indeed need road vehicles as part of the ‘scenery’ for the trains. I liked the lorry which caused me to look at what other models had been produced in the Minic series. It was quickly apparent that Minics were the ideal road vehicle models for the layout. Some Minics in particular are very charming and seem to me to really capture the spirit of the time. I’ve quickly come to see them as fine models in their own right, not just part of the background against which to view the trains.

So I have been slowly buying Minics when I have found models that will fit on the layout and offered at an acceptable price. I’m not looking for perfect examples, which can be expensive, but they need to be presentable. Nor do I need to pay the higher prices asked for rare models. For their role on my layout, the ‘common’ models will do just as well. I have bought and read ‘The Minic Book’ by Peter Bartok (New Cavendish Books, 1987) which gives a comprehensive account of the models made and the changes over the period of production. I do prefer, generally, the look of the pre-WW2 models, but the post-WW2 versions are typically cheaper and easier to find in good order. I am usually paying around £30 to £40 for a nice condition Minic — on a par with the cost of a tinplate goods wagon.

There are several places on the layout where road vehicles will be needed. At Cavendish Goods, the intention is two large factory/mill/warehouse buildings each with a rail siding. Here, various lorries and vans will contribute to a busy scene as raw materials and components are delivered and goods despatched. Outside the stations, a few cars parked but in particular a taxi or two, perhaps a post van or a railway delivery lorry. Then at Cairnie Junction, I intend modelling against the north wall of the room the facade of ‘The Station Hotel’. A car park at the front will need some superior cars belonging to the guests. The Minic range can supply all the vehicles mentioned. If I want a Rolls or Bentley for the hotel car park, I will have to be prepared to pay rather more than I have been paying for Minics thus far. They are, though, really nice looking models …

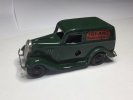
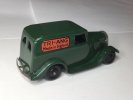
I have today given a clean to a couple of Minics acquired a few months ago. Both are post-WW2 and in good but not excellent condition. First, a small delivery van:

457CDD26-0FDF-4605-B6D9-601CB79BB476.jpeg

81D7DACD-E32F-424F-9028-6FC07A973422.jpeg

A few small chips to the paint and some minor filiform corrosion, but overall looks smart and the motor is in good order.

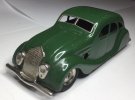
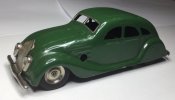
For the hotel car park, a ‘Streamline Saloon’. ‘The Minic Book’ advises this model is based on a 1935 Chrysler. A quick search on the web confirms a close resemblance to a 1935 Chrysler ‘Airflow’.

0F2DD4C2-1B10-4FAD-94CD-6867375F4BD6.jpeg

C4FE6408-085E-4DD9-9D15-6FD6E2913105.jpeg

The condition is similar to the van and the motor works.

A few comments about the Minic range based on the models I have now seen. The cars seem more convincing than the lorries which can appear rather ‘plain’. Post-WW2 lorries tend to be in quite garish colour schemes, so I’ll choose examples that aren’t too bright. Details present on some pre-WW2 cars (petrol can on the running board, luggage rack at the back) make the models much more attractive than the simplified versions produced after the war. The range of cars made was heavily biased towards upmarket and expensive types — Daimlers, Bentleys, Rolls Royces, an unspecified ‘limousine’, ‘saloon’, ‘town coupe’ and ‘cabriolet’, all with a bonnet and radiator resembling contemporary Rovers.

Just as well I need posh cars for the hotel car park.
 

40057

Western Thunderer
Another Minic cleaned this morning. In this case, the principal task was using fine tweezers to remove quantities of brown fluff wrapped round the axles. The owner appears to have used the car ‘off road’ on a brown carpet. Possibly a ginger cat in the house too.

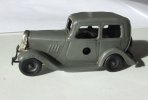
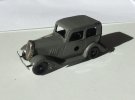
The car is a model of the ‘£100 Ford saloon’ and it was the only small car in the Minic range. Most Minic cars have seats for the passengers and the motor is where you would expect it to be — under the bonnet. But because of its tiny size, the Ford saloon is rear-wheel drive with the motor where the seats should be.

021F4BF6-79EE-44BD-9509-B9B7E86F70CF.jpeg

221C3A71-22D2-4906-9B53-36C54060FE1C.jpeg

On the basis of information in ‘The Minic Book’, I think this car was made in 1940. It’s probably my best Minic ‘find’ of the year, costing less than £40 and is in really excellent condition. Very likely ‘one careful owner’.

Not for The Station Hotel car park this one. The class of person who could afford to stay at the Hotel would almost certainly own a far more expensive car. But it will look good waiting outside the station or, as an employee’s car, parked at one of the factories.

We have a picture of my grandfather leaning against a similar but not identical just pre-WW2 car.
 

Brian McKenzie

Western Thunderer
When I started to read the post above, it crossed my mind that the model might have cost as much as the real ‘£100 Ford saloon’, but as you say, under £40.
What a delightful and skilled piece of tin bashing. The tooling for such would really interest me.

-Brian McK.
 

40057

Western Thunderer
What a delightful and skilled piece of tin bashing.

Hi Brian

It is indeed very clever. The main body (i.e. the grey painted bit) is just two pieces — (1) the bonnet and passenger compartment, and (2) the mudguards and running boards — each intricately folded and embossed, then clipped together (tab and slot) to form a rigid box. The bumpers are part of the baseplate on which the motor is mounted. The radiator grill is separate. I don’t know what the pre-WW2 price was for the Ford saloon model, but a lorry with load and the police car (both larger and more elaborate models) sold for 1/6. So these were both very affordable toys and working scale models. Some Minics were quite a bit more expensive — a Daimler, Bentley or Rolls with working headlights (battery included, in the boot) would set you back 3/6. That’s still only the contemporary price of a Bassett-Lowke tinplate goods van. Today, the Minic with electric lights will cost many times more than the goods van.

Incidentally, yes, I have seen the Ford saloon models offered for sale at well over £100. Perfect with the original box. Mine is not perfect (though pretty good) and I don’t have the box. But it is perfectly good for my purposes.

Martin
 

40057

Western Thunderer
A bit of a slow patch with Rivermead Central due to various modelling and non-modelling distractions. However, I have fixed the sleeper-built fence in place on the layout:

0E525F6B-29A4-42B8-8FA6-8C78E1AF3809.jpeg

The fence is vertical at the north end but has already developed some twist along its length and leans away from the wall slightly at the south end. Very prototypical but I would prefer it plumb vertical throughout. I may be able to hold it exactly upright using the next piece of ‘wall covering’ to the south. Otherwise, it’s a model of a slightly leaning fence.

The addition of the fence allows the yard office to be seen in its proper context:

18250272-D091-4DFF-909C-BC64AB021B3F.jpeg

As can be seen, the fence is held in place by a strip of wood painted to match the baseboards. The fence is a tight fit between the wall and the strip of wood and overlaps (behind) the corner of the yard office building. It won’t move or fall over.

Finally, just a view across the tracks of the fence at the back of the layout:

F2C8D448-B620-44E8-891E-970EEB4C9B2A.jpeg

The plan is (currently) that the yard signal box will be to the left (south) of the yard office, in front of the fence and between the two point levers. The visible partly built station platform (platform 1) will extend a foot or so south from the ends of the side walls as currently installed. There will be a few signals — but otherwise the third view above looks very like how I expect the same view to look when the layout is finished.

Nothing tangible to show for it (yet) but I have been testing some options for what goes at the back of the layout further south along the west wall of the room. I have a length of model wall with period lithographed tin adverts. I think this wall was probably made by one of smaller manufacturers of wooden buildings in the 1940s or ‘50s. It’s plywood with the usual impressed brick pattern, but the bricks are very close to correct scale size. This commercially made vintage wall is going to end up somewhere on the layout I’m sure. I have however decided it doesn’t look right behind the Cairnie Junction yard. This is because the adverts are fixed too close to the ground so are partially obscured by the very over-scale-height track. I’ll make up my own wall and very probably put some adverts on it — but where these can be easily seen by the passengers in the passing trains.

Martin
 

40057

Western Thunderer
Never make a model by simply copying someone else’s model. The copy will have all the faults of the original model plus a few more errors of its own. As pointed out, sort of, by Philip Larkin.

However, the wagon shown below is that rare thing — a copy that is, arguably, better than the original.

I don’t think I have yet shown any models in this thread that were made by the Leeds Model Company (LMC). That’s essentially because I have very little made by this firm. In terms of volume of output, between the wars, LMC were probably the third largest UK model railway manufacturer. They were definitely at the scale end of the spectrum, models not toys. LMC wheel standards were progressively refined but from the late 1920s on were finer than Bassett-Lowke. Clockwork was dropped as a method of propulsion in 1928. I couldn’t run most LMC rolling stock on Rivermead Central even if I wanted to.

From the early 1920s, most LMC coaches and wagons had a body made of wood (except roofs were tinplate) with all the detail being provided by printed papers stuck to the surface. The lithographed paper overlays are quite easily damaged, the wooden bodies can be attacked by wood worm, split and warp. Many surviving examples are in poor condition or have had the paper lithographs replaced. Further conservation problems with LMC products include poor paint adhesion to metal parts (locomotives with intact original paint-work are extremely rare) and disintegration of alloy parts (including wheels and motor side frames). Over and above all the foregoing, I don’t greatly like the appearance of the paper-covered wooden models. They don’t look right next to either tinplate or detailed scale models.

To be fair to LMC, the firm also made a range of detailed scale wagons (the ‘B’ series) and these were very nice indeed — but are scarce things. Most LMC locomotives were freelance but plausible, but there were also excellent models of some GCR and GWR prototypes. And a nice LMS ex-Caledonian 0-6-0. Anyway, I digress. I don’t have and I don’t plan to get any of the paper-covered LMC rolling stock.

But I do have a couple of wagons that are copies.

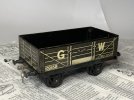
I’ve been working on the one shown below today. It needed a thorough clean as it was very oily and dusty. I treated two nasty patches of rust inside with Jenolite. One wheel had a split at the base of the flange and needed to be replaced. Fortunately — astonishingly, perhaps — I have a similar damaged wagon that I could use as a spares donor. Cleaning and repairs completed, the wagon is ready for traffic:
164BEC8C-5BEE-4C7A-9064-79C18E93A4F4.jpeg

The body above the frames looks exactly like the LMC model of a GWR merchandise wagon. It really is identical, a very close copy of the LMC wagon. Except the copy is lithographed tinplate, not printed paper stuck to a wooden body. Nor was the copy made in Leeds. It came from Japan.

The tinplate version of the LMC wagon was marketed by Strong & Co at one time based in Beaconsfield, Bucks. In the 1930s, this firm imported and sold a wide range of goods, particularly electrical items and lighting equipment, mostly sourced from Japan or Hong Kong. A lot of the goods sold by the company were marketed under the brand name ‘Stronlite’, as seen here on the base of my GW merchandise wagon:

EBA7BAB7-BF3E-4779-ADFE-FCFBD7518843.jpeg

The manufacturer of the wagon was Seki Denki Seisakusyo (or ‘Seki’) of Tokyo, Japan, a firm specialising in electrical goods. Much more information about both Strong & Co and Seki, and the models produced, is given by Peter Wray in his book ‘Stronlite Model Railways’ (published by Peter Wray, 2019). The first ‘Stronlite’ model railways were representations of Japanese trains, but it appears a member of the Strong family took a selection of British-made model trains (mostly LMC) to Tokyo in 1936 and asked Seki to produce copies. Thereafter the Stronlite range was largely composed of faithful reproductions of LMC models, but made in lithographed tinplate.

In relation to the GWR wagon above, it dates from 1937–1939. It has three-link couplings and unsprung but functional oval buffers, as per LMC wagons. The wheels are some type of early plastic. The under-frame is painted black and varnished. There are no axle-boxes or representation of brakes. Overall, I would rate the Stronlite wagon as a better model than the equivalent contemporary Hornby vehicle, but not as good as Bassett-Lowke’s version. The price of 2/- is scratched on the base of my Stronlite GWR wagon. Bassett-Lowke’s lithographed tinplate GWR open wagon was priced at 2/9 in the mid-1930s.

I also have a Stronlite LMS open wagon. It is essentially the GWR model but lettered LMS and with a different running number. The Stronlite covered goods van was based on the LMC model of an LMS van. Again, the body was an exact copy. The goods brake van too was based on the LMS model in the LMC range. For both vans, the LNER, GWR and SR versions in the Stronlite range were the LMS model just with different lettering.

I guess most people today have never heard of Stronlite model railways. Thus, the Stronlite LMS open wagon I bought some years ago was offered for sale on the internet as ‘LMC’ — an understandable mistake. Most Stronlite models are not suitable for use on Rivermead Central. A few of the wagon models though are of an appropriate standard of realism and will add a bit of extra variety to the wagon fleet.

 
Last edited:

John R Smith

Western Thunderer
Martin

I have come across Stronlite wagons before on a few auction sites, but I have never actually seen one. Thanks for your interesting historical summary. The name is potentially slightly confusing, as there is a French manufacturer of lightweight cycle parts called Stronglight (some very nice parts, too).

One thing which LMC was quite famous for in the later 1930s and post-war period was its range of bakelite open wagons, vans and even coaches. These were (as far as I am aware) the very first injection moulded model railway vehicles, and they heralded the direction in which the industry was to travel in the 1960s and 70s.

John
 

Roger Pound

Western Thunderer
I also remember Stronlite and have a vague recpllection of seeing one of their locomotives in my Hornby Clockwork days as a lad - nearly eighty years back.........! That's my excuse for it being a misty memory, but I think it was a non-descript 0-4-0 tender loco.

Roger.
 

40057

Western Thunderer
I also remember Stronlite and have a vague recpllection of seeing one of their locomotives in my Hornby Clockwork days as a lad - nearly eighty years back.........! That's my excuse for it being a misty memory, but I think it was a non-descript 0-4-0 tender loco.

Roger.
Hi Roger

It is slightly odd that these trains are customarily referred to as ‘Stronlite’. I suppose it is largely due to ‘Stronlite’ being the visible name on the models and their boxes. But, by analogy with ‘Bing for Bassett-Lowke’, the proper description ought to be ‘Seki for Strong & Co’. But then, very few people have heard of either Seki or Strong & Co. So ‘Stronlite’ it is.

Seki (like Bing) did not just make trains for one model firm/retailer. In Britain, there were trains sold as ‘Oxil’, made by Seki, but not imported/distributed by Strong & Co. One of the Oxil-brand locomotives was a blatant copy of a Hornby 0-4-0T. I understand Seki sold trains in Australia branded as ‘Maraklin’. There was even a facsimile of Marklin’s distinctive coupling. I assume the model trains Seki made for the Japanese market were original designs. Otherwise, it would appear the approach was to copy established manufacturers but undercut them on price.

Some of the trains sold under the Stronlite label were very undistinguished indeed. Even including absurdly short Japanese style bogie coaches in British railway liveries. On the other hand, judging by a photograph, the Stronlite model of an LNER (ex-GCR) B2 was really excellent. The B2 was another straight copy of an LMC model.

From a personal perspective, I am not going to be seeking to create a collection of Stronlite models. There are a few though that could be useful for operating Rivermead Central. The LMS covered van is a really nice model which would happily sit alongside the similar Bassett-Lowke van, but with a different running number. The Stronlite SR goods brake van is, so far as I am aware, the only lithographed tinplate model SR brake van ever made — albeit it is really a model of an LMS vehicle. Stronlite British-outline passenger coaches, because they are copies of LMC models, don’t have the windows cut out. Instead there is a printed representation of glass. So the Stronlite coaches wouldn’t look right mixed with Bassett-Lowke passenger coaches. However, the Stronlite corridor brake coach was a BCK. It could be used as a one coach local train — providing a plausible use for a clockwork locomotive with poor haulage capacity. An LMS BCK could be used to provide a brake coach and limited passenger accommodation on an overnight mail train. Bassett-Lowke made two lithographed tinplate TPO models but there was no suitable Bassett-Lowke brake coach to run with these. So, if I came across them in good condition, there are a small number of other Stronlite models I would find useful.

Martin
 

Fitzroy

Western Thunderer
Quite a few Stronlite locos turn up in Australia, generally the copy of the Leeds 0-4-0 tank. The rolling stock not so much. We do see a bit of the "Maraklin" though.
 

40057

Western Thunderer
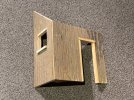
I refer to my post #562 above and the walls for a small storage shed shown therein.

Construction of the shed has resumed:

5ABF64FA-A422-45A3-8A22-ECE1C3926041.jpeg

A window aperture has been cut out in one end and a lintel and windowsill added. Framing has been fixed in place around the doorway. Two walls have been joined.

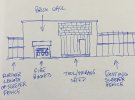
The storage shed is also going to be a lean-to against a brick wall. This is what I am planning to build:

8032E853-96EE-4493-903A-03265505CF0E.jpeg

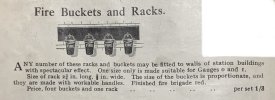
Yes, it is the back of an envelope. Mostly self explanatory. I have in mind an open-fronted shelter for fire buckets. I’m sure I have seen such things in a railway context, but can’t now find any photos of real ones. I have three Bassett-Lowke fire buckets. These were sold as a set of four buckets with a red-painted plank with four hooks for mounting on a wall. I have only the three buckets — bought from the local model shop over fifty years ago when I was a teenager. I have given up hope of finding a fourth bucket or an original rack to hang the buckets from. So I’ll make one.

Martin
 

40057

Western Thunderer
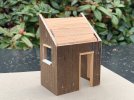
The basic structure of the shed is made. Three walls vertical and at right angles:

14F2B46A-C640-4BF5-879D-2C070A5887C0.jpeg

Internal bracing to keep the walls aligned fixed with wood glue and moulding pins. The lengths of pine strip wood which will support the roof and keep the end walls parallel are all cut from one piece of 12 X 6 mm section. Each piece is upside down or sideways on relative to the adjacent lengths, to counteract warping.
 

40057

Western Thunderer
Here’s the state of play with the storage shed at lunch time today:

4C71B531-2B67-45D7-9976-74EE686D4F82.jpeg

Nail and screw heads covered with filler and painted with a first coat of primer. Roof on, plywood impressed with a representation of slates, using the same vintage material as for previous buildings. Plinth also now in place. This will be covered with brick pattern MDF panels. Still to make — fascia boards, window, door and doorstep.

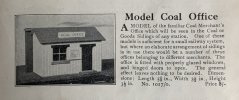
Like my other model buildings so far, this is not a model of a particular real building. A generalised representation based on photographs of typical examples. But also in this case with a definite similarity to a 1920s/30s Bassett-Lowke model. I took the same approach with the recently constructed section of retaining wall with its deliberate similarities to a Bassett-Lowke tunnel mouth (see my post #495). Since this storage shed is intended to be positioned on the layout very close to a genuine 100-year-old Bassett-Lowke signal box, it needs to look like a vintage model and a real building.

The model influence on the design of my storage shed is this, as described in the 1930s Bassett-Lowke catalogues:

622E1A54-1C20-4065-9365-5816915379AE.jpeg

The usual colour scheme for the coal office was white walls (now generally cream, possibly originally so) with a green door. My storage shed will be in the same colours, which I also used for the Cairnie Junction yard office.

Since I was looking for the above catalogue entry, here is the set of fire buckets (see my post #578) illustrated a few pages on:

319C7279-41B1-49E4-AF90-5618DFBD43C3.jpeg

I’m not sure I can make my home-made rack ‘spectacular’, but I’ll do my best.

Martin
 
Top