Thanks for the comments. I feel a bit of a fraud as I think building up this sort of detail in G1 with bits of Plastikard and brass etc is easier than working in the smaller scales, although it takes patience in the sense that everything takes so long, well it does for me anyway :
")
Anyway, in best Grandmothers eggs fashion here are the latest steps towards another wagon out on the line:
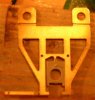
Here are the two ends and sides assembled around the floor. This is straightforward and a good fit, although I had very slight gaps at top and bottom of each corner which I have filled with Squadron filler and filed back. You have to fit the coplings at this stage as it is impossible to do the nut up along the threaded coupling shank once the end is fitted owing to the scale underframe mouldings under the floor - the instructions don't tell you this!
[attachimg=2]
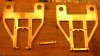
As Simon D mentioned on another thread, the Slaters' etches do seem to have a more pronounced cusp on them than others, all easily enough to clean up with a file though and the resulting W iron is really good. What I think is a failing with his wagon kit (in common with the RCH PO wagon) is that the backing pieces of the axleboxes which will slide up and down the W iron are too small for the etchings:
[attachimg=1]
I have a plan though...


)")