You are using an out of date browser. It may not display this or other websites correctly.
You should upgrade or use an alternative browser.
You should upgrade or use an alternative browser.
Wantage Tramway Jane No. 5 in 4mm
- Thread starter AdeMoore
- Start date
AdeMoore
Western Thunderer
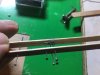
Done a bit more. Just filing up my blanks.
 Q
Q


Couldn’t solder the laminations well enough advice was not enough flux.

Made up a kind if jig but left the pin in which led to a useless outcome!


Cleaned up those badly soldered blanks again!

Then I struck on an idea two coffee stirrers with dressmakers pins drilled through for location.


Guess what? I left the pin in for the connecting rod hole again! So sweated it back up and pulled the pin out.

Which made the piston rod out of line. I heated again in a hair clip and sorted that.


Bingo success one happy chappy after starting the crossheads last October!

That’s 15 more to come just to finish off.
Q Couldn’t solder the laminations well enough advice was not enough flux.
Made up a kind if jig but left the pin in which led to a useless outcome!
Cleaned up those badly soldered blanks again!
Then I struck on an idea two coffee stirrers with dressmakers pins drilled through for location.
Guess what? I left the pin in for the connecting rod hole again! So sweated it back up and pulled the pin out.
Which made the piston rod out of line. I heated again in a hair clip and sorted that.
Bingo success one happy chappy after starting the crossheads last October!
That’s 15 more to come just to finish off.
Attachments
AdeMoore
Western Thunderer
Both crossheads done.
Time to mount on the front of the cylinders. But first as I envisage 70 deg solder for the cover plate, valve guide and slide bars all in one hit, I needed to cut and fit the cylinder wrappers.
First the cylinder assembly needed a fettle to fit the wrapper between the front and rear plates.
One wrapper fitted rear for solder and taking stock it’s great to do something other than the motion!
Question would you solder the slide bars etc. To the rear of the assembly in one hit with 70deg? The wrappers etc are/will be done with 145deg.
Progress pics.


That’s it for the foreseeable not a lot gets done now the lighter nights are here apart from holidays.
Cheers
Until next time
All comments greatfully received.
Time to mount on the front of the cylinders. But first as I envisage 70 deg solder for the cover plate, valve guide and slide bars all in one hit, I needed to cut and fit the cylinder wrappers.
First the cylinder assembly needed a fettle to fit the wrapper between the front and rear plates.
One wrapper fitted rear for solder and taking stock it’s great to do something other than the motion!
Question would you solder the slide bars etc. To the rear of the assembly in one hit with 70deg? The wrappers etc are/will be done with 145deg.
Progress pics.
That’s it for the foreseeable not a lot gets done now the lighter nights are here apart from holidays.
Cheers
Until next time
All comments greatfully received.
adrian
Flying Squad
Congratulations on persevering with them - it looks like you got there in the end.All comments greatfully received.
The fool who said you learn more from your mistakes than your successes obviously hasn't made many cock-ups and they are learning points you really don't want to learn. I've been there myself soldering up valve gear into a solid lump, now I tend to use a mix of cigarette paper between layers to keep them separate and cocktail sticks in holes to align layers - solder doesn't stick to paper and wood!!
AdeMoore
Western Thunderer
Thanks for looking in and your kind comments adrian.
Every days a School day they say. The mistakes are fine you learn from them that’s part of the learning process.
But to complete though still getting the crossheads slide bars motion bracket and cylinders all soldered together and working is going to be a big ask for me.
Cheers
Every days a School day they say. The mistakes are fine you learn from them that’s part of the learning process.
But to complete though still getting the crossheads slide bars motion bracket and cylinders all soldered together and working is going to be a big ask for me.
Cheers
AdeMoore
Western Thunderer
Here we are again so well over a year into it but still not a huge amount of time invested really.
The cylinder block valve chest was completed.

Next up solder the crossheads and piston covers!
Didn’t go well not enough heat needed a bigger iron was the consensus on RMWeb.
After using brass rod and oil to keep things lined up went disasterously wrong! Didn’t think that one through, had to unsweat it and then used a cocktail stick as I had already seen but forgotten to do the same job.
This side went kind of ok but one slide bar was not soldered in proper.

Next tried the other side oh dear!
I’d already pulled 5e first side off but this was loads of heat to get the solder to flow all coming apart and moving around!

So 2.5 hours later it was all sweated apart cleaned and back together again.
So I dropped that idea and decided i’ll Make another coffee stirrer jig to make up the motion assembly.
Like a ladder shape stirrer with hole place piston cover on it cocktail point to locate, two more holes either side cocktail sticks in up to the motion bracket end another’s stirrer with tight clearance holes for those sticks to allow adjustment. Carve the stirrer out to allow the connecting rod to pass through drop the crosshead through place in the motion bracket and solder! Easy in my minds eye harder to explain. Then resin the piston cover on the front the cylinder block.
Not done this yet but that’s the plan.
So on to making up the crossheads and connecting rods I couldn’t bend the dressmakers pins for toffee but since found out I should of annealed them. I cut them and mushroomed the back over!


So first needed to set up the crossheads to gauge what needed to go where.
oh dear!
The crossheads bash on rear of the cylinder block. Possibly grind the rod clamp back. Wondered why Dave used a tube and they supports went inside! Know now..

Then I’ve got alignment issues the mushroomed pin and the previously filed crankpin nut clash one side and almost overlap the other! The better side is where I’ve opened out the piston hole as it was a bit skew, so this is perhaps the solution opening the cylinder holes until I get clearance.


Dave again was feeling for me here so kind gent he is sent me some new cylinder etches ones he had produced for P4!
Save me redrilling mine anyway here’s those!


What were the chances of that! Hey I’m a P4 man now!
So next a strip and soda crystal wash and rinse not been cleaned since it’s start.


So back together I noticed some old holes in the block where I had drilled them to wide, worth a shot to see if that width would work.

Kinda works so quite pleased doesn’t look crazy wide on the cylinder so Will go with it.
The school desk my work bench has been temporarily taken down while the train room starts in Ernest so nothing here probably till after Christmas.
But while I work on Barnstaple Quay signal box and station I’ll also have a do with this Meldon Quarry
So as always all comments welcome
Until next time
Cheers
The cylinder block valve chest was completed.
Next up solder the crossheads and piston covers!
Didn’t go well not enough heat needed a bigger iron was the consensus on RMWeb.
After using brass rod and oil to keep things lined up went disasterously wrong! Didn’t think that one through, had to unsweat it and then used a cocktail stick as I had already seen but forgotten to do the same job.
This side went kind of ok but one slide bar was not soldered in proper.
Next tried the other side oh dear!
I’d already pulled 5e first side off but this was loads of heat to get the solder to flow all coming apart and moving around!
So 2.5 hours later it was all sweated apart cleaned and back together again.
So I dropped that idea and decided i’ll Make another coffee stirrer jig to make up the motion assembly.
Like a ladder shape stirrer with hole place piston cover on it cocktail point to locate, two more holes either side cocktail sticks in up to the motion bracket end another’s stirrer with tight clearance holes for those sticks to allow adjustment. Carve the stirrer out to allow the connecting rod to pass through drop the crosshead through place in the motion bracket and solder! Easy in my minds eye harder to explain. Then resin the piston cover on the front the cylinder block.
Not done this yet but that’s the plan.
So on to making up the crossheads and connecting rods I couldn’t bend the dressmakers pins for toffee but since found out I should of annealed them. I cut them and mushroomed the back over!
So first needed to set up the crossheads to gauge what needed to go where.
oh dear!
The crossheads bash on rear of the cylinder block. Possibly grind the rod clamp back. Wondered why Dave used a tube and they supports went inside! Know now..
Then I’ve got alignment issues the mushroomed pin and the previously filed crankpin nut clash one side and almost overlap the other! The better side is where I’ve opened out the piston hole as it was a bit skew, so this is perhaps the solution opening the cylinder holes until I get clearance.
Dave again was feeling for me here so kind gent he is sent me some new cylinder etches ones he had produced for P4!
Save me redrilling mine anyway here’s those!
What were the chances of that! Hey I’m a P4 man now!
So next a strip and soda crystal wash and rinse not been cleaned since it’s start.
So back together I noticed some old holes in the block where I had drilled them to wide, worth a shot to see if that width would work.
Kinda works so quite pleased doesn’t look crazy wide on the cylinder so Will go with it.
The school desk my work bench has been temporarily taken down while the train room starts in Ernest so nothing here probably till after Christmas.
But while I work on Barnstaple Quay signal box and station I’ll also have a do with this Meldon Quarry
So as always all comments welcome
Until next time
Cheers
Hi Ade, the etches l used for Jane came from Dave Sutton. Dave contacted me whilst he was developing his Shannon and l was able to help him with some info and it was due to my need of the cab that l believe he made the additional etches though he may well of had others interested at this time.
As you say Dave is a really helpful generous and friendly guy.
These days l use what ever l can to assist in my modeling, and Dave's etches were a great help. He also produced the 3D printed parts l used for the chimney and done.
Good luck with your model of Jane, when l get mine pai need l will post some more photos.
Cheers Robin.
Hi Ade
I am looking forward to getting some 4mm etches from Dave Sutton for my very own 'Jane'. So watching your build is really helpful. Thanks for posting the blow by blow account.
Q: On Dave's build, he had to file the motor to get it into the boiler barrel. Have you given any thought to fitting your motor?
AdeMoore
Western Thunderer
Just a few quotes I felt the need to record here for myself to refer to.
J_F_S Howard on Jonte’s first kit build thread
My tips for successful soldering:-
1. Clean the metal, clean it again, then clean it again.
2. use the minimum possible amount of flux
3. use the smallest possible soldering iron bit appropriate to the job - a 1mm point is big enough for most 4mm work.
4. clean the job after you soldered anything. Then clean it again.
Keep practicing - this is a skill not a talent, and skill only comes with practice.
Which I rather liked!
Adrian off the same thread.
It does highlight a difference in the materials but from my point of view the fact that brass conducts heat 5 times faster than N/S is why I prefer N/S. I take this as a plus point for N/S for a few reasons and it's all around soldering.
For a good soldered joint you need to concentrate the heat at the joint. So this is something I find people struggle with using brass because as you say it dissipates heat far quicker than N/S. This heat dissipation leads to other problems if the soldering iron doesn't have the required power to keep the temperature at the joint, also with thin overlays this heat dissipation can lead to buckling and distortion because the user ends up holding the soldering iron on for longer. With N/S the heat stays around the joint so it's up to temperature quicker to melt the solder which you can remove it quicker without disturbing the rest of the kit or other joints. I can solder a fine 5thou overlay in 2mmFS with a 75W iron without any buckling, I think I would struggle to do the same if it was in brass.
Which gives the final benefit for me - no burnt fingers! Due to the lower heat dissipation I find I can hold a couple of pieces of N/S together in one hand and solder the joint without it getting too hot. Again if it was brass I'd burn my fingers and drop the components before the solder has had time to cool.
Dave Sutton purveyor of the etches he kindly sent me over 1 year or was it 2 years ago! To aid this scratch build always said N/S was the way forward and his work is in N/S seems 7mm is more brass kit/scratch build territory.
Meldon is currently at the forefront but this is stirring just below the surface!
AdeMoore
Western Thunderer
Same thread again,
I'm incapable of arguing the technicalities. However, from my experience (and dealing with 7mm only) brass works really well for me (I have no problem with NS either) and I use a really large tip on the iron and a temperature at the tip around 300 degrees. I built the signal in brass and with the large tip iron using some tiny components and failed to solder the moving parts up solid. I also slosh the flux around like there's no tomorrow but use tiny pieces of solder.
I've tried Mickoo's technique with a gas torch and also the use of solder paste as recommended by others. Neither works for me but that doesn't mean they should be disregarded.
So........ This comes down to personal preference and what works best for you as an individual. I'd not impose my techniques on anyone else but can, very happily, demonstrate them to anyone who wants to watch.
Brian
John Baker
Western Thunderer
Ade, did you ever finish this loco? I enjoyed following this thread.
AdeMoore
Western Thunderer
Hi John thanks for the interest. Wow 2 years since I left this! On here. More was done but not complete or anywhere near.Ade, did you ever finish this loco? I enjoyed following this thread.
Someone earlier in the thread can’t find it now was interested in my attempt to roll a boiler this small, well I can confirm success! I read a bit on it on here and a steel rod on the back of a mouse mat pressing real hard was what I read. But that didn’t cut it, so I had some foam I just kept adding it until I had enough of a pile to make it work.
a stair rod cut off was the first tool then a screwdriver handle finished it off.


will need to solder up but I’ll get further first.
Cut a roof! Laugh is Dave gave me a roof in his etch I now see and I used it to cut crossheads I had no clue!


John Baker
Western Thunderer
Looking really good. Good to know small boilers can be rolled so well - I'll need to do this soon! Really admire the scratch building. I can only do the basics when provided with a plain sheet of brass!
Dave Sutton
Western Thunderer
I might have some more bits of the etch kicking about somewhere, I'll have a check in the morning.
AdeMoore
Western Thunderer
James rest assured this is point of beyond me! First thing in brass I’ve ever built so steep learning curve. But have had some great advice and assistance on here and over on RMWeb. What are you building?Looking really good. Good to know small boilers can be rolled so well - I'll need to do this soon! Really admire the scratch building. I can only do the basics when provided with a plain sheet of brass!
Dave your too kind! I’m feeling rather embarrassed as it is that I’ve not got on with it after all your kind assistance and generosity.I might have some more bits of the etch kicking about somewhere, I'll have a check in the morning.
Cheers Both.
John Baker
Western Thunderer
What are you building?
I'm building a Manning Wardle Old Class i. I've designed etches and castings though, so not sure it fall into the scratch building category, or not in traditional sense at least.
Have a look here if you like
")
7mm - Manning Wardle Old Class i: a self-designed 'kit'