The Masokits etches are beautiful looking:
.jpg")
First out of the traps is the main floor:
.jpg")
As you can see in the instructions in the picture above, there are two sets of folds, the first being the solebars, the second the buffer beams. The first solebar fold is easily done in bars or a Hold-and-fold, but the second is more awkward because the solebar that's already up at a right-angle is in the way of anything wider than the floor.
So, something more homemade is called for; I try to be quite ruthless with my hereditary hoarding tendency, but I do retain things that I find genuinely useful, though they may not look it. By using these things...
.jpg")
You can make this:
.jpg")
Which leads to this:
.jpg")
The buffer beam folds can then be done on the Hold-and-fold, which has an extremely well-designed variety of sections - I've not yet been defeated in trying to find a way to use it on a very wide variety of shapes:
.jpg")
.jpg")
Next are the hornguides (also referred to in the instructions as inner foundation units), the first things to come out of the other, equally lovely looking, 10 thou, etch:
.jpg")
.jpg")
These are folded up but before slotting them into place, I eased the slots that their tabs sit in ever so slightly using a 0.45mm drill, because an initial trial fit was even more snug than the isntructions had warned:
.jpg")
Providing you're careful, the fit is still nice and tight, easily sufficient to retain them in preparation for soldering:
.jpg")
The instructions - very detailed, carefully drawn and thoroughly annotated throughout - caution against applying the iron anywhere other than at the intersections of tabs and slots, so it was an opportunity to practise using minimal solder, something I have to watch, as I have a tendency to overdo the solder in the interests of strength:
.jpg")
Not to harp on about them, but the instructions really are wonderfully detailed. They're in two parts, a general overview and assembly sequence (a simple printed sheet) and quite a long booklet full of superbly detailed hand-drawn sketches with very comprehensive annotations - that booklet's the one you can see in the second photo in this post.
Hornblock and bearing carriers next...

")


 assembly & load.jpg")
 assembly & load.jpg")
 final, no load.jpg")
 final, no load.jpg")
 final, no load.jpg")
 final, no load.jpg")
 final, no load.jpg")
 load bracing.jpg")
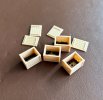
 crates.jpg")
")

 load roping.jpg")
 load roping.jpg")
 load roping.jpg")
 load roping.jpg")
 load roping.jpg")
 with load, final.jpg")
 with load, final.jpg")
 with load, final.jpg")
 with load, final.jpg")
 with load, final.jpg")
 with load, final.jpg")
