4mm Monks Ferry LNWR

jonte

Western Thunderer
Following instruction, I’m intending to paint appropriately two or three areas in bauxite.

Unfortunately, images of these long ago signals seem hard to come by and those in paintings seem daubed in anything from Smokey brown to, well, brown. There’s a (printed) image on the Wizard pamphlet with a bright coloured orangey/red which is probably more akin, but I’m looking to go down a subtler route.

Nothing ready made seemed to suit until I hit on this which seemed more in keeping so I plumped for it:

IMG_4571.png

But when it arrived, it was deeper and lighter in colour.

I’m hoping that a thinly applied coat or two over the black undercoat might tone it down; an additional mist of white subduing it.

Bottom line: nobody’s around anymore who will remember the earlier signal livery, so reckon I should get away with it.

jonte
 

Yorkshire Dave

Western Thunderer
I’m hoping that a thinly applied coat or two over the black undercoat might tone it down; an additional mist of white subduing it.

I'd try one or two thin washes of cavalry brown/oxide over the existing grey primer and let that subdue it. You can always lightly dry brush with ivory or a very pale grey to accentuate a few highlights. I think a black undercoat will grin through darken the colour.

Bottom line: nobody’s around anymore who will remember the earlier signal livery, so reckon I should get away with it.

I wouldn't worry, go with what looks right to you from your interpretation of any descriptions available. If anyone deigns to criticise - ask them for photographic evidence. That should keep them quiet :) :rolleyes:.

Reams, if not volumes, have been written about colour and the scaling of colour in this and other forums. At the end of the day the colour standards and pigment mixes stipulated by any railway company only appear as that colour when first applied. The next day it starts deteriorating through the actions of weather, UV light, airborne pollutants and cleaning.

My grandfather, who passed away in 1987, always told my dad and myself he could see the Midland Railway locomotive colours in his mind's eye but could never quite capture it exactly when trying to recreate it while painting pictures or models.
 

Debs.

Western Thunderer
My grandfather, who passed away in 1987, always told my dad and myself he could see the Midland Railway locomotive colours in his mind's eye but could never quite capture it exactly when trying to recreate it while painting pictures or models.
I feel the same about the ubiquity of B.R Blue, we're all so familiar with it, but I've never seen a model that accurately represents now, what our eyes saw at the time.

I have a form of synaesthesia; Chromesthesia (blended senses; to simplify 'I hear colour and see sounds').
So I can hear the small pitch change caused in hue between livery paint variants; but, nobody listens when I say Dapol and Heljan blues sound weird! :rolleyes::D
 

jonte

Western Thunderer
I'd try one or two thin washes of cavalry brown/oxide over the existing grey primer and let that subdue it. You can always lightly dry brush with ivory or a very pale grey to accentuate a few highlights. I think a black undercoat will grin through darken the colour.


I wouldn't worry, go with what looks right to you from your interpretation of any descriptions available. If anyone deigns to criticise - ask them for photographic evidence. That should keep them quiet :) :rolleyes:.

Reams, if not volumes, have been written about colour and the scaling of colour in this and other forums. At the end of the day the colour standards and pigment mixes stipulated by any railway company only appear as that colour when first applied. The next day it starts deteriorating through the actions of weather, UV light, airborne pollutants and cleaning.

My grandfather, who passed away in 1987, always told my dad and myself he could see the Midland Railway locomotive colours in his mind's eye but could never quite capture it exactly when trying to recreate it while painting pictures or models.

I feel the same about the ubiquity of B.R Blue, we're all so familiar with it, but I've never seen a model that accurately represents now, what our eyes saw at the time.

I have a form of synaesthesia; Chromesthesia (blended senses; to simplify 'I hear colour and see sounds').
So I can hear the small pitch change caused in hue between livery paint variants; but, nobody listens when I say Dapol and Heljan blues sound weird! :rolleyes::D

Debs and Dave.

Your opinions/contributions are more than appreciated.

I really couldn’t have put it better.

Thank you, both.

Jon
 

jonte

Western Thunderer
Popped out to the ‘shop earlier to attempt the next stage in the painting process.

Took me longer re familiarising myself with the cleaning substances and thinners, followed by a laborious process of attempting to remove the cup cap which had managed to weld itself on in the months since I last used it due to a thin line of residual paint around the cap seal. In the end, I reached for the matches…….

Cleaned up accordingly, everything else was fine n dandy.

Then to my outright disappointment, I discovered that all that remained of my Tamiya black (acrylic) was approximately six tiny drops (I’ve Ammo, Humbrol, Vallejo, Revell; the list goes on; in my humble, Tamiya is without doubt the best behaved). Anyway, I managed to accomplish the task with the assistance of the Ammo stuff chosen at random. The other good thing about using Tamiya is that it’s stocked by the everywhere stores like Hobbycraft and The Range which saves on having to travel distances to the nearest modelling shops or fork out hefty carriage charges from specialist suppliers.

So just before reaching fir the trigger, I remembered Dave’s kind advice about masking off the base of the posts to ensure an optimal hue for the bauxite, so dug out my supply of Tamiya tape in a variety of thinnesses’. Re-reading the notes accompanying, I noted that the bases of LNWR posts set in the Mediaeval period, which is the period I’ve chosen to cobble a model railway together, were painted as such up to a height of 5’, which I think my humble math (math never maths, guys. Well according to those clever emeritus profs anyway. You know the types: those that ensure that our Unis secure funding each n every year by making up stuff like Global Warming and convincing their mates in government and media that it’s real stuff ;)) equates to twenty milli or so in 4mm scale. Using a measuring stick placed up against the post, it simply didn’t sit right with me (just the way I am, I suppose), so inthe end I selected the thickest bit of thin masking tape supplied by my Oriental friends which I reckoned looked about right; to my wonky eyes any road.

So off I squirted. Then I stopped, as I recalled from the accompanying notes once more: ALL the ironwork - including the caps - were bauxite! Too late.

Never mind, Dave, I tried:

IMG_4591.jpeg

Till next time, thanks for reading.

jonte
 

40057

Western Thunderer
those that ensure that our Unis secure funding each n every year by making up stuff like Global Warming and convincing their mates in government and media that it’s real stuff ;)

Hi Jonte

Err… I can’t help noticing that in recent posts you have been complaining about the unbearable heat. How right you are, record breaking temperatures and heat waves. And not just this year, but more and more frequently in recent decades. Around 2,700 heat-related deaths in May and June in England and Wales alone, over 10,000 across Europe.

Nobody has made this stuff up.

I realise your remarks may have not been entirely serious, but climate change certainly is.

Martin
 

jonte

Western Thunderer
Hi Jonte

Err… I can’t help noticing that in recent posts you have been complaining about the unbearable heat. How right you are, record breaking temperatures and heat waves. And not just this year, but more and more frequently in recent decades. Around 2,700 heat-related deaths in May and June in England and Wales alone, over 10,000 across Europe.

Nobody has made this stuff up.

I realise your remarks may have not been entirely serious, but climate change certainly is.

Martin

Hi Martin

The school hols will be starting soon (some already have) so the sun will no doubt disappear again until they resume in early September when we can look forward to yet another characteristic Indian Summer.

I blame those darned volcanoes ;)

Best.

Jon
 

jonte

Western Thunderer
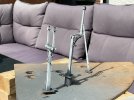
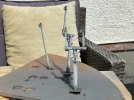
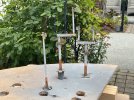
Painting has begun:

IMG_4601.jpegIMG_4599.jpegIMG_4602.jpeg

I’m aiming for a worn but operationally kempt appearance. The harsh environment of the Mersey at this point would have taken its toll, and despite the grandeur of the pregrouping days, things were let go here towards the end of the station’s service as all eyes were on the soon to open joint station at Woodside.

The arms, however, would occasionally see a little attention to ensure they were still visible to the engine crews and guards.

In respect of the arms, they’re red mixed with black to tone them down and sprayed onto a black base. Unfortunately, I was out of flat red (Tamiya) so had to turn to an unopened container of Revell acrylic (awful stuff, but when needs must). I was tempted to use a thinner coat of paint for a worn appearance but as written above, I erred on the side of caution as this wasn’t BR towards the end of steam, so used a slightly thicker mix. A film of dirt applied later should help with the hint of neglect I’m trying to portray.

Thanks for looking.

jonte
 

jonte

Western Thunderer
Grasped the opportunity to do a tad more painting.

Masking up was done over a couple of days when the opportunity arose. Overall it wasn’t too bad, despite it being a fiddle threading it through the wires at times and I had to resort to cutting the masking tape accordingly (variety of widths) which also proved a challenge. Still it could have been better: in places I thought I might get away with partial covering of parts which I thought might be out of range of the spray, but the wind didn’t help here and there are obvious signs of overspray in one or two places. Ideally, I wanted to cover the white with a coat of varnish to seal the paint in order to resist the placing and unplacing of the masking tape (and which have helped in cleaning up the overspray )but like on a number of occasions with this build, I simply couldn’t trace the jar so carried on unabated. Inevitably, it’s produced one or two scars. My own fault due to impatience. Anyway, I popped over to the local Hobbycraft after dropping off the grandchildren last evening so will give it all a covering later.

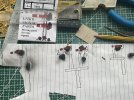
I mixed up the paint (to a colour which I’ve convinced myself gives a convincing hue of LNWR bauxite, but frankly, I don’t really know what the shade was like. I just don’t think for some reason that the shades of brown seen in paintings from the past are a true reflection; just my humble……) from the Vallejo colour of which I’ve made mention before and some Red/Brown from Tamiya, hoping the Tamiya would tone it down. The colours used are seen in the next shot and I’ve attempted to show the contrast between the Vallejo as bought and the mix I’ve used in the jar alongside:

IMG_0544.jpeg

And here a couple or so of the results:

IMG_4606.jpegIMG_4606.jpegIMG_4607.jpegIMG_4608.jpeg

I had to wait for the sun to appear before taking the shots, as it’s been overcast here once more. I note that the sun has gone AWOL since I started writing this so I need to make progress whilst I can and will return to the airbrush later today (with my preference for working outdoors) as rain is forecast for the weekend, much to Olive my pet tortoise’s disappointment.

Anyway, hopefully they’re sporting the worn but not a totally abandoned look for which I’m aiming.

So next I’ll varnish as mentioned and apply some weathering here and there before reconstructing the parts and soldering on the blinders.

Cheers for now.

jonte
 

jonte

Western Thunderer
Good work Jon, hope you beat the rain. Our plants are REALLY looking forward to a good downpour.

Thanks, John. Much appreciated.

It seems I’m always against the clock these days, so as the saying goes I’m making hay while the sun shines. Oh, hang on a mo….. ;)

Here’s to a well deserved good soaking!

Jon
 

jonte

Western Thunderer
I think I mentioned that my Precursor was kindly returned by Rails with the non-tyred wheels replacing the tyred version which came as standard.

When I tested it, it ran beautifully and I was delighted with it.

Unfortunately, I didn’t record the running in process, however, here’s one I did which is of a Bachmann Coal Tank, purchased new around the same time:


I didn’t run it any faster in either direction due to the perilous proximity to the edge, however, it ran smoothly in both directions out of the box. It will serve as branch train, although perhaps periodically on the London train as far as Crewe, or at least until I’ve cut my teeth on the Crewe Special kit which - provided I don’t make a b*lls up of it - should put me in line for purchasing another kit of a mainline engine to lighten the workload on the Precursor.

Thanks for looking/reading.

Now back to spraying.

jonte
 

jonte

Western Thunderer
With wet weather imminent, I decided to make hay with the day as mentioned to John in my previous.

Frankly, I’m not sure whether it was worth it. Bit of a mixed bag of results to be honest; more bad than good.

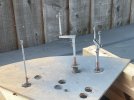
I started applying varnish to the posts last night in order to provide maximum time for going off (usually two to three hours at room temp.). Mixing the Tamiya Clear (flat) with their thinner X20A, 1 : 3 , it went on without blooming, so starting earlier today, I applied a second again without bloom. Then later this afternoon, I applied a third and final coat; you’ve guessed it: bloomed….. I think with the frustration experienced in between coats, I rushed it. Never mind, it adds a sort of fading to the finish (although too much on the weighted arms) so I’ll just have to like it and lump it.

Ordinarily, I wouldn’t have bothered with varnishing however, the coats of paint have been kept intentionally thin to achieve my aim of a weathered appearance, thus will mark at the slightest touch. As I’ve to reassemble the parts after painting it’s Sod’s law that the paint would succumb, hence the varnish coat. Anyway, to show you what I mean:

IMG_4610.jpegIMG_4611.jpegIMG_4612.jpeg

I’ve convinced myself it’s weathering…….

Elsewhere, I attended to ancillaries such as the ladders. Masking off the bases of each (apparently some signal ladders were white at the base), I mixed up another coat of Vallejo and Tamiya to make bauxite as before, only this time I made it slightly more concentrated. Pressing the trigger of the gun, nothing happened. Then bubbling in the vase/cup but nothing coming outside of the spout. I realised it was blocked. I upped the pressure: still nothing. Then I removed the nozzle and sprayed again. This time it spurted out but in spots. Suspecting I hadn’t cleaned the gun sufficiently after the (thin) varnish coat, I emptied the cup, took the whole darned thing to pieces and cleaned it again. Another mix, and this time it came out first time. But still bitty and spotted. I realised the problem straight away: the Vallejo in the Tamiya mix of flat brown and X20A didn’t like the thinner. Frankly, I suspected when mixing yesterday’s bauxite with these paints for the first time that I was pushing my luck and don’t know how I got away with it. Still, I needed to get the ladders etc done, so persevered with a weaker mix of the same. After cleaning the airbrush once again (this is the bugbear I find with air spray guns; spend more time cleaning than spraying) I tried again, but sadly the paint split again. My wife was out with the car so a quick visit to Hobbycraft for a suitable shade of Tamiya was of the question, so into the workshop I went to dig out a brown in Vallejo. I had several acrylics in brown including Humbrol and AJK(?) but no Vallejo. In the end I opted for a Golden Brown from an Air Master (?) set and went for it, mixing the colours with deionised water (after cleaning the air brush yet again….). To be fair, it was a close match but erring on the side of caution it was as weak as maiden’s water. But I’d had enough by this time and applied several coats. They’re okay I suppose, but not really what Ai was aiming for. Hopefully the white bands at the base will set them off.

Late afternoon I decided to call it a day (after cleaning the brush again and applying the disastrous final varnish coat yo the posts) and decided to leave putting the equipment away until after I’d eaten. Just needed a break from it.

Intending to tidy up after a meal, the thought of imminent rain had me reconsidering: I still wanted to break the back of painting the rear of the signals and the loose wires. As it was just black I needed for now, I figured I was in for an easier ride with just the Tamiya black. And so it proved. After cleaning up the gun for the umpteenth time today, everything is back in the workshop (and Olive is back in his vivarium overnight, protesting all the way after camping out for so long!) so the weather can now do its damndest.

I suppose the lesson here is stick to like with like if you want to avoid disappointment and using up copious amounts of isopropyl alcohol, as well as valuable modelling time.

Oh yeah: and don’t start a task if you ain’t in the mood. Phil O was right once again about that. Why didn’t I listen……….

Cheers for now.

jonte

 

John57sharp

Western Thunderer
Goodness me, what a day! If I may quote the long suffering Mr Bennett in Pride and Prejudice, I’m sure you’ll get over it soon enough….Id be pleased, if not amazed, to have got this far Jonte, hopefully you can give them all a wipe with the general grime of your choice and all will be well.

So let it rain (please) and then I’ll be able to regale you all with my progress as I have finally been able to spring for a compressor, and there are several queues of jobs awaiting.

All the best

John
 

jonte

Western Thunderer
Goodness me, what a day! If I may quote the long suffering Mr Bennett in Pride and Prejudice, I’m sure you’ll get over it soon enough….Id be pleased, if not amazed, to have got this far Jonte, hopefully you can give them all a wipe with the general grime of your choice and all will be well.

So let it rain (please) and then I’ll be able to regale you all with my progress as I have finally been able to spring for a compressor, and there are several queues of jobs awaiting.

All the best

John

Thanks once again, John, for your kind interest and sympathy. Whether I’m deserving of such is questionable as most of the mishaps are of my own doing. Like you, I’m also amazed I’ve got this far. Think I’ve given up on giving up. Pleased to read that you’ve managed to secure a spring for your compressor, John, and I trust you’ll enjoy addressing the queue of models for painting, of which you make mention, with your wealth of experience, and I do indeed look forward to seeing the results and how it should be done.

Pride and Prejudice, hey? Not read anything by Jilly Cooper, but it would seem Mr. Bennett and I have much in common ;)

As I write, I note that there are one or spots of rain about this side of the water which unfortunately quickly evaporated with the high winds we’re experiencing. Fingers crossed that the heavens will open later as they’ve forecasted overnight.

Cheers again.

Jon
 

jonte

Western Thunderer
It was brighter than expected this morning, and with a generous window until the heavens were due to open, I bit the bullet and masked off the signal arms.

Once again the use of Tamiya (Flat White) and its thinner went like a dream and proved uneventful. The airbrush behaved and was a doddle to clean afterwards (I guess practice makes perfect as they say).

Anyway, I’ve waffled enough of late so here are the results:

IMG_4614.jpegIMG_4613.jpeg

The (shorter) shunt signal will receive a disc cut from the Wizard Models’ brass fret.

A bit of grime, as suggested by John, should help to tone them down a tad, like the posts, although as mentioned, I guess the authorities at this time were keen on keeping the arms attended to. Somewhere in between should do.
The next step will be to make some handrails (from the same nickel silver wire as I’ve nothing thinner) for the two bracket type signals, which I’ll quickly prime and paint when the sun returns, plus a little weathering as mentioned. Then it’s a case of reassembly and some soldering.

With a view to making them work, I took the advice on the MERG site of obtaining one or two (digital) servos from Hobby King, which arrived a couple of days ago. These are recent replacements for the type recommended by MERG according to the HK website.
Whilst I still have two or three others for this project originally obtained from Clive at Heathcote, unfortunately he was unable to supply for the couple of recent kits, thus had to do a bit of searching and purchasing. Now they’re here, I can relax in the knowledge that they’re the same size as previously:

IMG_4615.jpeg

Hopefully a little nearer completion.

Thanks for reading and for your kind ‘likes’ and interest to date.

jonte
 
Top