7mm Rob's Rolling Stock Workbench

Rob Pulham

Western Thunderer
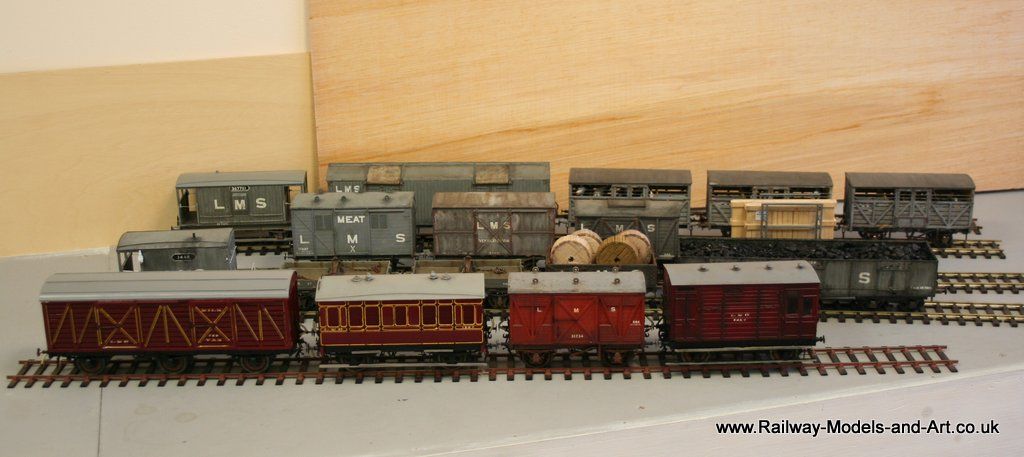
Thanks for posting that - you are building quite an eclectic collection of wagons there - it'd be great to see them all together. There's quite a few tempting vehicles in the Dragon range so I'd be interested to hear your views on how well they go together.

A few posts back Adrian said he would like to see my wagon collection pictured together. I found a bit of time and head space to have a go at it yesterday. Once I got started I got a little carried away so I appologise in advance for the photo overload.....

First up and purely because they were easier to get to I started with my LMS and constituents stock. It came as a little bit of a surprise just how much LMS stock I have given that I am mainly an LNER modeller hmm....

IMG_7090_zpsdcd0f772.jpg


IMG_7091_zpsb346a838.jpg

IMG_7092_zpse691d267.jpg

IMG_7093_zps4ab9d193.jpg

IMG_7094_zpsdeb68256.jpg

IMG_7095_zps7236bfce.jpg

IMG_7096_zps1e8cb873.jpg

IMG_7097_zps6af342e3.jpg

IMG_7098_zpsd105d3fd.jpg

They represent quite a range of suppliers -
Dragon Models (L&Y Bogie van, Caledonian bogie coal wagon and timber and ore wagons, S&D Horsebox - the latter 3 being part of the former majestic models range)
Connoisseur (Milk van)
Slaters (MR Slatted milk van, fruit van, 8 ton van, open wagon, cattle wagons, and brake van).
Parkside (Brake van, meat van and corrugated end van)
MMP (Glass wagon)
 

Rob Pulham

Western Thunderer
Next up is my LNER and constituents based stock - not quite as many as the LMS stock but I have many more in the stash:drool:

IMG_7108_zpsbd3845c1.jpg

IMG_7106_zps03f834b3.jpg

IMG_7109_zps8d5bb66a.jpg

IMG_7110_zps7b93858b.jpg

IMG_7111_zps44729084.jpg

IMG_7112_zps5f5b216e.jpg

IMG_7113_zps4dc23b67.jpg

IMG_7115_zps2a21f1f9.jpg

IMG_7104_zps3d43eadb.jpg

IMG_7102_zps30e5c843.jpg

The suppliers not included in the earlier quote are MMP sadly David doesn't offer any LNER prototypes:( and Slaters who while they do a couple of LNER prototypes I don't seem to have finished any - I say this because I have a part built Alumina wagon in my shelf queens (which is the only Slaters LNER kit that I possess).

Dragon Models (NBR Tank wagon - I also have an NBR floor cloth wagon but because it's in a box awaiting some home made transfers I forgot to include it.)

Connoisseur( NER Implement wagon, MacL - I only picked up the traction engine at locomotion last weekend so it isn't chained on yet, LNER Refrigerator van, NBR Brake van, NBR tender truck, GER Sand wagon).
Parkside (LNER Horsebox, LNER 10 ton vans, LNER Plate and Bolsters wagons, NBR 8 ton van, LNER steel hopper wagon and LNER fitted and unfitted cattle wagons).
 

Rob Pulham

Western Thunderer
Lastly I took a shot of my cattle train - or what I could fit on the length of track - you will have noticed a 3rd Midland van in the LMS shots. I have a part built GWR mex on the go too.

IMG_7116_zps206a9755.jpg

And last of all I have a single GWR example and a single private owner example... - methinks I need to expand the latter for a realistic grouping layout...

IMG_7118_zpsd4b68901.jpg

IMG_7119_zps6a320111.jpg

And for those of a Southern persuasion look away now for there is nothing to see here (although if you hold your breath long enough the odd southern van may appear in the next year or three).
 

adrian

Flying Squad
Thank you for taking the time to take the photo's - that's an impressive range of vehicles. The variation in styles, sizes etc looks just like the photo's of a large goods yard, storage sidings.
 

Dog Star

Western Thunderer
Rob, pure envy in Hampshire.

Just one question... given that you and Chris are considering an engine shed layout then how does the good stock fit into that scenario?
 

Rob Pulham

Western Thunderer
Rob, pure envy in Hampshire.

Just one question... given that you and Chris are considering an engine shed layout then how does the good stock fit into that scenario?

Thanks Graham,

The plan is that the engine shed/turntable is at one end with the engine shed on the short L section with the coal drops/goods shed and sidings at the other end.
 

Rob Pulham

Western Thunderer
Having completely forgotten the NBR Floor cloth wagon in the group shot I thought that I had best dig it out and see where I actually got to with it.

It's not quite a shelf queens being complete in all respects apart from some additional transfers - "return to Kirkaldy" and some weathering.

IMG_7123_zpsebc8561f.jpg

IMG_7124_zps84ed9767.jpg

IMG_7125_zps4e336a2e.jpg
And finally the other side.

IMG_7126_zps513470c2.jpg
 

Rob Pulham

Western Thunderer
Last night also saw me make a little progress on the next item across the bench a Medley Models (NER Days as Steve now trades under) NER fish truck to diagram C1.

The kit is a little agricultural in that the etches I believe are hand drawn with the tabs created as half etched circles. Which when you cut items from the etches leaves visible dimples. That said quite a bit of it is built up from layers so they can be placed inside to hide them.

A plus point is that it's etched in nickel. The instructions had me head scratching so when I last saw Steve Hoyle I asked him to explain what he meant by making a middle layer up from parts included inside another. See below, apparently there was enough room on the etch for 8 of these so you have to make 2 of them up yourself.
Sideframes_zpsdc361f44.jpg
These build up in layers to give you the sides looking similar to the ends below
IMG_7121_zpsed700c00.jpg
A small error that I have discovered so far is that the coupling hook slot was only in one of the three layers that make up the ends so I had to drill and file them out once the layers were soldered together.
Buffers_zps6e3bdbf5.jpg
Lastly a poor photo but it does contain brass buffer shanks.
 

Rob Pulham

Western Thunderer
A little more progress on the fish truck - now I am starting to laminate the various layers together its starting to take on a satisfying mass.

IMG_7127_zps4fba782b.jpg

IMG_7128_zps24159023.jpg
 

Rob Pulham

Western Thunderer
I made a little more progress on the fish truck last Wednesday and Thursday evenings. First I made up the brake shoes strangely there are eight brakes each consisting of a centre shoe with arm and then twelve etched outer shoes - four short to add one each side. Initially I decided to add one to each shoe and a second to the four shoes that would fit at each end. Having done this I noticed that the shape of the scrap etch that the shoes came out of would allow me to add a plain inner one to the four inner shoes with a bit of filing to shape.

IMG_7135_zps47337507.jpg

I also realised that there were no brake yokes included in the kit - luckily my spares drawer yielded some nice cast ones from Laurie Griffin.

IMG_7136_zps86287153.jpg

The middle shoe has the supplied etch both sides, the right hand one shows the plain one made from etch waste and the left one shows the same but with a semi circle scored in to represent the edge of the shoe itself - I am not sure whether it will survive painting but for the few seconds it took to do there is nothing lost of it disappears.

Lastly I made up the side door runners.

IMG_7134_zps74789721.jpg
 

Rob Pulham

Western Thunderer
In between assembling the sides and ends of Graham's cattle wagons this came together over the last couple of weekends. I still need to add the many hand rails that these wagons had - having looked closely in part two of Essery's Midland wagons tome I was surprised at just how many I have still to add.

IMG_7139_zpsf81240dd.jpg

IMG_7138_zpsf38c165f.jpg

IMG_7137_zpsf2ce3e0a.jpg

Sadly this is quite an early Slaters kit (in the narrow white box) that I collected at Telford from Nick Rees and it's lacking in any sort of brake yoke detail so I will need to add at least a representation of it.

On a completely different note after reading Tony's (Osgood) posts on metal blacking/browning I had a go at warming the wheels for this one with a hairdryer before applying Birchwood Casey with a cotton bud. I was amazed at how much better the blacking seemed to take to the wheels. So a big thanks to Tony for that one:thumbs:
 

Rob Pulham

Western Thunderer
Although the metal construction has slowed over the last couple of weeks I have managed to crack on with painting plus making and adding transfers.

A second parkside NBR 8 ton van is in primer and the CCT just needs a few bit's touching up and it's ready for transfers too.

IMG_7196_zps5baa1139.jpg

IMG_7201_zps1d503019.jpg

IMG_7197_zpsca058834.jpg

IMG_7198_zpscb96a47b.jpg

Then I finally got around to printing the "return to Kirkcaldy" transfers for the floor cloth wagon. They were printed onto white transfer paper and to achieve this I scanned the wagon side to get the grey for the background and then added the lettering. It's not come out a perfect match but once the wagon side and the transfer is toned down a little by some weathering I think that they will look the part.

IMG_7193_zps8ca6ba97.jpg

IMG_7194_zps697c783d.jpg

IMG_7195_zpsdb319075.jpg
 
Top