You are using an out of date browser. It may not display this or other websites correctly.
You should upgrade or use an alternative browser.
You should upgrade or use an alternative browser.
7mm Rob's Rolling Stock Workbench
- Thread starter Rob Pulham
- Start date
Rob Pulham
Western Thunderer
The temporary workbench has been dismantled again but before it went I did manage to get the brake van up on it's wheels and sitting nice nicely on a sheet of glass.

Since this photo was taken I have added the brake gear and some screw couplings.
Since this photo was taken I have added the brake gear and some screw couplings.
Rob Pulham
Western Thunderer
Firstly my appologies for the crap photos's I haven't anywhere set up to take them at the minute so I had to do with poor lighting and try to make up for it with software but it isn't up to much.
I managed to get my hands on some styrene so the last couple of days while it has been raining I cleared a space and set up the cutter. First I cut the parts for the new door and the internal lockers/benches etc.
Sadly it didn't go without incident and on the very last cut it moved out of registration and scrapped them all. Undeterred I cut them again and they came out okay.
I glued the layers for the door together and laid them between two sheets of glass to dry and it was only when I was rubbing the edges down to remove the layering that I realised that I had a few layers too many - the completed door was a scale 4" thick. I must have been thinking I was building a bullion van or something...
So third time lucky as the saying goes we have the new door sorted. And after all that I forgot to take any photos of it.
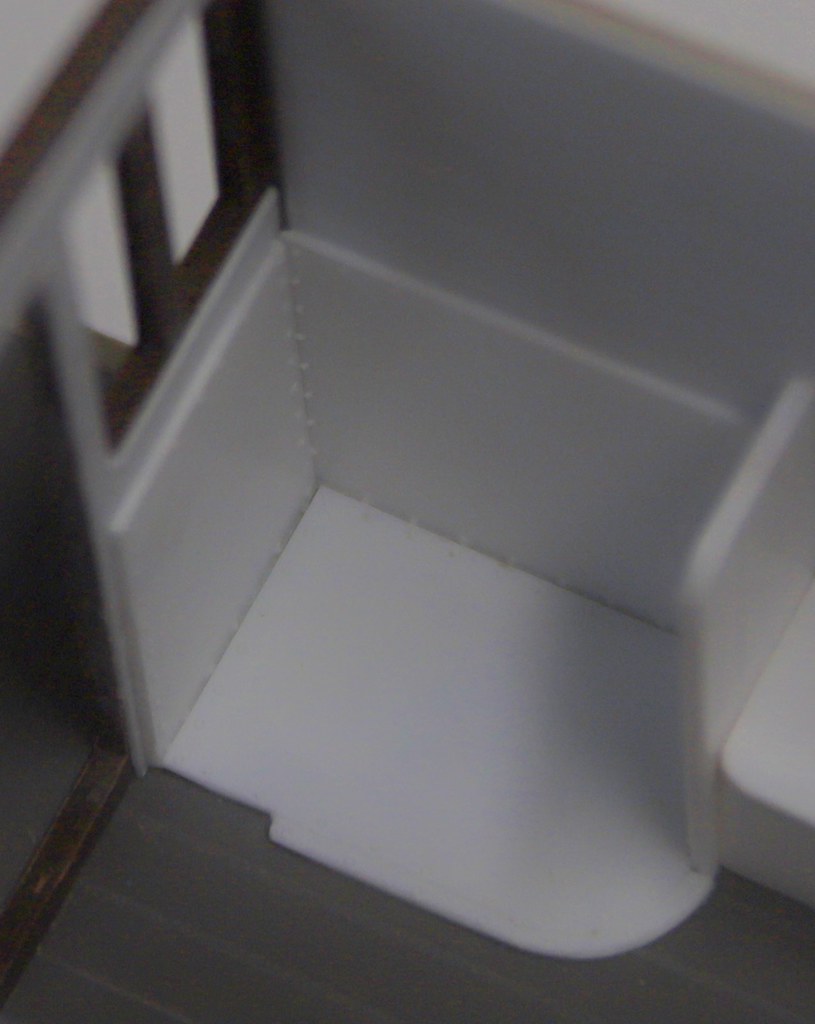
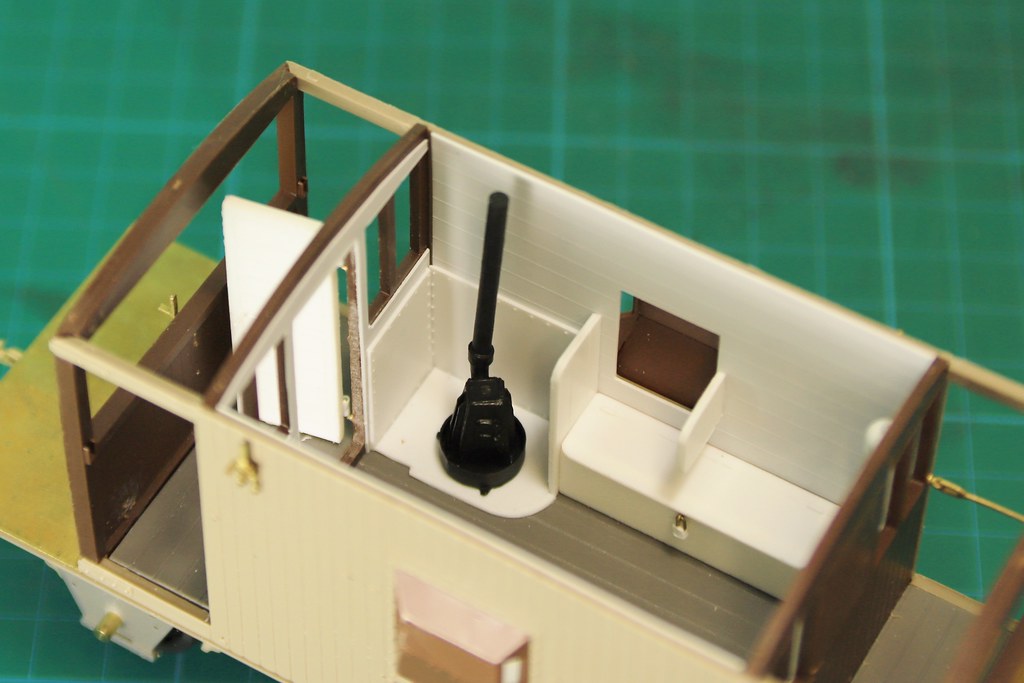
While the door was drying I made up the lockers and from the drawing added hinges, and hasp and staple to each locker area. The drawing also says that the guard was to be issued one padlock, so only one of them has a padlock.

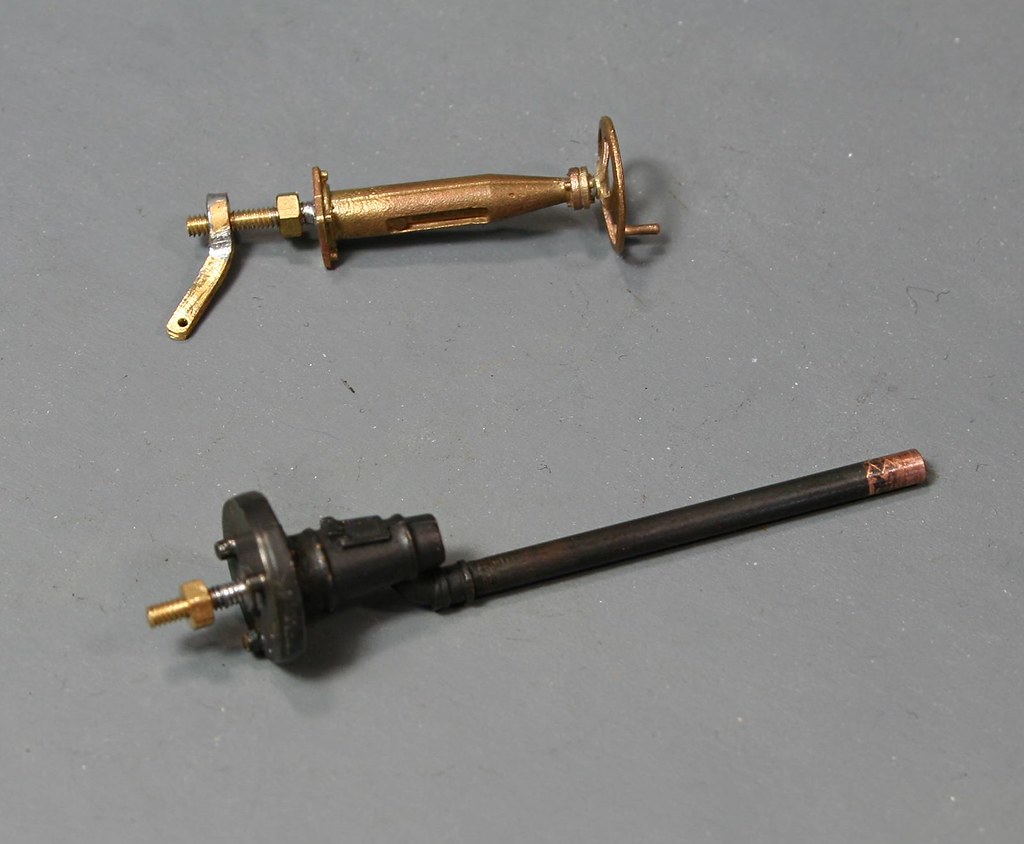
Having added the lining detail to the interior I set about making the Guard's vacuum gauge and the automatic van valve etc.

All made from styrene rod and tube of various sizes. I have just realised that I have missed of the guard's handle I will add that before final fitting.
Here are a few shots of things just resting in place.


Just ready for the stove when I finish drawing and cutting it...


I managed to get my hands on some styrene so the last couple of days while it has been raining I cleared a space and set up the cutter. First I cut the parts for the new door and the internal lockers/benches etc.
Sadly it didn't go without incident and on the very last cut it moved out of registration and scrapped them all. Undeterred I cut them again and they came out okay.
I glued the layers for the door together and laid them between two sheets of glass to dry and it was only when I was rubbing the edges down to remove the layering that I realised that I had a few layers too many - the completed door was a scale 4" thick. I must have been thinking I was building a bullion van or something...
So third time lucky as the saying goes we have the new door sorted. And after all that I forgot to take any photos of it.
While the door was drying I made up the lockers and from the drawing added hinges, and hasp and staple to each locker area. The drawing also says that the guard was to be issued one padlock, so only one of them has a padlock.
Having added the lining detail to the interior I set about making the Guard's vacuum gauge and the automatic van valve etc.
All made from styrene rod and tube of various sizes. I have just realised that I have missed of the guard's handle I will add that before final fitting.
Here are a few shots of things just resting in place.
Just ready for the stove when I finish drawing and cutting it...
Rob Pulham
Western Thunderer
Although I have been busy in the workshop all day I have been distracted by fitting buffers to a good number of part finished models. I did manage to get the door on the brake van hung though and it does open and close.


Finally a better shot of the internals than I managed last night.

Finally a better shot of the internals than I managed last night.
Rob Pulham
Western Thunderer
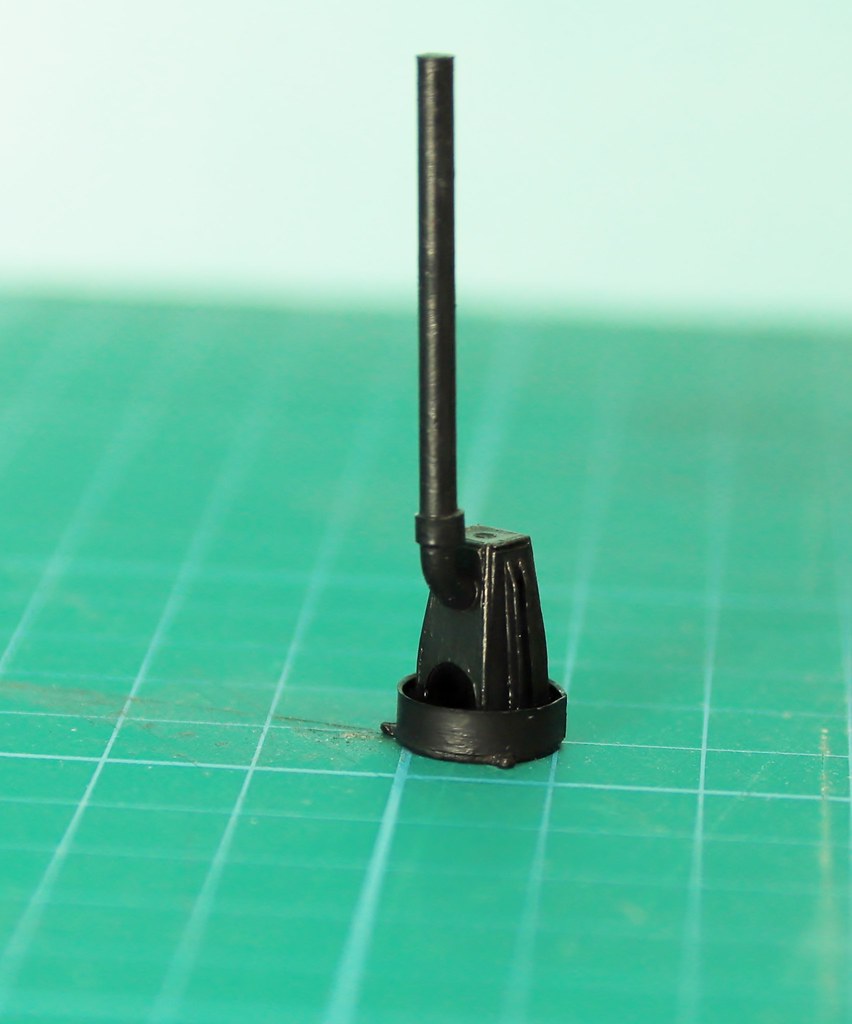
As many will know Slaters do a really nice casting for a brake van stove. The problem with them is tht they are based on an LMS(Midland?) design and although I have used them myself on other builds I have always hoped that someone would do an LNER version.
Slaters Stove (and brake standard).
For this build having got a drawing for the stove, (thanks Dave) I thought I would have a bash at making one.
I am quite pleased with the results and I should have taken a shot with a 5p piece to show how big it isn't...

I will have to straighten the jaunty chimny angle before final fitting though


Finally a couple more shots of the interior as it is at the moment.

Slaters Stove (and brake standard).
For this build having got a drawing for the stove, (thanks Dave) I thought I would have a bash at making one.
I am quite pleased with the results and I should have taken a shot with a 5p piece to show how big it isn't...
I will have to straighten the jaunty chimny angle before final fitting though
Finally a couple more shots of the interior as it is at the moment.
Rob Pulham
Western Thunderer
My order from Metalsmith arrived this week so I moved back onto the Slaters brake van build.
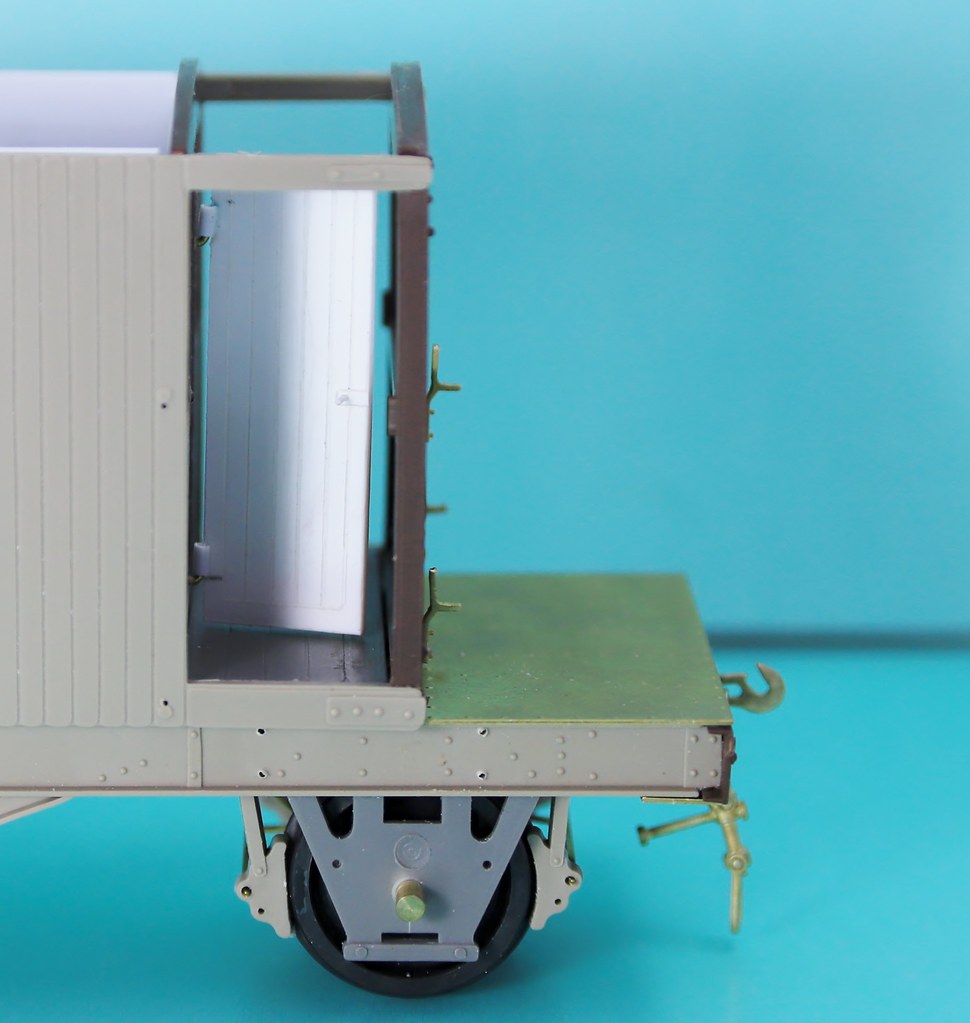
The order from Metalsmith was chiefly for 4mm x 2mm angle which I have used to make replacement stepboards in brass.

The reasons for this are twofold, they will be more resilient to handling and I can solder them to the cast brass stepboard supports provided in the kit.
Conversely I have swapped the cast brass buffer stocks in the kit for some spare Parkside ones of the same style which I can glue more easily to the plastic headstocks.

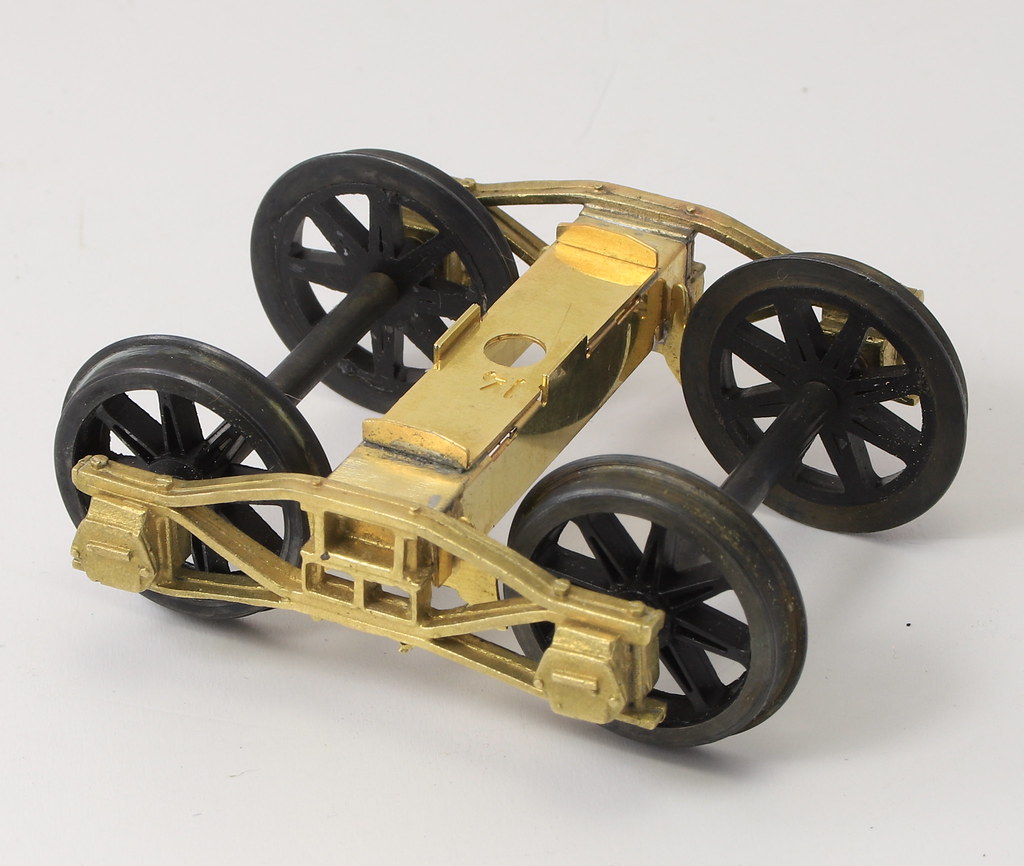
I aslo cut out and cleaned up the axles boxes and springs ready for fitting and ran in to a little problem.


I had previously fitted some triangular (well almost) etched corner plates to the underside of the headstock/solebars. as you can see from the photos these now prevent the spring hangers from sitting flat under the sole bars. A look at the GA reveals that the spring hangers have been cut to allow the plates to be fitted but I feel that I may have fitted them in the wrong orientation and plan to remove one of them to check how it fits with the plate turned through 45 degrees.
The order from Metalsmith was chiefly for 4mm x 2mm angle which I have used to make replacement stepboards in brass.
The reasons for this are twofold, they will be more resilient to handling and I can solder them to the cast brass stepboard supports provided in the kit.
Conversely I have swapped the cast brass buffer stocks in the kit for some spare Parkside ones of the same style which I can glue more easily to the plastic headstocks.
I aslo cut out and cleaned up the axles boxes and springs ready for fitting and ran in to a little problem.
I had previously fitted some triangular (well almost) etched corner plates to the underside of the headstock/solebars. as you can see from the photos these now prevent the spring hangers from sitting flat under the sole bars. A look at the GA reveals that the spring hangers have been cut to allow the plates to be fitted but I feel that I may have fitted them in the wrong orientation and plan to remove one of them to check how it fits with the plate turned through 45 degrees.
Rob Pulham
Western Thunderer
Work 'on' the workshop, rather than 'in' the workshop has kept me rather busy for the last three or so weeks. The good news is that my workshop is now complete apart from a few tiles and a couple of shelves.
What has been lacking, is the energy and head space to pick up modelling again and very quickly I found myself making mental excuses for not doing any. The Mojo was well and truly absent!
The spell was broken by my neighbour asking me to make up some Dingham Couplings for him which he was struggling to solder up. Having done them I surveyed a good number of the shelf queens which when I unpacked them had placed on view around my desk. A couple of them, this GCR wagon included, only needed transfers and weathering to complete the build. so Last night and this morning I got stuck in and added the transfers.
Rob Pulham
Western Thunderer
Like many I suffered a bit of a mojo loss recently so I decided to take a short break from loco building to tackle a couple of wagons in the hope that the enthusiasm was rekindled.
The first of these is a D&S Kit for a North Eastern Railway Bogie Road Van. Although I have had one of these kits for about 3 years, this one is for a gent who lives in Scotland who models the North Eastern Railway so I rang Dan Pinnock to enquire as to availability last year. Dan said he could do a kit but he would have to order the etches.
And so, onto the build.
I started with the basic floor pan and solebars. Like many kits the floor pan has fold down strips down the long edges. what is unusual is that these are not the solebars. The solebars have a full thickness rear section and a half etched overlay. The rear has a narrow fold along the bottom edge to represent the C section of a steel solebar. When put together the solebars fit into slots behind the fold down strips on the floor pan. To this floor pan is added a pair of queen posts


Next, I made up the bogies, these are simple in design. A pair of really nice brass castings fit onto the ends of a fold up central bolster. Each bolster has a fold up strip on the top which either allows for and aft rocking or side to side.
 [/url]
The brakes are simple affairs which fit nicely between the wheels on each side.

The first of these is a D&S Kit for a North Eastern Railway Bogie Road Van. Although I have had one of these kits for about 3 years, this one is for a gent who lives in Scotland who models the North Eastern Railway so I rang Dan Pinnock to enquire as to availability last year. Dan said he could do a kit but he would have to order the etches.
And so, onto the build.
I started with the basic floor pan and solebars. Like many kits the floor pan has fold down strips down the long edges. what is unusual is that these are not the solebars. The solebars have a full thickness rear section and a half etched overlay. The rear has a narrow fold along the bottom edge to represent the C section of a steel solebar. When put together the solebars fit into slots behind the fold down strips on the floor pan. To this floor pan is added a pair of queen posts
Next, I made up the bogies, these are simple in design. A pair of really nice brass castings fit onto the ends of a fold up central bolster. Each bolster has a fold up strip on the top which either allows for and aft rocking or side to side.
The brakes are simple affairs which fit nicely between the wheels on each side.
Rob Pulham
Western Thunderer
Before going any further I took the time to detail the sides while they were flat. One of the features that I love about many North Eastern Railway vans is the doors and their variations of the locking mechanisms.
Much of this detail is provided in the etches and I only added the locking rods and some thin half etched strip to create the staples that the locking rods and lower locking bar fit into.

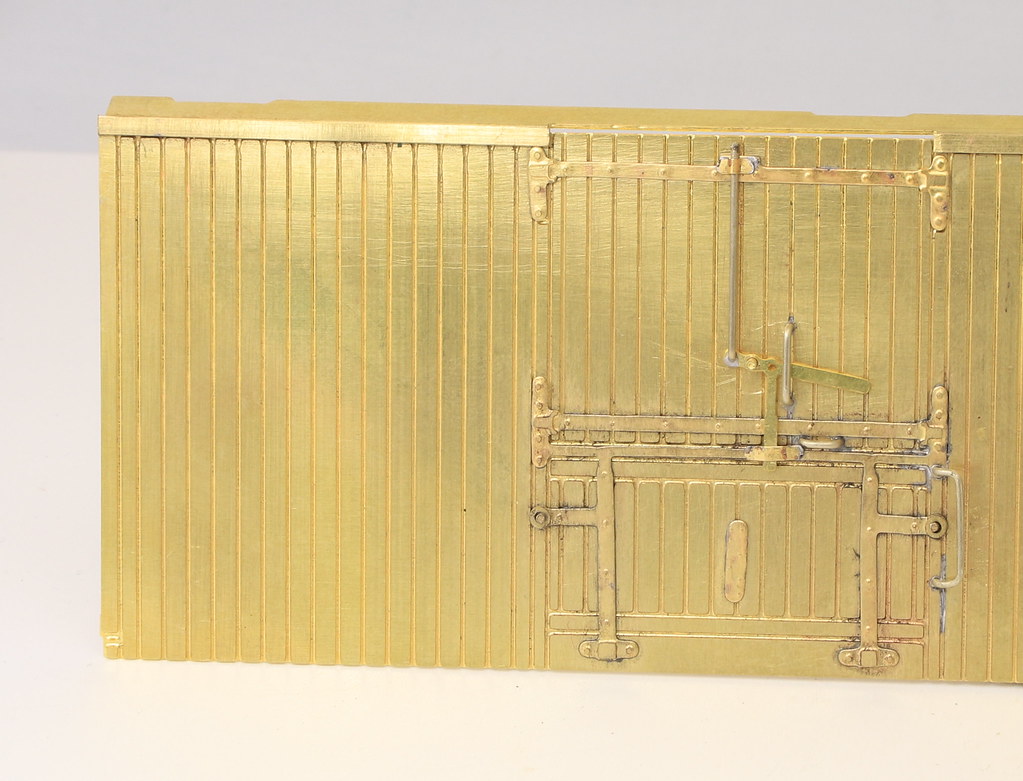

Once the various grab handles and pins for the drop doors were added they were ready for fitting.
Much of this detail is provided in the etches and I only added the locking rods and some thin half etched strip to create the staples that the locking rods and lower locking bar fit into.
Once the various grab handles and pins for the drop doors were added they were ready for fitting.
Rob Pulham
Western Thunderer
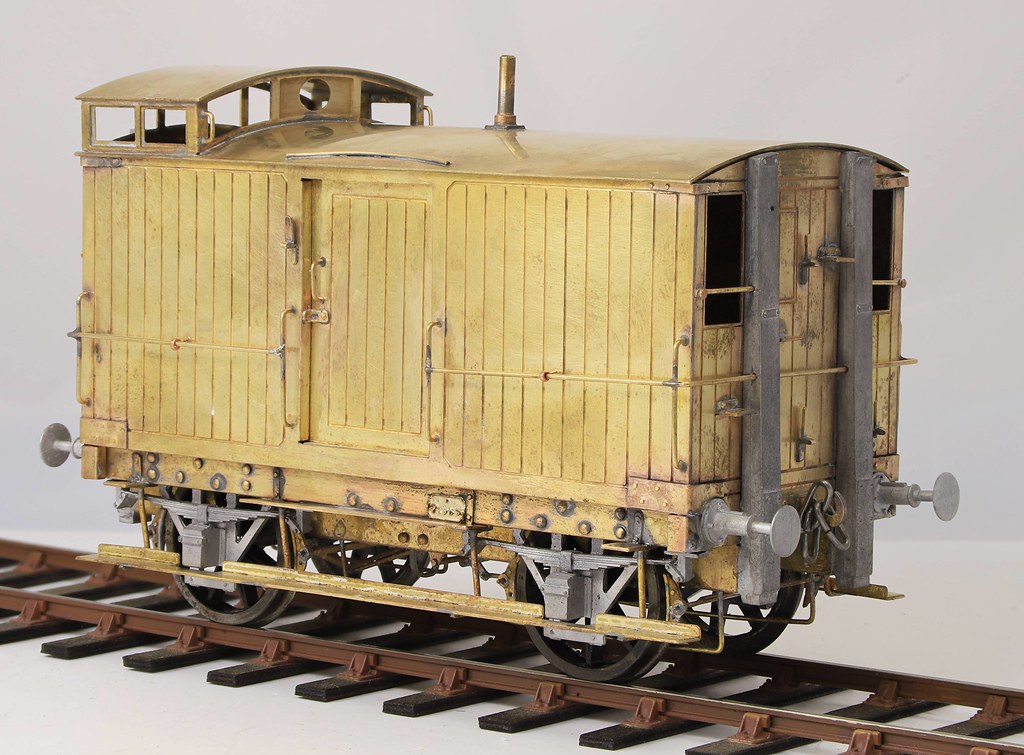
When I got my office and workshop completed last year I placed most of my shelf queens on the window sill in full view so that they are a constant reminder that they need finishing.
One of those is quite a blast from the past, those with long memories will remember my building this NER V4 brake van back in 2017. I got so far with it and for some reason as sometimes happens, it was popped on one side.
With the bit between my teeth, on Friday evening I picked it up and realised that all it needed to complete it was the fitting of the brake gear, guard irons and couplings. I am pleased to say that I knew exactly where the missing bits for it were and a couple of hours last night saw it complete.

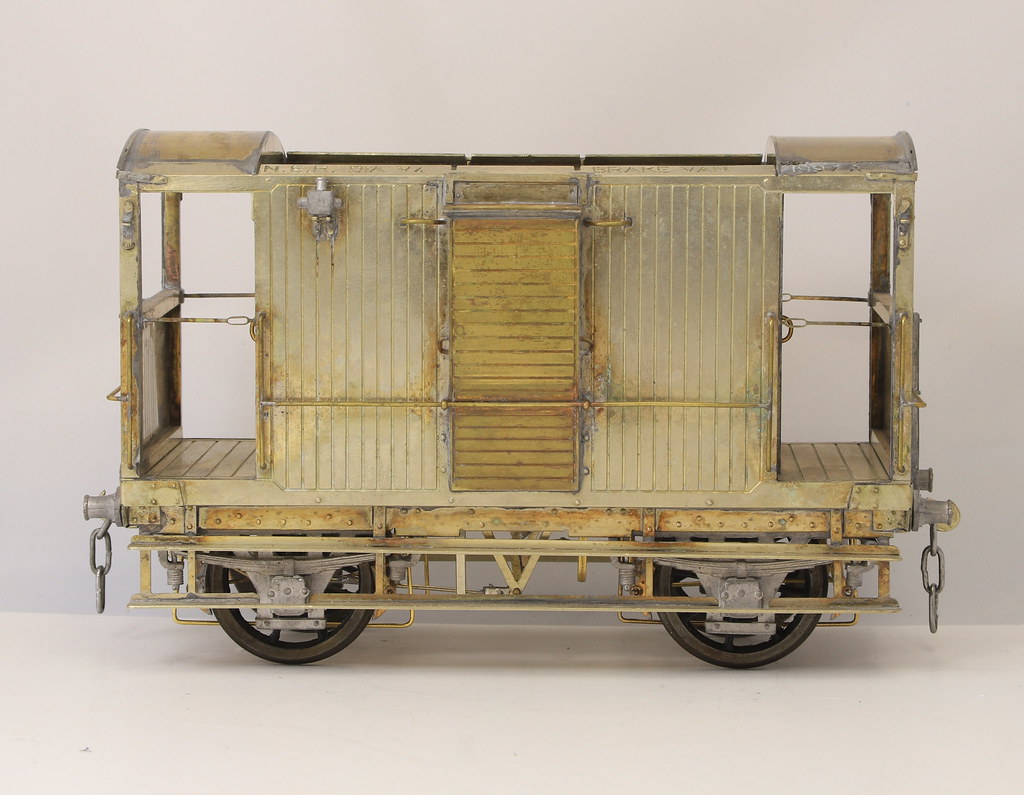
It does need a good scrub before it gets painted but it's now ready for a blast of primer when I do the road van.
One of those is quite a blast from the past, those with long memories will remember my building this NER V4 brake van back in 2017. I got so far with it and for some reason as sometimes happens, it was popped on one side.
With the bit between my teeth, on Friday evening I picked it up and realised that all it needed to complete it was the fitting of the brake gear, guard irons and couplings. I am pleased to say that I knew exactly where the missing bits for it were and a couple of hours last night saw it complete.
It does need a good scrub before it gets painted but it's now ready for a blast of primer when I do the road van.
Rob Pulham
Western Thunderer
Moving rapidly on with the Road van body, the instructions suggest that you fit the ends first and once I filed of an offending etching cusp, the ends fit nicely.
My recently acquired RSU has come into its own on this build. Using it allows me to use the probe to hold pieces in place while tacking them. After tinning the edges of the ends, sides and the fold down on the floor pan, tacking it together with the RSU became a breeze. I ran the microflame gently down the joints to join up the dots and hey presto.


It may just be me but it seemed so much easier than my previous efforts with van bodies. In fairness, the kit is well designed and that helps too.
My recently acquired RSU has come into its own on this build. Using it allows me to use the probe to hold pieces in place while tacking them. After tinning the edges of the ends, sides and the fold down on the floor pan, tacking it together with the RSU became a breeze. I ran the microflame gently down the joints to join up the dots and hey presto.
It may just be me but it seemed so much easier than my previous efforts with van bodies. In fairness, the kit is well designed and that helps too.
Rob Pulham
Western Thunderer
Almost before adding much more under frame detail I couldn’t resist trying the bogies underneath it for an idea of how the finished van would look.

The outer truss rods are quite interesting on that they have two rod one on the outside and the second on the inside of the solebar. The instructions have you add these in two pieces I did them in one with a square U bending in the middle. This proved a bit tricky to get sitting right on the front face and I suspect that doing it in two pieces wouldn’t have proved equally tricky.
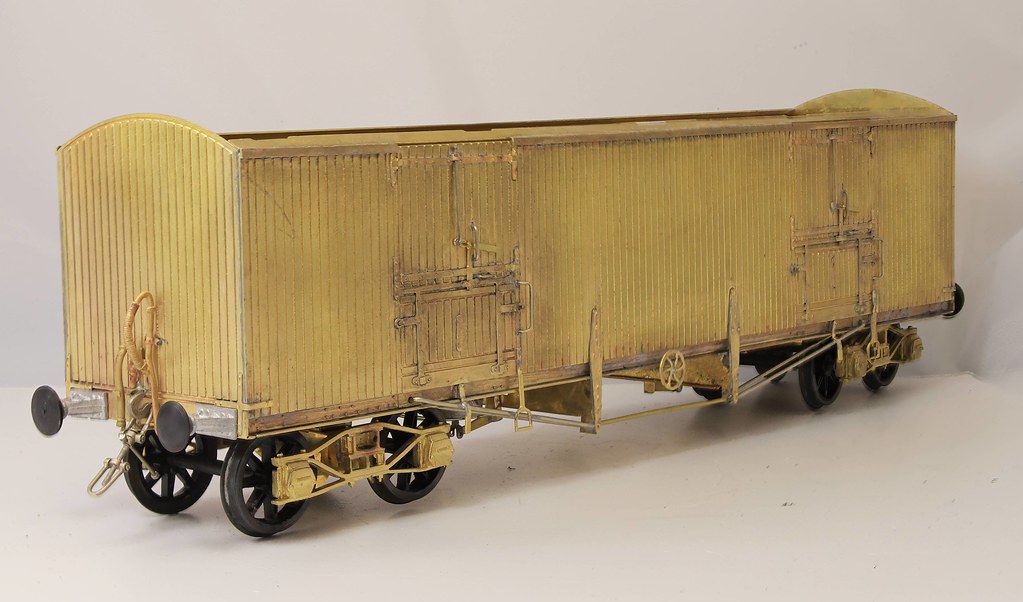

The outer truss rods are quite interesting on that they have two rod one on the outside and the second on the inside of the solebar. The instructions have you add these in two pieces I did them in one with a square U bending in the middle. This proved a bit tricky to get sitting right on the front face and I suspect that doing it in two pieces wouldn’t have proved equally tricky.
Rob Pulham
Western Thunderer
Another two even longer term inhabitants of the work bench from four years ago are two Connoisseur V1/3 Birdcage Brake vans. on a bit of a roll with the V4 I looked at the other two and found that the only things missing from them was buffers.
The reason that I hadn't finished them initially was because I had read On the late Raymond Walley's blog that he had replaced the solid buffers supplied with some sprung ones from NMRS. I subsequently bought some from the late Graham Jones at a show.
Fortunately despite not touching them or the V4 van since 2017 I knew exactly where the replacement buffers were so dug them out and soldered on the buffer shanks and then when I went to fit the heads/springs etc. I found that there wasn't any room for them or indeed access to get the nuts on and tightened.
It is possible to fit sprung buffers, but you need to plan for it and fit them much earlier in the build. In order for them to fit and be able to spring them you need to remove some of the base of the W Iron/spring casting prior to fitting it and adding the wheels brakes etc..
In the end I spent another half an hour removing them and fitting the solid buffers.
Here they are scrubbed up and awaiting paint.


Not wishing to waste a good scrubbing, we had a warm dry day here in North Yorkshire today so I popped out and squirted them and the V4 with etch primer.
The reason that I hadn't finished them initially was because I had read On the late Raymond Walley's blog that he had replaced the solid buffers supplied with some sprung ones from NMRS. I subsequently bought some from the late Graham Jones at a show.
Fortunately despite not touching them or the V4 van since 2017 I knew exactly where the replacement buffers were so dug them out and soldered on the buffer shanks and then when I went to fit the heads/springs etc. I found that there wasn't any room for them or indeed access to get the nuts on and tightened.
It is possible to fit sprung buffers, but you need to plan for it and fit them much earlier in the build. In order for them to fit and be able to spring them you need to remove some of the base of the W Iron/spring casting prior to fitting it and adding the wheels brakes etc..
In the end I spent another half an hour removing them and fitting the solid buffers.
Here they are scrubbed up and awaiting paint.
Not wishing to waste a good scrubbing, we had a warm dry day here in North Yorkshire today so I popped out and squirted them and the V4 with etch primer.
lankytank
Western Thunderer
since 2017 I knew exactly where the replacement buffers were so dug them out
OK, go then...... how the h*ll do you do that......


That's up there with the dark art of soldering without solder...

)")
Rob Pulham
Western Thunderer
Hi Barry,
At one time it was take away tubs but I have moved up market to Lidl plastic containers. When I moved into the workshop I made a mental note of which containers went into which drawer. I have one drawer specially for shelf queen bits.
At one time it was take away tubs but I have moved up market to Lidl plastic containers. When I moved into the workshop I made a mental note of which containers went into which drawer. I have one drawer specially for shelf queen bits.
lankytank
Western Thunderer
Yes, Rob, know where you're coming from, very posh with your Lidl's finest - in the past I was subject to 4 house moves in 3 years, stock answer, then, to the question 'do you know where XXXXXXXXX is?' (where the XXXX's could be anything) was 'It's in a box...!!!!' - even now some nine years later, a lot of 'stuff' is still in boxes & the stock answer is still the same........
Bests to you & Chris
A quick photo of Chris's 'wet pallet' wouldn't hurt (bacon tray....??). Sorry, think I'm mixing threads here.
Bests to you & Chris
A quick photo of Chris's 'wet pallet' wouldn't hurt (bacon tray....??). Sorry, think I'm mixing threads here.
Rob Pulham
Western Thunderer
I forgot to add in the last post that the Couplings, vac and Westinghouse pipes are Laurie Griffin.
The kit comes with nice cast brake cylinders which have cast on mounting brackets. The odd thing is that they come with a separate domed end but you can't fit them unless you make the mounting brackets longer. I elected to file them off and replace them with brass strip. This makes them sit a bit lower and I had to put a slight bend in the brake rods to get them to pass over the cylinder.


With it being quite a long van, I added some supports for the middle of the roof from scrap etch.

The kit comes with nice cast brake cylinders which have cast on mounting brackets. The odd thing is that they come with a separate domed end but you can't fit them unless you make the mounting brackets longer. I elected to file them off and replace them with brass strip. This makes them sit a bit lower and I had to put a slight bend in the brake rods to get them to pass over the cylinder.
With it being quite a long van, I added some supports for the middle of the roof from scrap etch.
Rob Pulham
Western Thunderer
Good to hear from you Steve, I hope that you and yours are keeping well?