The Yard - A small industrial layout in 7mm

Greengiant

Western Thunderer
Ah, your post gave the impression that it was the whole operating thing that was hacking you off, not just the presence of the "brake" function, not what you intended to convey perhaps?
I was responding to SimonD and he liking the F2 braking, who in turn was reply to my post of yesterday highlighting F2 issue.
Anyway, it is all sorted now and ran fine on the layout, well almost!
There will be a further post about a problem.
Martin
 

Greengiant

Western Thunderer
The next show for The Yard, will be the Orpington Model Railway Exhibition, 5–6 April, held at Pratts Bottom Village Hall. This was the hall that featured in the Mr Bates vs The Post Office, TV dramatisation.

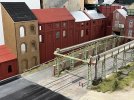
We had our usual post show debriefing meeting after the NEC show, this is when we discuss how the layout performed and any changes/improvements we would like. I had expected no changes apart from a light source at the rear of the factories that show up the lorries to the operators on the hidden part of the back road.

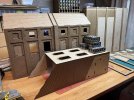
Then Ken said, at the NEC he noticed Whiteoak 'looked more industrial' than The Yard.
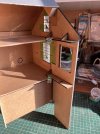
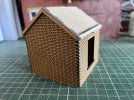
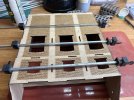
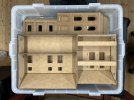
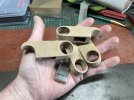
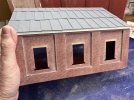
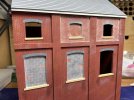
We had some buildings rescued from Theobald's Yard and mocked those up behind The Yard gantry crane to gauge the effect. It was immediately obvious this is what was needed. The photos do not really convey the difference as it does in person.

54273196198_ed07c144be_b.jpg

54273196183_6aa8e1d472_b.jpg

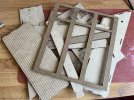
I need to mock up, draw and laser cut some suitable backdrop buildings to serve the purpose of making the layout have a greater industrial feel.

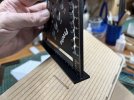
This task had taken a back seat this past few weeks. I have had eye surgery to remove cataracts and only now got to a situation I can see a computer screen properly. It was quite startling how yellow tinged my vision had become, those that have had it done will know what I mean. Something else that has taken some getting used to, is not needing glasses for normal distance vision, having worn glasses since the age of four, it still catches me out trying to take off glasses that aren't there!

Something else that surprised me, now having new lenses in my eyes, is how bright the colours are to me now. It was interesting comparing colour perception between a treated and untreated eyes of the layout.

Martin
 

Greengiant

Western Thunderer
I have finally got around to doing some rough drawings to gauge how this could work, before making up the buildings.
It is rather a large building unit at 1700mm long.
Printed onto A3 sheets and taped together, they were hung up at the rear of the layout.
It does mean we will have to alter the lighting rig and back scene uprights, but this should be fairly straightforward.

54357081155_6aa3a54721_b.jpg

54355797997_0961694bd1_b.jpg

Martin
 

Terry

Western Thunderer
Cataracts? I didn't think that you were old enough Martin. Mind you, I have been telling you for years that orange grass and purple buildings never looked quite right on your layouts!

Terry
 

Greengiant

Western Thunderer
Cataracts? I didn't think that you were old enough Martin. Mind you, I have been telling you for years that orange grass and purple buildings never looked quite right on your layouts!

Terry
I certainly am Terry. Seems to be a family trait this cataract lark. I now get what you were on about with my layout colouring.

Martin
 

Greengiant

Western Thunderer
I have done the initial rough drawing for the backdrop buildings, but also needed to draw the crane and front buildings, put them on a separate layer, so that I could switch them on and off to see how it could potentially look.

Below the buildings is a footprint drawing so I know how the wall layers will work. This is having to be made as four main units to make up the 1700mm length, even some of the units will be in two parts because of the 500mm x 300mm limit I have on my laser cutter.

Sample buildings 1742145915289.gif
To test settings before doing any major cutting, or indeed the final drawings, I drew up a small hut to check the finger corner joints and some window apertures, plus two treatments for the end and side soffit boards.

The hut having just been cut.

 1742145915298.gif
Now assembled, quite pleased with how the various elements turned out. I will tweak the window brickwork on the final factories.

 1742145915307.gif

 1742145915316.gif
Martin
 

Greengiant

Western Thunderer
I never managed to get this done in time for the Orpington exhibition, hopefully will be ready for the Hastings show next month!
Lots of laser cutting has taken place.

 1744646058801.gif

 1744646058812.gif
Followed by assembly.


 1744646058829.gif
Until I ended up with this.

 1744646058846.gif

 1744646058856.gif
Luckily it all fitted in the storage box we had to hand.

 1744646058865.gif
Martin
 

Attachments

  • 1744646058821.gif
    1744646058821.gif
    43 bytes · Views: 2

Greengiant

Western Thunderer
I have been disappointed that my ‘go to’ Halfords primer has changed and nowhere near as good as it used to be.
Some recent testing has come up with a primer sold by Toolstation, works like the old Halfords, plus an added bonus, is just over half the price of Halfords!

Primer test 1745145848051.gif

 1745145848062.gif
Martin
 

Greengiant

Western Thunderer
At some shows we have had trouble with venue lighting casting unwanted shadows on the back cloth, A workaround we started using was a black sheet that we drape over the layout for protection on two days show overnight.

Using a metal tent pole, this was clamped to the lighting support and the black sheet folded back over itself forming a top cover cutting out venue lighting. The clamp system never looked very neat. The solution was to laser cut from scrap pieces of 2mm MDF I had kept from previous projects, a multilayered device that would hold a 20mm x 10mm x 10mm rare earth magnet.

The component parts.

 1745235327864.gif
Glued up ready for the magnets to be epoxied in place.

 1745235327874.gif
In place on the lighting frame, this clamps the pole firmly. The sheet passes under the magnet, wraps round the pole and drapes over the top and back held by two further magnetic clamp units made in a similar facing.

The hole is to make it easier to pull off the frame when taking down the layout, rare earth magnets can hold really well and be hard to pull off.

I took care ensuring the magnet poles of each unit all faced the same way, so that all the clamps fit together neatly for storage.


 1745235327884.gif
Martin
 

Greengiant

Western Thunderer
Roofing going on, here using Slater's corrugated sheets, I had just enough in stock.

 1746543079676.gif
This has been a rather useful purchase, very handy having the lip, it helps with positive positioning for alignment checking. The lasered lines came in handy.

 1746543079685.gif
Roof completed, I lowered a sheet to break up the uniformity.

 1746543079693.gif
Scribing and texturing black Plasticard for roof tiles. I like to use black instead of white, if I miss a bit when painting, it hardly shows up in black. The downside, pencil marks do not show well, I mainly use a scalpel tip to make measurement marks.


 1746543079702.gif
The tiles are cut into strips, taped in position, then Deluxe materials SuperPhatic is wicked in where the Plasticard touches MDF. Where the tiles overlap, I use MEK wicked in. I don't use superglue due to time constraints of positioning before it goes off.

 1746543079711.gif
Initial coat of red primer being applied, a building at a time.


 1746543079725.gif
Martin
 

Greengiant

Western Thunderer
For the next two tiled roofs I used a sub sheet of Plasticard, that way I could use MEK for all the sticking and get it done quicker.

 1746713920542.gif
For the longest roof I did not fancy doing more tiling, so went for a zinc sheet type effect. So much quicker than tiling, plus it breaks up the uniformity of the buildings.

 1746713920551.gif
Applying the first coat of paint on the brickwork features. I like these paint brushes with fatter handles, my fingers don't cramp with these ones and you get finer twisting control.

 1746713920560.gif
Getting there now with the detail painting and mottling of the brickwork.

 1746713920570.gif
Certainly getting a more larger industrial look to the layout.

 1746713920578.gif
It is surprising how much bigger the layout looks, despite a comparatively small area increase.

 1746713920588.gif
Time has come to do the mortar lines and tone the bricks down, this is when it all starts to come together and blend in with the layout.

 1746713920598.gif
For mortar I use Polyfilla, coloured with acrylic, spread on and wipe off. Let it dry and buff off to taste. This process is more about what is removed than applied. Milk bottle tops make handy mixing pallets, only a small amount at a time, otherwise it goes off before you can use it.

 1746713920607.gif
After initial buffing and before any weathering.
 1746713920617.gif
Making a start on the recessed panels of a larger factory.

 1746713920626.gif
Martin
 

Phil O

Western Thunderer
Hi Martin,

How do you buff the brickwork after you have added the mortar, I always seem to end up with a big splodge of mortar everywhere. Thanks.
 

PhilH

Western Thunderer
Hi Martin,

How do you buff the brickwork after you have added the mortar, I always seem to end up with a big splodge of mortar everywhere. Thanks.

Use a very lightly dampened cloth, I usually just press it on my tongue. You'll always leave traces of mortar on the surface of the bricks but if you repeat it a few times they will get less and less. Biggest problem is internal corners and I use lightly dampened cotton buds. If you squeeze the end of the cotton bud with pliers it helps to get them more in the the corners.
I use polyfilla mixed with black poster paint for the mortar and it gives a grey finish when dry.
 
Last edited:
Top