1/32 Launceston Road

Simon

Flying Squad
Embryo G1 Garden line

iploffy said:
love the layout mate are you enjoying the trowel trade fun aint it just one thing arn't the roads of the passing loop a bit close together could you provide a picture abit closer please

Ian

Hi Ian

Thanks very much for picking up on that, the second track isn't fixed yet and I am not happy with how it looks either.

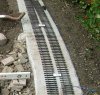
Here is a closer view of how mine is at the moment:

[attachment=1:2x4n7au7]Six foot.jpg[/attachment:2x4n7au7]

And here is a shot of Don Froud's line which looks right to me (in more ways than just the track spacing):

[attachment=0:2x4n7au7]Froudspace.jpg[/attachment:2x4n7au7]

My spacers (white Plastikard in picture) are 60mm wide, which gives a scale outer edge of rail to outer edge of rail distance of six feet and 4 inches or thereabouts. Presumably "the six foot" as it is called is/was somewhat bigger?

Any suggestions or guidance on this point will be very welcome, I know I am being a model railway numptie in looking for a "theoretical answer" when my eye tells me something just isn't right, but there must be numbers that were worked to. I have looked through all my books and the Interwotsit and can't find them.

Re bricks and trowels, absolutely - happy as a pig in sh*t. One of my favourite tools is my gauging trowel, a good quality one that seemed expensive when I bought it 15 years ago but which has helped lay countless floors, mixed bucketloads of muck and is perfect for flopping out the mix before slapping another brick down :D
 

Attachments

  • Six foot.jpg
    Six foot.jpg
    333.1 KB · Views: 91
  • Froudspace.jpg
    Froudspace.jpg
    372.9 KB · Views: 92
  • Six foot.jpg
    Six foot.jpg
    333.1 KB · Views: 91
  • Froudspace.jpg
    Froudspace.jpg
    372.9 KB · Views: 90

iploffy

OC Blue Brigade
Embryo G1 Garden line

I think the 6 foot is a saying as I don't think there are any hard and fast rules it's about clearance tomorrow morning I will take some pictures of the spacings at Oxley Depot both in the sidings and on the main lines and you can judge for yourself.

Personally I would allow more room between the tracks as if the line you are modelling is ex GW there is a fair bet it was built to a wider gauge than L1 as the cylinders on GW loco's I think where wider as the loading gauge was more generous.

Just a few thoughts tell me to shut up

Ian
 

Phill Dyson

Western Thunderer
Embryo G1 Garden line

iploffy said:
I think the 6 foot is a saying as I don't think there are any hard and fast rules it's about clearance tomorrow morning I will take some pictures of the spacings at Oxley Depot both in the sidings and on the main lines and you can judge for yourself.

Personally I would allow more room between the tracks as if the line you are modelling is ex GW there is a fair bet it was built to a wider gauge than L1 as the cylinders on GW loco's I think where wider as the loading gauge was more generous.


Ian


I agree with Ian, if it looks right it is right ;)

[attachment=0:2lvktcry]Monday%20Morn%2021%207%2008%20001RMW.jpg[/attachment:2lvktcry]

Phill :thumbs:
 

Attachments

  • Monday%20Morn%2021%207%2008%20001RMW.jpg
    Monday%20Morn%2021%207%2008%20001RMW.jpg
    183.7 KB · Views: 75
  • Monday%20Morn%2021%207%2008%20001RMW.jpg
    Monday%20Morn%2021%207%2008%20001RMW.jpg
    183.7 KB · Views: 75

28ten

Guv'nor
Embryo G1 Garden line

Isnt there something about it in the Great Western Way? and if its ex GWR It would have been broad gauge originally in that part of the world
 

Neil

Western Thunderer
Embryo G1 Garden line

I wonder if we're so used to seeing the model six foot set by proprietary track systems in the smaller gauges that our judgement of what's right is more influenced by this than by what the real railway does. In Iain Rice's Building Finescale Track there's a cross section diagram of ballasting the GN main line where the six foot is dimensioned as six feet exactly (top of page 12), it looks like a genuine railway drawing than a Rice interpretation.
 

Phill Dyson

Western Thunderer
Embryo G1 Garden line

28ten said:
Isnt there something about it in the Great Western Way? and if its ex GWR It would have been broad gauge originally in that part of the world
Isn't Simon's on the 'Withered Arm' ?
 

Simon

Flying Squad
Embryo G1 Garden line

Just back from nailing two tedious jobs, boys busy in garden videoing destruction of lego droid armies with toy crossbow :lol: and a cup of tea on the go :) so thought I'd check out my favourite corner of cyberspace.

Thanks very much for the input and yes please Ian, photos would be much appreciated.

I guess the line is supposed to be withered arm rather than GW, but on the other hand it is also vaguely S&D inspired and that was built to broad gauge originally, (as was the line from Exeter to Barnstaple I think) so I could base the look of the line on that premise.

I have also pondered Neil's point, and it is this which makes me curious to know some actual figures from the real thing, but even bearing this in mind my current setting still looks decidedly narrow to my eyes.

As for Phill's photograph, that sure looks right :drool: , words fail me except to say that ballast trains and BR brake vans suddenly seem more attractive than they did.

Ah well, perhaps its time to make another cup of tea and check out the book collection again :lol:
 

Scale7JB

Western Thunderer
Embryo G1 Garden line

So far as I know... Could be wrong...

The 6 foot was indeed 6 foot, and in sidings and passing loops it was 10ft between rails..

JB.
 

iploffy

OC Blue Brigade
Embryo G1 Garden line

The BR rule book appendix states track designations are as follows 4ft-6ft-4ft on double lines 4ft-6ft-4ft-10ft-4ft-6ft-4ft on 4 lines or more. The 10ft denoting the gap between independant running lines

Please note it does not say 4ft 8 1/2 inches-6ft 4ft 8 1/2 inches so the actual measurements are not used and the 10ft is the name given to the space between 2 sets of running lines. In sidings the running rails are set closer (in most cases) together so as to fit more roads in .

below are some blurred but readable shots from Oxley taken at 5 in the morning and you will see that there are no 2 spaces in bettween the rails the same similar but not the same i will try too get more shots.

Ian
 

Attachments

  • S8300500.JPG
    S8300500.JPG
    150.9 KB · Views: 262
  • S8300499.JPG
    S8300499.JPG
    142.7 KB · Views: 262
  • S8300496.JPG
    S8300496.JPG
    417.7 KB · Views: 244
  • S8300500.JPG
    S8300500.JPG
    150.9 KB · Views: 261
  • S8300499.JPG
    S8300499.JPG
    142.7 KB · Views: 261
  • S8300496.JPG
    S8300496.JPG
    417.7 KB · Views: 243

Simon

Flying Squad
Embryo G1 Garden line

iploffy said:
The BR rule book appendix states track designations are as follows 4ft-6ft-4ft on double lines 4ft-6ft-4ft-10ft-4ft-6ft-4ft on 4 lines or more. The 10ft denoting the gap between independant running lines

Please note it does not say 4ft 8 1/2 inches-6ft 4ft 8 1/2 inches so the actual measurements are not used and the 10ft is the name given to the space between 2 sets of running lines. In sidings the running rails are set closer (in most cases) together so as to fit more roads in .

below are some blurred but readable shots from Oxley taken at 5 in the morning and you will see that there are no 2 spaces in bettween the rails the same similar but not the same i will try too get more shots.

Ian

Thank you very much for those Ian, nice atmospheric shots and great to see that there is still a box there. Running lines do appear closer than one would think.....

Jury's still out on my track spacing, I think Neil's point that I/we get so used to seeing OO with its "wider six foot" is still influencing my judgement, more browsing and thinking required. I am also going to make up a second "inner" length of track to get a better feel for what the current spacing would look like.

In the meantime Dave the welder has very sensibly disappeared and I am working through a list of other non railway jobs. I also need to deploy the remaining chequer plate bricks on the ground and start laying the paving slabs around the base of the retaining wall, this would give me the additional benefits of mostly losing the ugly mess in the middle of the garden and clearing the way for the next section of digging and retaining wall construction.

Oh, and yesterday the boys and I located a skip with bricks in it, only half a mile from home and they look to be of the "un-rendered with difficult to remove stuff" variety :thumbs: :lol:

Simon
 

Simon

Flying Squad
Embryo G1 Garden line

I managed to track down my friend Dave and his welder and today we set about converting more garden to railway line :shock:

First off was a cunning trapezoid to be attached to the end of the existing concrete base, the "angles" will lead to the yard and main line respectively and I used Pythagoras to set them out. Here Dave is welding in steel rod to make the structure rigid and to give something for the concrete to lock aound when it is cast into the frame. It is being done over the recently laid chequer block bricks and paving slabs, more work required on these.

[attachment=3:3nxtb1lv]Weld1.jpg[/attachment:3nxtb1lv]

Here it is being fixed into position, it is welded to steel angles hammered into the ground at each corner in addition to the netspike that was sticking out of the existing concrete base. Tess looks on, she was very good natured about the whole thing and didn't chase the cats all day :lol:

[attachment=2:3nxtb1lv]Weld2.jpg[/attachment:3nxtb1lv]

The next section was trickier, being the curved section of the "branch" (continuous run) that runs from the edge of the first frame, now secured in place, right up to the bridge over the stream, about sixteen feet long. We first of all positioned the inner steel strip, followed by the outer strip, and after much scratching of heads and deploying of spirit levels, welding to upright angle knocked into the ground at the "stream end". Dave is here welding the outer strip to the upright angle. Spot the out of scale scenic heron :shock:

[attachment=1:3nxtb1lv]Weld3.jpg[/attachment:3nxtb1lv]

This is the view looking "down the track" towards the bridge site, Dave was welding a piece of strip across the ends of the two strips at this point. We ran out of time shortly afterwards although a few more steel centre rods were added before we knocked off. We have arranged to continue work on Thursday week after we get back from our holiday.

[attachment=0:3nxtb1lv]Weld4.jpg[/attachment:3nxtb1lv]

It was quite hard to get the level on the last piece right and I am a bit suspicious that is dropping towards its outer end, I may need to find a more sophisticated method of taking levels before we go much further.

Apart from that I am really pleased with today's work and think that the trackwork is going to look really good running around the new curve. It is wide because it will carry both the goods loop, with a head shunt running pretty much up to the bridge abutment and the station platform at its inner end. I reckon the platform length will be about five coaches long.

I'm not sure quite how I will treat the ground in and around the bases, one things for sure though cutting the grass is never going to be as simple as it used to be :scratch:
 

Attachments

  • Weld4.jpg
    Weld4.jpg
    340.8 KB · Views: 172
  • Weld3.jpg
    Weld3.jpg
    307.6 KB · Views: 170
  • Weld2.jpg
    Weld2.jpg
    287.7 KB · Views: 170
  • Weld1.jpg
    Weld1.jpg
    317.7 KB · Views: 172
  • Weld4.jpg
    Weld4.jpg
    340.8 KB · Views: 171
  • Weld3.jpg
    Weld3.jpg
    307.6 KB · Views: 172
  • Weld2.jpg
    Weld2.jpg
    287.7 KB · Views: 170
  • Weld1.jpg
    Weld1.jpg
    317.7 KB · Views: 172

Jordan

Mid-Western Thunderer
Embryo G1 Garden line

Major Engineering!!! I hope your dog didn't get the Flash ("Arc Eye"), though.... :shock: :? :scratch: ;)
 

Phill Dyson

Western Thunderer
Embryo G1 Garden line

Simon said:
I'm not sure quite how I will treat the ground in and around the bases, one things for sure though cutting the grass is never going to be as simple as it used to be :scratch:
:scratch: If this section is to be raised above ground I would go for 'Baggensens Gold'..............Keep up the good work :thumbs:

Phill :wave:
 

Simon

Flying Squad
Embryo G1 Garden line

I returned home from holiday with a pretty good haul of "mind your own business" courtesy of the very overgrown end of the garden of the house we rented ;)

[attachment=1:371dxop2]myob1.jpg[/attachment:371dxop2]

In the meantime there had been a lot of the wet stuff in Bath and the original patch of the same plant from a tiny piece given by a friend in Bath is now looking good, the edge of the lintels will be nicely masked in due course.

[attachment=0:371dxop2]myob2.jpg[/attachment:371dxop2]

Thanks for the comments Phill, I think your suggestion will be just the job to eventually "lose" the steelwork.

I'm now looking forward to the return of Dave the welder on Thursday, and in the meantime have picked up Simon Dunkley's fantastic 1/32 5 plank at Railwells today for running tests on Wenbridge Junction :)

I think there might be a BR freight running up the line sometime this week :D
 

Attachments

  • myob2.jpg
    myob2.jpg
    329.7 KB · Views: 109
  • myob1.jpg
    myob1.jpg
    296.9 KB · Views: 108
  • myob2.jpg
    myob2.jpg
    329.7 KB · Views: 108
  • myob1.jpg
    myob1.jpg
    296.9 KB · Views: 109

lancer1027

Western Thunderer
Embryo G1 Garden line

Hi Simon, hope you had a good holiday :thumbs: . The mindyourown business is certainly doing the trick. It's really taking shape :bowdown: Keep those pics coming.

Rob :wave:
 

Simon

Flying Squad
Embryo G1 Garden line

Bit of playing and lots of digging this morning.

First off is farmer Divot trying out his new fangled Fergie below the railway line :lol:

[attachment=2:1v24fdsy]Fergie.jpg[/attachment:1v24fdsy]

Simon Dunkley's rather splendid scratch built BR 5 plank out on the line.

[attachment=1:1v24fdsy]Dunklewag.jpg[/attachment:1v24fdsy]

And the result of a lot of digging, weeding and de-stoning, in readiness for continuing the retaining wall that defines the edge of Wenbridge Junction's yard. Tomorrow will hopefully see some more welding, the large curved section put in 2 weeks ago needs a lot of stiffening in addition to several additional vertical supports before it is ready for concreting.

[attachment=0:1v24fdsy]Dugout.jpg[/attachment:1v24fdsy]

The lengths of Peco track laid across the steel framing pretty much show the position and layout of the tracks at the junction/yard entrance.

Still tons of work to do, in a fairly literal sense :cry:
 

Attachments

  • Dugout.jpg
    Dugout.jpg
    418 KB · Views: 73
  • Dunklewag.jpg
    Dunklewag.jpg
    255.5 KB · Views: 71
  • Fergie.jpg
    Fergie.jpg
    351.5 KB · Views: 71
  • Dugout.jpg
    Dugout.jpg
    418 KB · Views: 72
  • Dunklewag.jpg
    Dunklewag.jpg
    255.5 KB · Views: 71
  • Fergie.jpg
    Fergie.jpg
    351.5 KB · Views: 71

Simon

Flying Squad
Embryo G1 Garden line

More trackbed progress yesterday. After various failed attempts we gave up trying to pre bend the steel strip and instead welded on the end pieces and formed the curve by g clamping to the upright angles and a piece of strip connecting back to the previous base. The second strip was then welded in place whilst holding the curve with more g clamps and temporary uprights driven into the ground, the whole being internally braced with netspike steel rod welded in the triangular fashion shown.

[attachment=1:7c0tnrwh]Pathside1.jpg[/attachment:7c0tnrwh]

Here is a shot of the completed job, the steel strip across the stream will probably form the bridge deck, with strip girders welded on either side via cross bearing strips below the "deck" which will allow a drainage gap along each side. Needless to say, this is only possible because of Dave's patience with my crazy ideas and well honed welding skills, usually used in the cause of banger racing :shock: The whole construction is now very satisfyingly rigid.

[attachment=0:7c0tnrwh]Pathside2.jpg[/attachment:7c0tnrwh]

Next job on this section is to make some "droppers" to hang down off the internal bracing to carry the wiring below the "baseboard", I intend to drill down through the concrete for each pair of track feeds, thus keeping the wiring hidden. I will then wedge temporary boards under the frame, with gaps/holes for the "droppers" before pouring and floating up the concrete track base in sections.

One moot point at the moment is whether I ought to paint the steel before casting in the concrete, on the one hand there is bound to be movement between the steel sides and the concrete base, allowing the possibility of rust etc, on the other hand I can't see there being much of a gap and I will probably add SBR to the mix to make it flexible anyway. Current thinking is to paint the outsides and uprights and perhaps everything around the stream where the whole assembly is likely to be buried by mud and rock.

Oh for the days of Sundeala and 2X1 :lol:
 

Attachments

  • Pathside1.jpg
    Pathside1.jpg
    372.9 KB · Views: 108
  • Pathside2.jpg
    Pathside2.jpg
    373.7 KB · Views: 107
  • Pathside1.jpg
    Pathside1.jpg
    372.9 KB · Views: 105
  • Pathside2.jpg
    Pathside2.jpg
    373.7 KB · Views: 105

Neil

Western Thunderer
Embryo G1 Garden line

I'm intrigued by the choice of such an unusual baseboard construction, which if I understand correctly is to be a steel supported concrete slab not unlike a motorway bridge. Would it not be easier to carry the more aesthetically pleasing solid embankment further round the garden, are theere planning restrictions that I'm not aware of? Also kudos to Dave the welder, craftsman bent over yet not a hint of bum cleavage, pure class.
 

Captain Kernow

Western Thunderer
Embryo G1 Garden line

Simon said:
Oh for the days of Sundeala and 2X1 :lol:
Well, you know you want to..... :p :p :p

Neil said:
Also kudos to Dave the welder, craftsman bent over yet not a hint of bum cleavage, pure class.
I reckon it was posed..... :laugh:

The whole thing is pure class, in fact, it's going to be terribly exciting when the Golden Spike is driven in to the final track panel.... :D
 
Top