You are using an out of date browser. It may not display this or other websites correctly.
You should upgrade or use an alternative browser.
You should upgrade or use an alternative browser.

simond
Western Thunderer

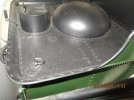
this photo from the Kitten Engineering site shows the detail that unfortunately the GWR Modelling doesn’t. But of course, it’s a case of modelling a model, with the risk of perpetuating a mistake.
Simon T’s note confirms what I had surmised, and my investigation of the F7 site had revealed, that the dome has a rivetted rim. And in answer to Simon’s other point, yes, the flange provided is a bit thick 0.48mm scales at just less than 7/8”.
thanks also to Phil, Kev & David. It’s quite obvious that I didn’t anneal the sheet to any significant extent. I probably should have been braver. Being smart after the event, it would have been very easy to put the etch on a bit of brass, scribe round it and create the opportunity to make a duplicate if I’d bu66ered it up.
So, I have some choices. It obviously should have rivets around the dome, and maybe around the filler too.
I can use the kit etch as is, though I think we all know that’s not happening.
I can add a ring of rivets around the said etch, two possible approaches, set up the GW rivetter and X-Y the rivets, or set up a guide and use the edge of the etch, and the previous rivet as the guide to place each rivet.
I could, but I’m not going to, create a new etch with the rivets etched in, or holes on the reverse to guide them being pressed.
I can also draw it up in CAD and 3D print a dome with a rivetted flange, which would be easy to draw, how well such a thin flange (say 0.2917 mm - scale half inch) would print is a question.
Or draw it in CAD, print & stick paper to a bit of thinner brass and rivet & then cut out.
Meanwhile, I‘ve been doing the steps.

Fresh out of the ultrasonic. I see one of the straps has pinged off. Will fix that tomorrow.
S
Last edited:
simond
Western Thunderer
A little more progress…

the 3DP parts are just placeholders, they’re not as good as I would like, the dome was a particular shame, it’s got a very evident fault to the rear but is lovely for 7/8 of the circumference
the springs and axleboxes printed beautifully, but just don’t fit (and neither did the WM ones) but that’s already fixed in the CAD.
I’ve fitted buffer stocks and lamp irons, and the handrails, we’re nearly there. The brake & scoop handles and water taps need fitting, I’ll do another print run tomorrow, all being well, the parts will all be useable.
atb
Simon
the 3DP parts are just placeholders, they’re not as good as I would like, the dome was a particular shame, it’s got a very evident fault to the rear but is lovely for 7/8 of the circumference
the springs and axleboxes printed beautifully, but just don’t fit (and neither did the WM ones)
but that’s already fixed in the CAD. I’ve fitted buffer stocks and lamp irons, and the handrails, we’re nearly there. The brake & scoop handles and water taps need fitting, I’ll do another print run tomorrow, all being well, the parts will all be useable.
atb
Simon
simond
Western Thunderer
Axle boxes and springs look ok, and now fit, the gap between the hanging bar and the frames is tight on the WM springs and so I made the printed ones a wee bit thinner. I’ll measure the real thing next time I’m in Didcot.

OMG! I’ve shown the underside and lots of stray solder)")
(You can also see the bit of waste etch used as a stiffener on the rear steps - I bent one and thought “mmm, need to fix that right now”)
My efforts to print domes have not been successful, but to my surprise, I was able to print a riveted flange less than 0.5mm thick
It’s a bit difficult to see the rivets but they are there!

I can pop the supplied WM dome in the lathe and it’ll clean up fine. The lid of the filler is slightly damaged, I might have another go at printing one.

I need to solder up the fingers before fitting these bits. I have toolboxes, the supplied WM vents are fine, but I’m missing the lyre for the fire irons, a water gauge and the scoop & brake handles. Don’t think I’ve used them elsewhere, so I think they might have been missed from the kit, but I bought it about 10 years ago - I will just make them.
Final bits are the vac tank and scoop

Vac tank is snug…

Right, finish descaling coffee machine and do the last of the soldering!
OMG! I’ve shown the underside and lots of stray solder
(You can also see the bit of waste etch used as a stiffener on the rear steps - I bent one and thought “mmm, need to fix that right now”)
My efforts to print domes have not been successful, but to my surprise, I was able to print a riveted flange less than 0.5mm thick
It’s a bit difficult to see the rivets but they are there!
I can pop the supplied WM dome in the lathe and it’ll clean up fine. The lid of the filler is slightly damaged, I might have another go at printing one.
I need to solder up the fingers before fitting these bits. I have toolboxes, the supplied WM vents are fine, but I’m missing the lyre for the fire irons, a water gauge and the scoop & brake handles. Don’t think I’ve used them elsewhere, so I think they might have been missed from the kit, but I bought it about 10 years ago - I will just make them.
Final bits are the vac tank and scoop
Vac tank is snug…
Right, finish descaling coffee machine and do the last of the soldering!
RichardG
Western Thunderer
Right, finish descaling coffee machine and do the last of the soldering!
Based on what I am learning about AI, you put the descaler into the coffee machine and then soak the model in the solution?
simond
Western Thunderer

I used Lawson 3mm leaded solder wire. I’ll look up the melting point, but it’s quite high, I run my Ersa at 400C and the solder melts but goes very pasty as soon as it hits the cold brass.
Anyway, should be fine to clean up.
From Lawton website
Type of Alloy
Alloy No. 136
Alloy Designation Pb74Sn25Sb1
Melting Temperature 185 - 263oC
Packing
Format: solid solder wire. Compliant to the European and international standard: EN-ISO 9453: 2014.
Diameters: 0,35mm to 6mm. Delivered in reels of 500gr
Composition
25% Tin 74% Lead 1% Antimony
I’m surprised to see the MP is around 200C
simond
Western Thunderer
Actually, I put the used descaler in the kettle…Based on what I am learning about AI, you put the descaler into the coffee machine and then soak the model in the solution?
But I’m sure that it would clean up the model!
Ian@StEnochs
Western Thunderer
The pastiness helps bridge the gap but you will find that a waft with a flame will smooth up the surface if your iron doesn’t put out enough heat. I have an old Solon 175 watt with a copper bit, cone shaped, which does a lovely job on the inside surface which is difficult to smooth.

")
Nice workmanship on your model, I don't know how far you want to go on detail with it, But either side of the tender dome are 2 holes, these were tubes that went from top to bottom, they let excess water run off the tender top and also were a support for the water pressures that were on the tender top when picking up water, i have a good drawing showing this in my garage, ill dig it out over the next day or so and show you.
simond
Western Thunderer
Nice workmanship on your model, I don't know how far you want to go on detail with it, But either side of the tender dome are 2 holes, these were tubes that went from top to bottom, they let excess water run off the tender top and also were a support for the water pressures that were on the tender top when picking up water, i have a good drawing showing this in my garage, ill dig it out over the next day or so and show you.
thanks for the kind comment!
I have two more of these to build in the stash, so a good drawing would be an absolute boon. I would be delighted. Thank you very much!
Cheers
Simon
Dog Star
Western Thunderer
And the lifting rings...two on the sides of the coal space and two in the rear corners of the top of the water tank. Mind you, Sn seemed to remove the coal space rings after fitting the tank to the frames / add those rings when the tender enters the works for repair.
simond
Western Thunderer
Jobs that I quite enjoyed

Slightly fiddly turning job, there was no brake standard in my kit, so I made one. I have cross drilled the top for the spindles and will make the handles when I put the milling machine away
Jobs I never want to do ever ever again

Cruel enlargement
I didn’t have any milled brass T, so I made myself about an inch and a half. I can’t get at the big mill because there is a motorbike and a 3.5” gauge loco in the way and it’s raining so I don’t want to start shifting bikes and so I did it on the Proxxon. I was in two minds whether to wait to see Barry at Kempton or buy enough to make mail order viable but in the end I thought “how hard can it be?”
I only need it to make the lifting ring straps.
It wasn’t hard but it wasn’t fun either. I ended up wearing ear defenders
Slightly fiddly turning job, there was no brake standard in my kit, so I made one. I have cross drilled the top for the spindles and will make the handles when I put the milling machine away
Jobs I never want to do ever ever again
Cruel enlargement
I didn’t have any milled brass T, so I made myself about an inch and a half. I can’t get at the big mill because there is a motorbike and a 3.5” gauge loco in the way and it’s raining so I don’t want to start shifting bikes and so I did it on the Proxxon. I was in two minds whether to wait to see Barry at Kempton or buy enough to make mail order viable but in the end I thought “how hard can it be?”
I only need it to make the lifting ring straps.
It wasn’t hard but it wasn’t fun either. I ended up wearing ear defenders
lankytank
Western Thunderer
I was in two minds whether to wait to see Barry at Kempton or buy enough to make mail order viable but in the end I thought “how hard can it be?”
Simon, an email is all it takes..... just to ask the question 'Have you got a bit of.....?'
You never know what's in the 'bits box' (come to think of it, neither do I) - along life's travails, profiles get bent or mullered, so if they can't be sold as full lengths they go in my 'that'll come in handy, one day, stash'. Can save a lot of pain & 'ear ache', always provided you're prepared to wait for Postman Pat......
Any road, I'll see you at Kettering then....???
Last edited:
Debs.
Western Thunderer
 I didn't avert my eyes sufficiently quickly, and caught sight of your naked and obviously dangling, undercarriage!
simond
Western Thunderer
Hi Barry,Simon, an email is all it takes..... just to ask the question 'Have you got a bit of.....?'
You never know what's in the 'bits box' (come to think of it, neither do I) - along life's travails, profiles get bent or mullered, so if they can't be sold as full lengths they go in my 'that'll come in handy, on day, stash'. Can save a lot of pain & 'ear ache', always provided you're prepared to wait for Postman Pat......
Any road, I'll see you at Kettering then....???
thanks, that’s kind. yes, Kettering is on the agenda, all being well. See you there and replenish supplies. Whilst looking for the T, I found some 1mm equal angle, I’m blowed if I can remember what I bought that for…
Any a somewhat fiddly job, but they’re now soldered on. I think the soldering is pretty much done and it’s had a final half hour in the ultrasonic
the araldite beckons…
simond
Western Thunderer
Madam, I can only apologise…
simond
Western Thunderer
Moving swiftly on…

A couple of minor bits to finish off - the buffer stocks needed shortening where they fit through the buffer beam, that was easy, a saw and file sorted it out, but the stems of the buffers themselves are now 2mm too long, and they are 2mm diameter, but threaded 10BA, so I have to turn them down to 1.6. I shall make a split collet to hold them, but I need an inch of 8mm brass to make it from. I’ll have a look in the scrap bin tomorrow.

Coupling is ready to fit.
Water gauge, two water taps, brake and scoop handles still to do.
Needs a drag link, but I’ll do that when I’ve built the loco!
I think that’s about it. Or it will be when I straighten that bloody lamp iron…
A couple of minor bits to finish off - the buffer stocks needed shortening where they fit through the buffer beam, that was easy, a saw and file sorted it out, but the stems of the buffers themselves are now 2mm too long, and they are 2mm diameter, but threaded 10BA, so I have to turn them down to 1.6. I shall make a split collet to hold them, but I need an inch of 8mm brass to make it from. I’ll have a look in the scrap bin tomorrow.
Coupling is ready to fit.
Water gauge, two water taps, brake and scoop handles still to do.
Needs a drag link, but I’ll do that when I’ve built the loco!
I think that’s about it. Or it will be when I straighten that bloody lamp iron…