SimonD’s workbench

Final assy riding van & packing van
  • simond

    Western Thunderer
    Firstly, thanks to Adrian for the transfers, arrived yesterday, they’ll get used over the weekend, much appreciated.

    the issue with the fixing screws is resolved, along with the vac & steam bags, by making a couple of bolt-on carriers, the offset 10BA fixings will secure these carriers to the body and the chassis is trapped between the two. I didn’t bother with an extra thickness of brass, I’ll just have to go gently...

    image.jpg

    And I can paint them before installation, which I prefer.

    need to make a set for the other van now.

    more soon
    Simon
     
    Dapol 58xx
  • simond

    Western Thunderer
    I purchased a Dapol 58xx to use as a test bed for a Deltang r/c which I have also ordered. There’s a snag, I intended to use a 3s (11V approx) battery but there are no 13v receivers available, so it’ll have to wait. I could change the motor, but I’m reluctant to do so.

    I stripped it to have a look, having given it a brief run on Porth Dinllaen. It seems to suffer dreadfully from wheelslip going chimney first, though it reverses with rather more confidence.

    The front axle is rigidly supported, the centre axle is lightly sprung and the rear axle is somewhat wobbly, presumably rocking equalisation, with some limited sideplay. This, of course, wastes adhesive weight on a non-powered axle, which explains the wheelslip.

    The mouldings are crisp, lots of nice little details, it was supplied with 1934 shirtbutton, and a smokebox number plate, neither of which suit me, so the first was polished off with some IPA, and the latter with a scalpel. I’ll put some Great - gap - Western on later tonight, and add a crew. It also has a whistle shield which was a later addition, this looks like a more challenging fix, which may require new whistles fitting. I don’t have any, so will make or obtain before commencing that particular surgery.

    It dismantles easily, two screws under each tank, two under the bunker and two in the smokebox. Don’t forget to take out the slide-in PCB for the decoder. That seems to be a neat approach, commendable IMO. Conversely, two screws were missing from the front axle retainer. They’re 10BA, bizarrely. I suppose they could be very loosely tapped M1.5...

    The cab roof is magnetically attached, again, neat. I keep saying I’m going to do that on my home-built models, I must buy some magnets.

    Electrically, it’s a little curious. There’s a firebox flicker device, two leds, yellow & red. You’ll like it, or not. Can turn off if you fit DCC, or open up, and unplug it if not. The left pickups are red wires, why? Pick-up on all wheels, which is good, but it would surely benefit from KA if DCC, but that might require a bit of fiddly installation given the pull-out decoder PCB, which is ready for a 21-pin decoder to be installed. There is a number of electrical components on this PCB, most of which are not readily identifiable. At least one is a mosfet, and another has 8 legs, but isn’t a spider. If the r/c works it’ll be put in the box, if not, a decoder & speaker will be fitted.

    There’s nothing not to like, apart from the poor haulage. It cost £196 including postage, which was considerably less than the Springside kit I built some 20 years back. I think you’d have to really want to build a kit to not purchase some of the modern RTR. Don’t worry, I’ve got lots to build!

    image.jpg

    Atb
    Simon
     
    Jobs that need doing...
  • simond

    Western Thunderer
    Job#1. The louvres on the loco shed need doing. I been putting it off because early attempts were unsatisfactory, and thought that I might try etching, but MissD suggested a couple of approaches, and I had another go with the laser.

    three experiments later, I think we have something that will do.

    image.jpg

    Fiddly business!

    image.jpg

    but I think it looks quite good.

    image.jpg

    not convinced about the glazing.
     
    Arduinos and CAN
  • simond

    Western Thunderer
    Arduinos. And CAN.

    when I built PD loco, I had in mind the intent to incorporate it into a larger layout at some indeterminate point in the future, when we get our extension built, so the control panel is on the end of a wander lead. I wanted to include points, turntable and lighting control, along with a socket for the Lenz x-bus, and I also wanted to use a standard 25-way d-plug cable, as nobody wants to make up leads, and they can get damaged with use, so easy replacement is also desirable.

    There aren’t enough wires in a 25-way cable! I was advised that using I2C comms between Arduinos was likely to lead to problems, but it worked when I first installed it, and it still works now, but not reliably, and that’s a PITA, so over the last few weeks, I started to rebuild things, to use CAN comms. The MCP2515 modules are cheap and after a few issues, I have them communicating happily, so now I’m reprogramming.

    Inevitably, the Arduino pins that are required to communicate with the CAN modules were already used, so that required some rewiring too. This would not have been the case had I started with CAN of course.

    The control box is functional, though not pretty, it’ll be much improved by a laminate front panel with trackplan, and a more attractive set of buttons for the turntable. The other switches are lights and program track.image.jpgimage.jpg

    the red button is a reset for the Arduino mega within, the red & black 4mm sockets are track DCC to facilitate use of the test track & rolling road, and the DIN socket allows a Lenz/Roco controller to plug in. The knob is the brightness control for the layout lighting, of which there are 5 channels. The orange and white wires are the temporary CAN connection.

    image.jpg

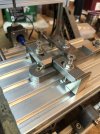
    This is a typical slave - the CAN interface is the nearer board, and it’s connected to the Arduino Nano which will eventually be reconnected to the turntable stepper motor. Similar arrangements are connected to the points controller and lighting dimmers.

    the CAN interfaces were about 3 quid each, the Arduinos similar money, so it’s within the bounds of realistic money to put a CAN interface and an Arduino pretty much anywhere on a layout (eg in a building, just to have individual lighting control, though you could program a few other features/gimmicks/whatever as well)

    it’s all spread across the bench, a table and my workbench chair at the moment, but a good push this evening will sort out the controller programming, hopefully before Hislop & Merton enjoy the weeks’ events.

    The lighting slave controller is done and works. It also operates a relay which connects the front siding to the programming outputs of the DCC but which is interlocked with the crossover, hopefully this will continue to prevent me reprogramming my entire loco fleet to the same address…. I can install that over the weekend and hopefully get the layout lighting connected & working nicely.

    The points slave controller has been built on a piggy-back board, so, if I’ve got it right (fingers firmly crossed) I can unplug the Nano that is on the points control board, and simply plug the piggy-back board in. I hope.

    image.jpg
    points piggyback board lower left. The white panel carries the lighting PWM outputs and the programming track relays.

    image.jpg

    This is where it has to go. The Arduino Nano on the left is the turntable controller, that on the right is the points controller, the ICs are NOT gates to provide the reversing polarity for the Tortoises, the LEDs to the right are green/red and change colour to indicate what the tortoise should have done. Was quite pleased with that, it all works rather well.

    The turntable board will require a little reallocation of pins to accommodate the CAN interface. That or another piggy-back might be easier. Might get that done over the weekend.


    More soon
    Simon
     
    Decorating - and baseboards out from the corner
  • simond

    Western Thunderer
    Not so much “what’s on my workbench?” As “what’s not….?”

    a decorating project has required the removal of PD Loco from its normal place at one end of the lounge, and with it, just about everything else.

    image.jpg

    the chaos does give a couple of opportunities; With the backscene removed, I can access the rear of the coal stage, so the missing scenery can be attacked. More later, current state of play;

    image.jpg

    and the ground cover between the tt and coal stage is more accessible too - masking tape in place already!

    image.jpg

    there are some photo opportunities which are not normally accessible too

    image.jpg

    image.jpg

    image.jpg

    image.jpg
     
    Signal box interior & lever frame
  • simond

    Western Thunderer
    Having painted myself figuratively into a corner with the Parkside version, and have disappointed myself with the home-brew versions, I decided to put the Micas on ice (heh heh) for a while.

    I can’t progress with Tony’s Manor until I get the frames, so that’s parked in a siding.

    Jon Fitness kindly sent me one of his lever frame kits which I’ll use in the back-dated Larry Goddard signal box. As there isn’t a trackplan yet, I’ll have to guess the lever colours. I believe Jon’s kit is for an LMS-derived BR standard box, but frankly, if you can tell that the frame is not 100% Reading through the windows, your nose is probably too damn close!

    So what d’you get?

    image.jpg

    A fret of 20 levers, lever plates, back plates and a fold-up jig to support the levers whilst you solder the plates on, together with 21 rather oddly shaped laser cut bits to form the frame, two dowels, a pivot wire and an A4 instruction sheet.

    Required; glue, solder, yellow, red, blue, black, white paint.

    (and maybe some other colours, depending - I just saw a photo including a bright green lever - that’s new one on me)

    the dowels are bamboo skewers, one of mine was a little loose so I purloined one from the kitchen and used it after sanding slightly.

    image.jpg

    Frame glued

    First lever plate soldered. I had a PFI moment, but luckily found the plate on the floor under the bench…. The plates are very small, and it’s difficult. I didn’t get on with Jon’s jig, so made a holder for the lever from a bit of nice close-grained wood.

    image.jpg

    The levers are really nice, by using half etch on both sides of the fret, it’s got a very convincing pull-rod from the catch handle.

    The difficult bit is the lower end of the lever plate, which is where the tag joins. At about the 7mm mark in this photo. Need to hold this bit whilst filing out the end of the etched groove so the plate sits nicely on the lever

    image.jpg

    I have a pair of slide pliers which get a firm grip, and the last couple of teeth on a razor saw do the needful.

    set up for soldering:

    image.jpg

    The first three took a while but once I’d got the knack, the remaining 17 took a couple of minutes each. I used citric acid flux and as little solder as I could. Washed off with a toothbrush and hot water. It all assembles very simply, and I think it looks brilliant. I’ll strip it and paint it over the weekend. And cut a hole in the signal box floor to fit it.

    image.jpg

    The camera is cruel. A couple of the plates will need to be adjusted. Not going to lose any sleep over that!

    I reckon it’s a fiddly build but well worth it.

    atb
    Simon
     
    Bolster wagons
  • simond

    Western Thunderer
    Meanwhile…

    image.jpg

    John Duffy kindly sent me a couple of laser-cut sets of bits for a pair of North British bolster wagons, so I’ve been doing them. Ambis axleguards, 3DP buffer stocks, home made bolsters. Lots still to do, but on their wheels, at least. After a brief flurry of activity, they’ll probably stay like this for months…

    atb
    Simon

    reference Help required producing unusual buffers.
     
    Last edited:
    CSB meets 45xx
  • simond

    Western Thunderer
    Right Ho.

    Before attacking Chris’ loco, let’s have a look at my 45xx. Springside kit, my first 0 gauge loco build, 1997. Been DCC’ed, obviously pre 3DP from the plasticard speaker box. White metal pony trucks have suffered a bit, & brakes seem to have gone entirely AWOL but the reasons for a rebuild are a) the Portescap whine, and b) rigid chassis.

    The years have otherwise not been too unkind… and I’m rather fond of the old girl.

    image.jpg

    So I have two Warren Shepherd pony trucks, ditto brakes, a set of Premier jointed rods, a set of Slaters brass horns & axle locks, and a Premier two sage helical 30:1 gearbox with Canon 1833

    image.jpg

    I’m also armed with the CLAG spreadsheet and Solidworks. Let battle commence!
     
    1366
  • simond

    Western Thunderer
    Enough muppetry!

    time for a win :).

    the slide bars were finished on the miller last night before going to see Soft Machine in Canterbury. Fabulous musicianship, though I found a couple of the tracks a bit impenetrable, a bit too jazz for my taste.

    Anyway, they need cleaning up, and a little filing here and there, but we now have two locos’ worth.

    image.jpg

    So as MrsD was off to a tennis tournament (neither strawberries nor Wimbledon weather!) I had the opportunity to make more noise.

    I’d borrowed a steel packer from work, so with a 2.5mm hole drilled through it, I put a drill in the miller chuck, lined it up, and then clamped the block at a known location. A trial run on a bit of plasticard required a couple of goes, to correct a typo (I was lucky, they can be expensive!) and double check everything before doing the front rods for my 1361 ST.

    IMG_8602.jpeg

    IMG_8605.jpeg


    These went well, so I stripped the rods off Chris’ Pannier, and did them too.

    IMG_8608.jpeg

    IMG_8609.jpeg

    the bore is actually nice & crisp, the reflections confuse the iphone camera. Needs no more than the fluff cleaning off. Now I need to turn up a new pair of bushes and with a bit of luck, the most difficult bits of this build will be sorted.

    This little machine is proving useful!

    And Scotland waiting for the decision… no try, unbelievable.
     

    Attachments

    • IMG_8603.jpeg
      IMG_8603.jpeg
      124.5 KB · Views: 9
    Last edited:
    Sand furnace
  • simond

    Western Thunderer
    Exciting times, well, a bit…

    Phil @BrushType4 ‘s Intentio sand furnace arrived and the kit looks great. It’s chilly down here this morning but the sun’s shining so I’ll blat on a coat of red primer and then set about the brickwork before assembly.

    So the question. How were these furnaces used? There’s a door up high on one side which I believe was a hopper to put the sand in - presumably from a wagon, by shovel.

    In which case it needs to be near to a track on which the wagon can run, even if it needs to be unloaded and moved out again.

    From memory, the one at Didcot is between a shed road and a line along the outside of the shed, I don’t have space for that, but could install it here

    image.jpg

    Or here

    image.jpg

    Sadly in both cases, the windows are facing the back of the layout, but I can probably arrange a light or something to shine through them, and add some atmosphere, I hope.

    And how was the sand brought out for use?

    I recall at Aberystwyth, there were some “watering cans” with big spouts for the sand - were these typical of GW sheds or were they a later VoR addition?

    And locos, mmm, @Dog Star ’s search for the perfect guillotine led to @lankytank giving him, and thereby, us, a link to a laser cutting company. I’m going to talk to them Monday about having frames cut to my design.

    I’ve had a laser for years, can’t cut brass, and very interested to compare and learn from what Phil can achieve with posh kit and years of experience with my own efforts.

    Right, things to do!
     
    N6 loco coal wagon
  • simond

    Western Thunderer
    the hypothesis…

    1702587250937.png
    The reality

    image.jpg

    Whilst it looks like its had a bit of a serious battering due to warping of prototypically thin sections (and that, in itself, might be attractive from a modelling perspective), I’m surprised and delighted in equal measure that it is apparently entirely possible to 3DP a wagon in one piece, even if it does take 8 hours.

    This is an N6 loco coal wagon, with iron mink-style rounded corners. There doesn’t seem to be any obvious banding except at one end, and even that is more distortion than surface defects.

    I think a little beefing up of the solebar channels will be beneficial, I need the W irons before I can do that, they’ve been ordered. The solebars are really not very good!

    The body sheeting needs to be a little thicker too, the model is currently 0.3mm, and I think 0.5 will work, and this coupled with some doors, will make the bodies stiff enough to be useable.

    I shall persevere with rivets and other details - watch this space!

    cheers
    Simon
     
    Last edited:
    Shed apron lamps
  • simond

    Western Thunderer
    Another shed question. Does anyone have any dimensions, drawings or data for these lamps.

    image.jpg

    image.jpg

    Lyons 1947 (Leamington, pg 139) & Lyons & Mountford 1837-1947 (Bristol Bath Rd plate 38) (c) OPC snips for illustration

    Thanks in advance!
    Simon
     
    Crosshead clearance
  • simond

    Western Thunderer
    The Saddle Tanks were a legacy from the minerals line, and I believe the pannier version was closely based on them - I should have a look at the Holcroft books again. Clever bloke…

    I was hoping that, given the rails are closer than scale in G0G 0F standards, if I made the cylinders etc to scale width, it would be reasonably easy. Of course, tolerances are bigger, and they, and clearances, don’t scale. There’s only about 0.2 sideplay. I really don’t want to get into skimming wheels, though it is an option if necessary.

    Once I’ve sorted Chris’ loco, I shall build my ST. I imagine I’ll have all the same problems :(
     
    Salt?
  • simond

    Western Thunderer
    I went to the Ally Pally show yesterday, there were a couple of captivating layouts on display including a 4mm model of the Wantage tramway.

    in what I took to be a gasworks siding was a pitched roof salt wagon. Judging by the vast range of models of this style of wagon in all sorts of colourful liveries, salt was obviously a significant source of trade, I guess originating in Cheshire, and going all around the country. This got me thinking.

    Presumably not for the fish & chip shop market. So for what? Preserving fish & making bacon? What else?

     
    back to the bolsters
  • simond

    Western Thunderer

    thirty pages and eight months on, I said something about them "staying this way for months". not wrong!

    So a little progress on the bolster wagons. Unfortunately I cannot complete one of them this evening because I broke the coupling guide plate and I don't have a spare :rant:

    IMG_8672.jpeg

    however, the buffers and couplings work very satisfactorily, even allowing for the very limited space between the Ambis W irons and the buffer plank. There is about a millimetre of travel, and marginally more for the hook.

    IMG_8673.jpeg

    And the end on which I didn’t break the reinforcement

    IMG_8674.jpeg
     
    Last edited:
    Top